92 篇文章带有标签 “docker”

加速 Docker 构建镜像

查看镜像信息

操作系统版本

cat /etc/os-release 
  • Debian
PRETTY_NAME="Debian GNU/Linux 11 (bullseye)"
NAME="Debian GNU/Linux"
VERSION_ID="11"
VERSION="11 (bullseye)"
VERSION_CODENAME=bullseye
ID=debian
HOME_URL="https://www.debian.org/"
SUPPORT_URL="https://www.debian.org/support"
BUG_REPORT_URL="https://bugs.debian.org/"
  • Ubuntu
PRETTY_NAME="Ubuntu Jammy Jellyfish (development branch)"
NAME="Ubuntu"
VERSION_ID="22.04"
VERSION="22.04 (Jammy Jellyfish)"
VERSION_CODENAME=jammy
ID=ubuntu
ID_LIKE=debian
HOME_URL="https://www.ubuntu.com/"
SUPPORT_URL="https://help.ubuntu.com/"
BUG_REPORT_URL="https://bugs.launchpad.net/ubuntu/"
PRIVACY_POLICY_URL="https://www.ubuntu.com/legal/terms-and-policies/privacy-policy"
UBUNTU_CODENAME=jammy
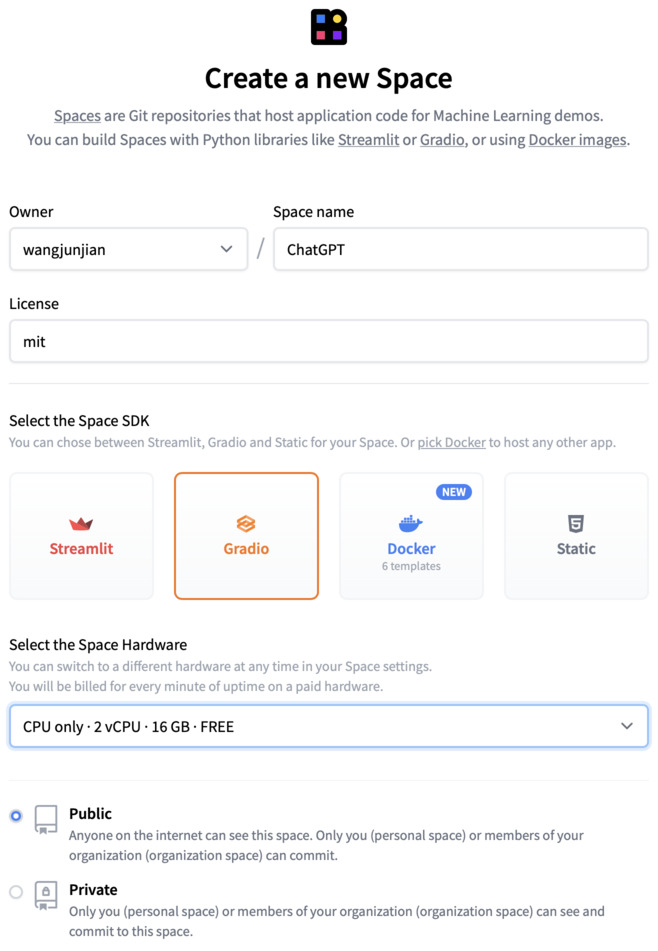
在 Hugging Face 上搭建 ChatGPT 聊天机器人

Hugging Face 上创建 ChatGPT Space

克隆

git clone https://huggingface.co/spaces/wangjunjian/ChatGPT
cd ChatGPT

创建应用(聊天机器人)

chat.py

这里的 Conversation 记录了所有的对话消息,在提问前,会检查是否超过最大 token 数量,如果超过,会删除第一条与用户的对话消息,然后再提问。

import openai
import tiktoken


class Conversation:
    def __init__(self, prompt, model="gpt-3.5-turbo", temperature=0.8, max_tokens=250):
        self.prompt = prompt
        self.model = model
        self.temperature = temperature
        self.max_tokens = max_tokens

        self._init_messages()

    def _init_messages(self):
        self.messages = [{"role": "system", "content": self.prompt}]
// ...

命令 alias

zsh 中使用单引号('),不对特殊符号进行解析,使用双引号(")会对特殊符号进行解析,如:$

docker rmi none

alias docker.rmi.none='docker rmi --force $(docker images -q --filter "dangling=true")'

在终端通过 Safari 打开网址

alias open.chatgpt='open -a Safari https://platform.openai.com/playground\?mode\=chat'

基于 FastAPI 开发 Ultralytics Serving

Ultralytics Serving

Inference service based on Ultralytics

创建虚拟环境

python -m venv venv source venv/bin/activate

安装依赖包

创建 requirements.txt

fastapi
python-multipart
aiofiles
onnxruntime
ultralytics
uvicorn[standard]
gunicorn
pytest
httpx

安装

pip install -r requirements.txt

调试

创建 launch.json 文件,用于调试 FastAPI 应用。

.vscode/launch.json { "version": "0.2.0", "configurations": [ { "name": "Python: FastAPI", "type": "python", "request": "launch", "module": "uvicorn", "args": [ "app.

Python in Visual Studio Code

开发文档

扩展

选择 Python 解释器

  1. 通过 Shift + Command + P 快捷键,打开命令面板。
  2. 输入 Python: Select Interpreter ,回车。
  3. 选择您想使用的环境。

在状态栏上可以单击进行切换不同的环境

测试

我选择了 pytest 测试框架,这个写起来更自然且简单。

Ultralytics YOLOv8

Ultralytics

构建环境

Ultralytics 镜像

  • GPU
docker pull ultralytics/ultralytics:latest
  • CPU
docker pull ultralytics/ultralytics:latest-cpu
  • Apple Silicon
docker pull ultralytics/ultralytics:latest-arm64

本地安装

pip install ultralytics

基于 COCO128 数据集的目标检测范例

运行容器

git clone https://github.com/ultralytics/ultralytics.git
docker run --runtime=nvidia -it --name ultralytics -v `pwd`/ultralytics:/usr/src/ultralytics ultralytics/ultralytics:latest

yolo 命令的使用参数

yolo TASK MODE ARGS

训练模型

yolo train data=coco128.yaml model=yolov8n.pt

训练可视化(Comet) pip install comet_ml export

OpenWrt

DIY自己的软路由系统

LEDE

我买了一个使用 Intel 赛扬处理器的路由器。主要是为了搭梯子,2020年的时候网上编译好的系统不支持 TROJAN 协议,所以我自己使用 LEDE 编译。他的 SSR Plus+ 组件支持 SS/SSR/V2RAY/TROJAN 等协议.

  • Images built after May 31 2020 are based on Ubuntu 18.04.
  • x86 This image has 26G, and the dependent software packages and compiled binaries are in it. It can be used directly for x86, or it can be recompiled through simple configuration.
  • x86-bin This image contains only x86 binaries generated by compilation.

Compile your own LEDE system. Compile: docker run -it --name=lede gouchicao/lede:x86 git pull ./scripts/feeds update -a && .

在 MacBook Pro M2 Max 上安装软件

Apple macOS Command

办公

WPS

Chrome 浏览器

Chrome 插件

Awesome Screenshot

Google 翻译

工具

数码测色计使用手册

LICEcap

My Zsh

sh -c "$(curl -fsSL https://raw.githubusercontent.com/ohmyzsh/ohmyzsh/master/tools/install.sh)"

V2rayU

Unzip One: RAR ZIP Extractor

FileZilla

macSVG

OmniGraffle

CleanMyMacX

ImageMagick(图像处理)

brew install imagemagick

asitop - Performance monitoring CLI tool for Apple Silicon

pip install asitop

jq

brew install jq

rar

brew install rar

unrar x <filename.rar>

开发 GitHub Desktop Visual Studi

在 MacBook Pro M2 Max 上构建开发环境

今天预订的 MacBook Pro M2Max 16寸 顶配 64G内存 2T硬盘到了,¥36097 。

硬件信息

芯片、内存

system_profiler SPHardwareDataType | head -n 9
Hardware:

    Hardware Overview:

      Model Name: MacBook Pro
      Model Identifier: Mac14,6
      Model Number: XXXXXXXXXXXX
      Chip: Apple M2 Max
      Total Number of Cores: 12 (8 performance and 4 efficiency)
      Memory: 64 GB

硬盘

system_profiler SPStorageDataType | head -n 8
Storage:

    Macintosh HD:

      Free: 1.37 TB (1,372,357,345,280 bytes)
      Capacity: 2 TB (1,995,218,165,760 bytes)
      Mount Point: /System/Volumes/Update/mnt1
      File System: APFS

更改主机名

sudo scutil --set HostName MBP

hostname
MBP

HomeBrew 安装 /bin/bash -c "$(

安装Kubernetes 1.26.0

Master 节点

查询可用安装包的信息

$ apt-cache madison kubeadm | head
kubeadm |  1.26.0-00 | https://mirrors.aliyun.com/kubernetes/apt kubernetes-xenial/main amd64 Packages
kubeadm |  1.25.5-00 | https://mirrors.aliyun.com/kubernetes/apt kubernetes-xenial/main amd64 Packages

切换 root 用户

su - root

更新

apt -y update
apt -y install docker-ce docker-ce-cli containerd.io
apt -y install kubelet=1.26.0-00 kubeadm=1.26.0-00 kubectl=1.26.0-00

安装 Kubernetes $ kubeadm reset -f $ kubeadm init --kubernetes-version=1.26.0 --image-repository=registry.aliyuncs.

OpenVINO Deep Learning Workbench

使用 Docker 运行 DL Workbench

拉取镜像

docker pull openvino/workbench:2022.1

运行

docker run -p 0.0.0.0:5665:5665 --name workbench -it openvino/workbench:2022.1

浏览器访问

http://127.0.0.1:5665/

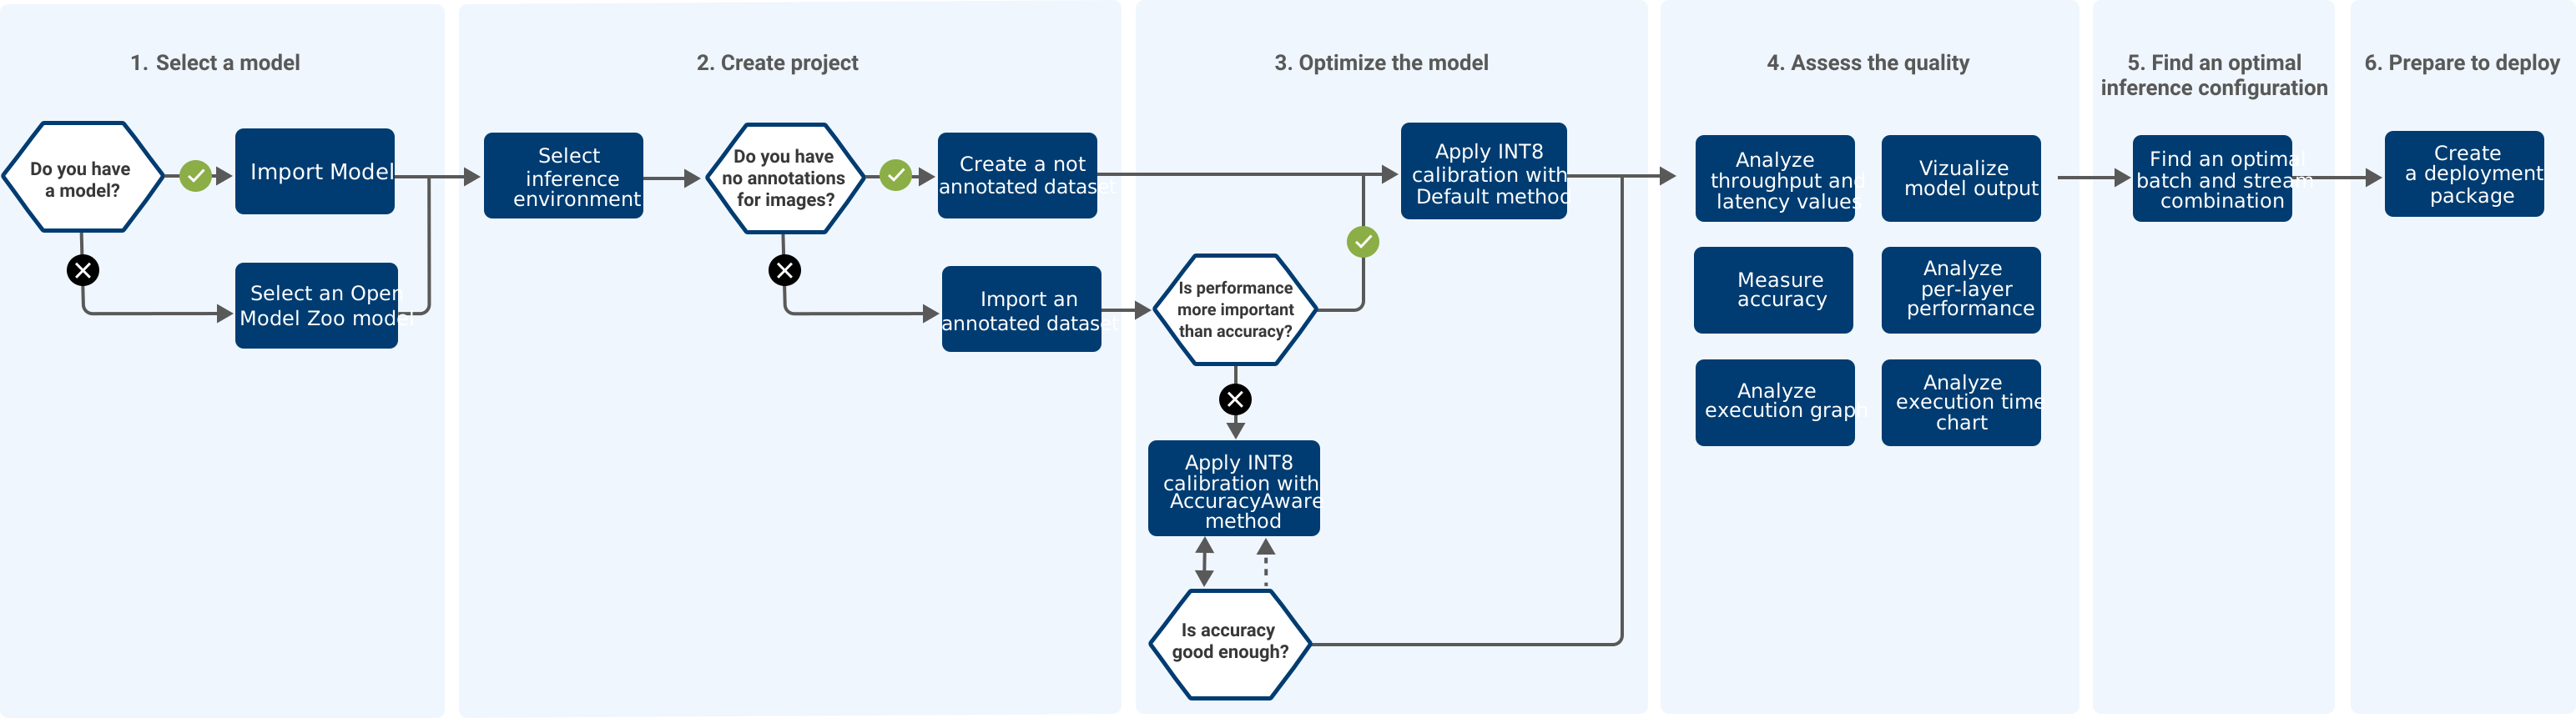
DL Workbench 工作流程

快速了解 DL Workbench 用户界面中的工作流程

参考资料

基于健康码识别的 FastAPI 同步和异步函数的基准测试

健康码识别服务使用了 FastAPI 进行开发的,本周主要工作是为了对健康码识别的服务进行性能调优。接口函数使用了 async 关键字,但是内部的实现并没有使用 await。由于改写成异步代码需要时间,这里并没有改写代码,只是删除了 async 关键字。部署服务使用了 uvicorn 和 gunicorn+uvicorn 两种方法。

基准测试工具使用的是 ab

测试流程

生成测试数据

准备测试图片 health.jpg

echo -n '{"base64": "' > health.json
base64 -w0 health.jpg >> health.json
echo -n '"}' >> health.json

部署服务

uvicorn

docker run --runtime=nvidia --rm -it -e NVIDIA_VISIBLE_DEVICES=2 -p 20001:8000 \
    -v $(pwd):/health_code_service --name=health-uvicorn  health-code-service \
    uvicorn controller:app --host 0.0.0.0 --workers 1
  • workers 并发进程数

Dockerfile 实践

系统

指定本地时区

FROM ubuntu:20.04
LABEL maintainer="wang-junjian@qq.com"

ARG TIME_ZONE=Asia/Shanghai
RUN DEBIAN_FRONTEND=noninteractive apt-get install tzdata -y && \
    ln -fs /usr/share/zoneinfo/$TIME_ZONE /etc/localtime && \
    echo $TIME_ZONE > /etc/timezone

Python 开发环境 构建 Python, OpenCV 开发环境的镜像 FROM ubuntu:20.04 LABEL maintainer="wang-junjian@qq.com" # 设置 apt 源(阿里云),设置完必须 update。 RUN sed -i 's/archive.ubuntu.com/mirrors.aliyun.

构建基于PaddlePaddle开发服务镜像

构建镜像

FROM paddlepaddle/paddle:2.2.2-gpu-cuda10.2-cudnn7
LABEL maintainer="wang-junjian@qq.com"

RUN apt-get update && apt-get install libjpeg-dev zlib1g-dev -y

RUN pip install -i https://mirrors.aliyun.com/pypi/simple/ \
    numpy fastapi paddleocr opencv-python

EXPOSE 20000

WORKDIR /inference-serving
ADD . ./

CMD ["python", "app.py"]

官方推荐:非安培架构的GPU,推荐使用CUDA10.2,性能更优。

自己构建 paddlepaddle 镜像

通过官方的 Docker Hub 没有找到 runtime 版本,想着节省几个G的空间,于是考虑自己来构建。

MinIO Quickstart

使用容器的方式部署 MinIO

Standalone

docker run --rm \
  -p 9000:9000 \
  -p 9001:9001 \
  --name minio \
  -v /data/minio/data:/data \
  -e "MINIO_ROOT_USER=admin" \
  -e "MINIO_ROOT_PASSWORD=12345678" \
  minio/minio server /data --console-address ":9001"
API: http://172.17.0.2:9000  http://127.0.0.1:9000 

Console: http://172.17.0.2:9001 http://127.0.0.1:9001 

Documentation: https://docs.min.io

单机分布式 # 创建4个目录 mkdir -p /data/minio/erasure-code/data{1..

OpenResty 内执行 Lua 脚本

OpenResty 是一款基于 NGINX 和 LuaJIT 的 Web 平台。

拉取 OpenResty 镜像

  • Ubuntu
sudo docker pull openresty/openresty:xenial
  • CentOS
sudo docker pull openresty/openresty:centos

查看镜像的标签 $ sudo docker inspect openresty/openresty:centos | jq '.[].Config.Labels' { "maintainer": "Evan Wies <evan@neomantra.net>", "org.label-schema.build-date": "20210915", "org.label-schema.license": "GPLv2", "org.label-schema.name": "CentOS Base Image", "org.label-schema.schema-version": "1.0", "org.label-schema.

构建基于 ONNXRuntime 的推理服务

构建 ONNXRuntime-GPU 镜像

编写 requirements.txt

$ vim requirements.txt
flask
connexion[swagger-ui]
connexion
gunicorn
numpy
opencv-python
scikit-image
psutil
pynvml
onnxruntime-gpu

编写 Dockerfile 需要带 cudnn 库的 CUDA 作为基镜像 $ vim Dockerfile FROM nvidia/cuda:11.4.0-cudnn8-runtime-ubuntu20.04 LABEL maintainer="wang-junjian@qq.com" RUN rm /etc/apt/sources.list.d/cuda.list /etc/apt/sources.list.d/nvidia-ml.list && \ sed -i 's/archive.ubuntu.com/mirrors.aliyun.com/g' /etc/apt/sources.

GaiaGPU: 在容器云中共享GPU

容器技术由于其轻量级和可伸缩的优势而被广泛使用。GPU也因为其强大的并行计算能力被用于应用程序加速。在云计算环境下,容器可能需要一块或者多块GPU计算卡来满足应程序的资源需求,但另一方面,容器独占GPU计算卡常常会带来资源利用率低的问题。因此,对于云计算资源提供商而言,如何解决在多个容器之间共享GPU计算卡是一个很有吸引力的问题。本文中我们提出了一种称为GaiaGPU的方法,用于在容器间共享GPU存储和GPU的计算资源。GaiaGPU会将物理GPU计算卡分割为多个虚拟GPU并且将虚拟GPU按需分配给容器。同时我们采用了弹性资源分配和动态资源分配的方法来提高资源利用率。实验结果表明GaiaGPU平均仅带来1.015%的性能损耗并且能够高效的为容器分配和隔离GPU资源。

编译 GaiaGPU 服务

配置 git 加速

$ git config --global url."https://github.com.cnpmjs.org".insteadOf "https://github.com"

$ vim /etc/profile
export GOPROXY=https://goproxy.cn,direct
export GO111MODULE=on
$ source /etc/profile

vCUDA Controller $ git clon

安装Kubernetes 1.21.5

删除 Kubernetes 旧版本,安装 Kubernetes 1.21.5。

必备安装

每台服务器都需要

root 登录

su - root

设置时区

timedatectl set-timezone Asia/Shanghai

设置主机名

hostnamectl set-hostname new-hostname

安装 Docker-CE

apt-get -y update
apt-get -y install apt-transport-https ca-certificates curl software-properties-common

# 安装GPG证书
curl -fsSL https://mirrors.aliyun.com/docker-ce/linux/ubuntu/gpg | apt-key add -

# 写入软件源信息
add-apt-repository "deb [arch=amd64] https://mirrors.aliyun.com/docker-ce/linux/ubuntu $(lsb_release -cs) stable"

# 更新并安装
apt-get -y update
apt-get -y install docker-ce docker-ce-cli containerd.io

Docker 网络

ifconfig & route

$ docker run -d --name centos1 centos
$ docker run -it --name centos2 centos bash
# yum install net-tools -y

# ifconfig
eth0: flags=4163<UP,BROADCAST,RUNNING,MULTICAST>  mtu 1500
        inet 172.17.0.3  netmask 255.255.0.0  broadcast 172.17.255.255
        ether 02:42:ac:11:00:03  txqueuelen 0  (Ethernet)
        RX packets 3475  bytes 14166022 (13.5 MiB)
        RX errors 0  dropped 0  overruns 0  frame 0
        TX packets 2988  bytes 214839 (209.8 KiB)
        TX errors 0  dropped 0 overruns 0  carrier 0  collisions 0

lo: flags=73<UP,LOOPBACK,RUNNING>  mtu 65536
        inet 127.0.0.1  netmask 255.0.0.0
        loop  txqueuelen 1000  (Local Loopback)
        RX packets 0  bytes 0 (0.0 B)
        RX errors 0  dropped 0  overruns 0  frame 0
        TX packets 0  bytes 0 (0.0 B)
        TX errors 0  dropped 0 overruns 0  carrier 0  collisions 0

# route
Kernel IP routing table
Destination     Gateway         Genmask         Flags Metric Ref    Use Iface
default         _gateway        0.0.0.0         UG    0      0        0 eth0
172.17.0.0      0.0.0.0         255.255.0.0     U     0      0        0 eth0