DashScope 模型服务灵积
让大模型能力触达每位开发者
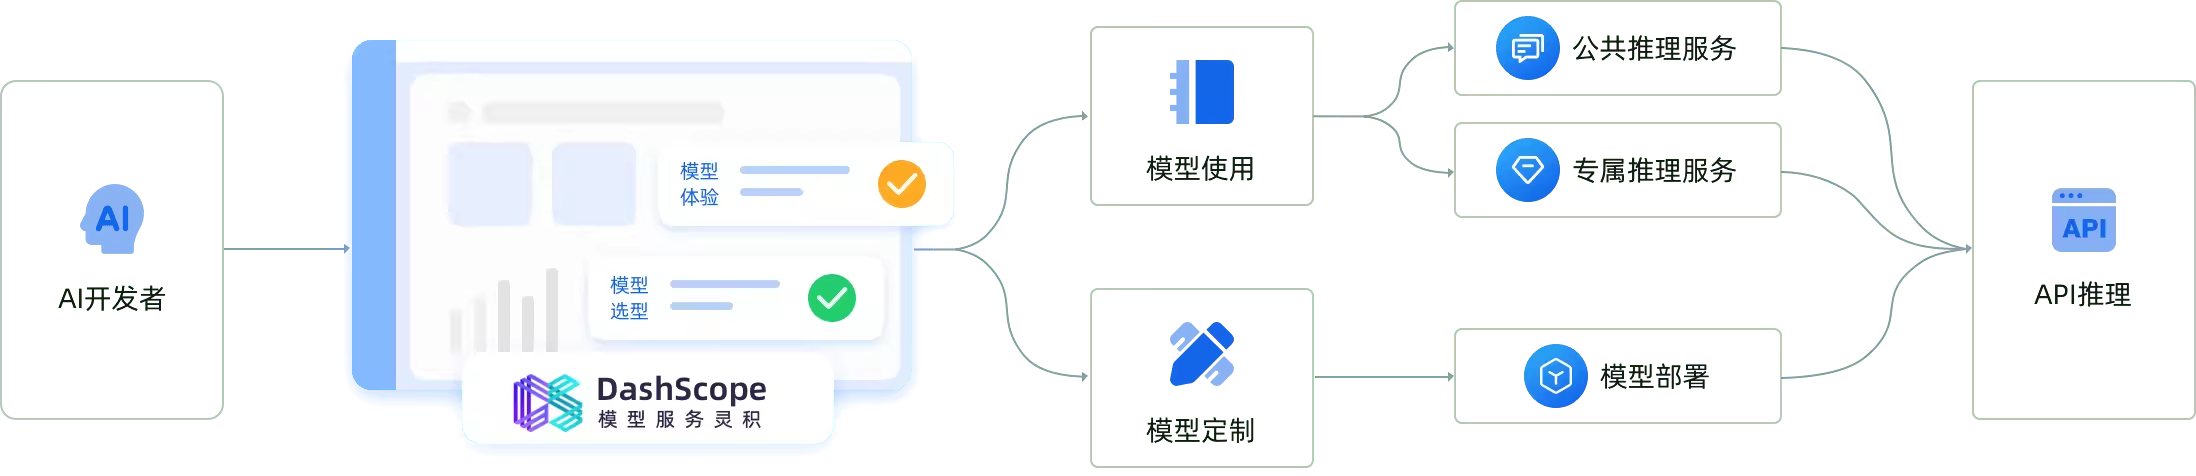
灵积模型服务建立在“模型即服务”(Model-as-a-Service,MaaS)的理念基础之上。
灵积通过灵活、易用的模型API服务,让各种模态模型的能力,都能方便的为AI开发者所用。通过灵积API,开发者不仅可以直接集成大模型的强大能力,也可以对模型进行训练微调,实现模型定制化。
通义千问大型语言模型
| 模型 | 描述 | 上下文长度 | 计量单价 |
|---|---|---|---|
| qwen-turbo | 通义千问超大型语言模型,支持中文、英文等不同语言输入。 | 8k | 0.008元/1000 tokens |
| qwen-plus | 通义千问超大型语言模型增强版,支持中文、英文等不同语言输入。 | 32k | 0.02元/1000 tokens |
| qwen-max | 通义千问千亿级别超大型语言模型,支持中文、英文等不同语言输入。 | 8k | 0.12元/1000 tokens |
| qwen-max-longcontext | 通义千问千亿级别超大型语言模型,支持中文、英文等不同语言输入。 | 30k | 0.12元/1000 tokens |
| qwen-72b-chat | 通义千问开源 720 亿参数大型语言模型 | 8k | 0.02元/1000 tokens |
| qwen1.5-72b-chat | 通义千问开源 720 亿参数大型语言模型 | 32k |
LangChain 调用
LangChain Text2SQL Agent
OpenAI Function Call (Extraction)
这个方法只有 OpenAI 的模型支持。
from langchain.agents import tool
from langchain.chat_models import ChatOpenAI
from langchain.tools.render import format_tool_to_openai_function

from langchain.pydantic_v1 import BaseModel, Field
from enum import Enum


# 省份、直辖市
class ProvinceEnum(str, Enum):
    山东省 = "山东省"
    # 其它省份


# 山东省地级市
// ...
OpenAI gpt-3.
LangChain
介绍
LangChain 是一个用于开发由大型语言模型(LLM)支持的应用程序的框架。
LangChain 简化了 LLM 应用程序生命周期的每个阶段:
- 开发(Development):使用 LangChain 的开源构建块和组件构建您的应用程序。使用第三方集成和模板快速启动。
- 生产化(Productionization):使用 LangSmith 检查、监控和评估您的链,以便您可以持续优化并放心部署。
- 部署(Deployment):使用 LangServe 将任何链转换为 API。
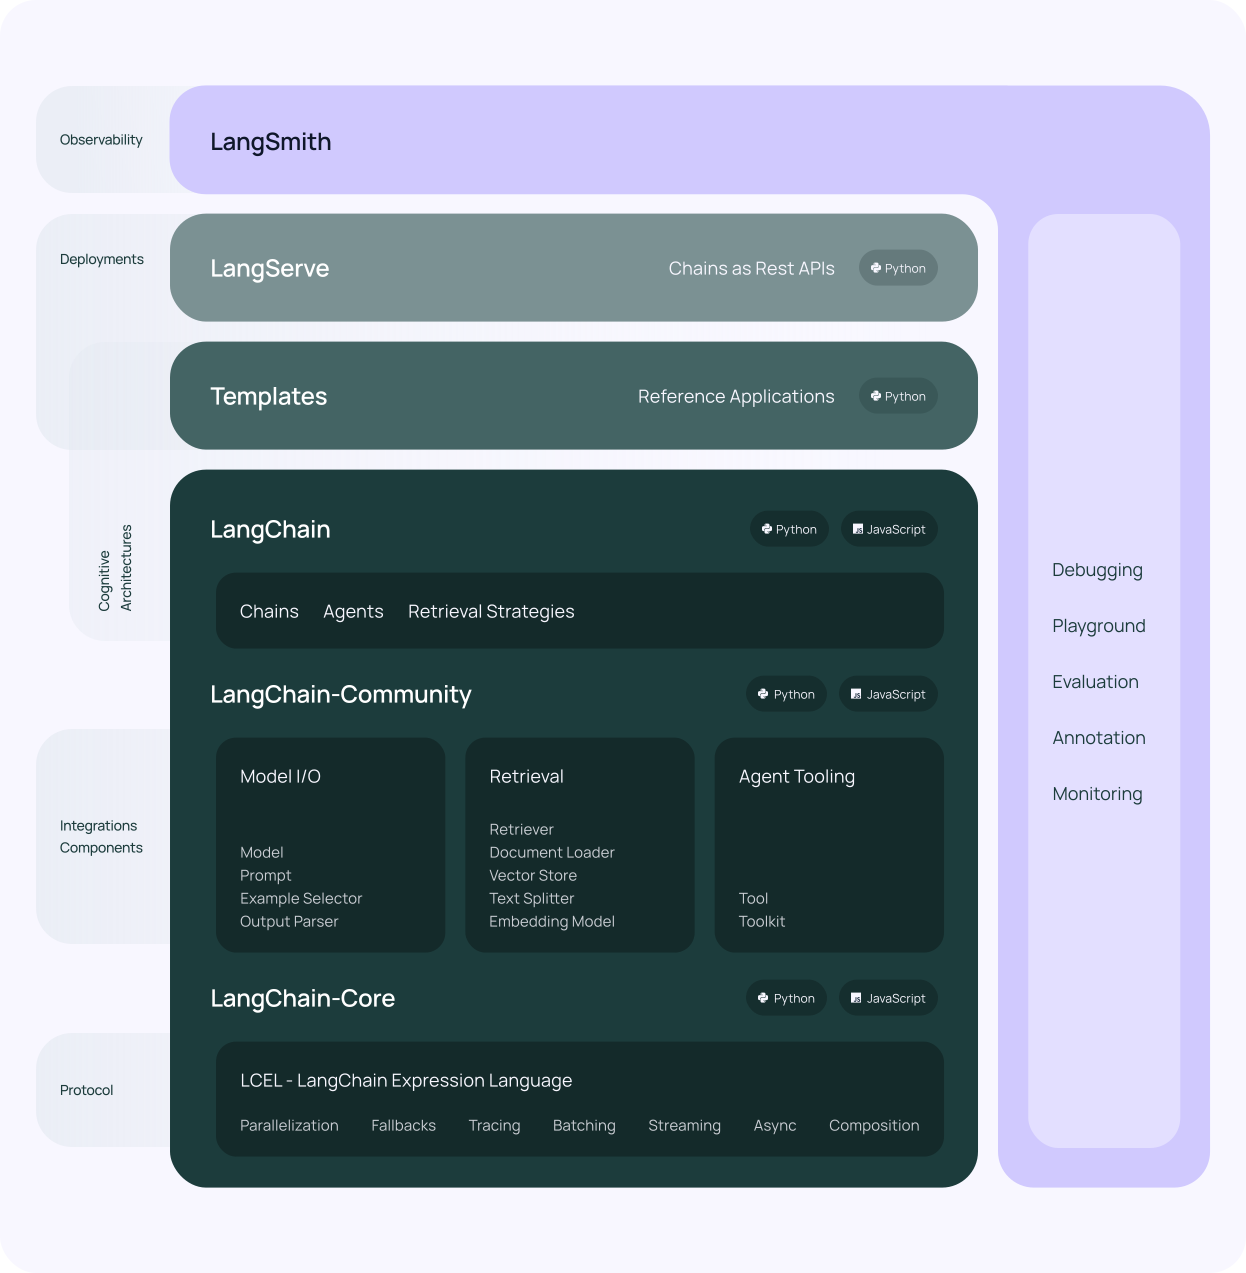
具体来说,该框架由以下开源库组成:
- langchain-core: 基本抽象和 LangChain 表达语言(LangChain Expression Language)。
- langchain-community: 第三方集成。
- 合作伙伴包(例如 langchain-openai、langchain-anthropic 等):一些集成已进一步拆分为自己的轻量级包,这些包仅依赖于 langchain-core。
- langchain: 构成应用程序认知架构(Cognitive Architecture)的链(Chains)、代理(Agents)和检索策略(Retrieval Strategies)。
- langgraph: 通过将步骤建模为图中的边和节点,使用 LLM 构建强大且有状态的多参与者应用程序。
- langserve: 将 LangChain 链部署为 REST API。
Functions, Tools and Agents with LangChain
OpenAI Function Calling (OpenAI 函数调用)
import os
import openai
import json

from dotenv import load_dotenv, find_dotenv
_ = load_dotenv(find_dotenv()) # read local .env file
openai.api_key = os.environ['OPENAI_API_KEY']


# Example dummy function hard coded to return the same weather
# In production, this could be your backend API or an external API
def get_current_weather(location, unit="fahrenheit"):
    """Get the current weather in a given location"""
    weather_info = {
        "location": location,
        "temperature": "72",
        "unit": unit,
        "forecast": ["sunny", "windy"],
    }
    return json.dumps(weather_info)

# define a function
functions = [
    {
        "name": "get_current_weather",
        "description": "Get the current weather in a given location",
        "parameters": {
            "type": "object",
            "properties": {
                "location": {
                    "type": "string",
                    "description": "The city and state, e.g. San Francisco, CA",
                },
                "unit": {"type": "string", "enum": ["celsius", "fahrenheit"]},
            },
            "required": ["location"],
        },
    }
]

messages = [
    {
        "role": "user",
        "content": "What's the weather like in Boston?"
    }
]

response = openai.ChatCompletion.create(
    model="gpt-3.5-turbo",
    messages=messages,
    functions=functions
)
print(response)
{
  "id": "chatcmpl-9CK2or9rtxzcsVgbfwWmIvqi36wF0",
  "object": "chat.completion",
  "created": 1712724014,
  "model": "gpt-3.5-turbo-0125",
  "choices": [
    {
      "index": 0,
      "message": {
        "role": "assistant",
        "content": null,
        "function_call": {
          "name": "get_current_weather",
          "arguments": "{\"location\":\"Boston\",\"unit\":\"celsius\"}"
        }
      },
      "logprobs": null,
      "finish_reason": "function_call"
    }
  ],
  "usage": {
    "prompt_tokens": 82,
    "completion_tokens": 20,
    "total_tokens": 102
  },
  "system_fingerprint": "fp_b28b39ffa8"
}
Continue - It’s time to collect data on how you build software
是时候收集关于你们如何构建软件的数据了。
Development data engine (开发数据引擎)
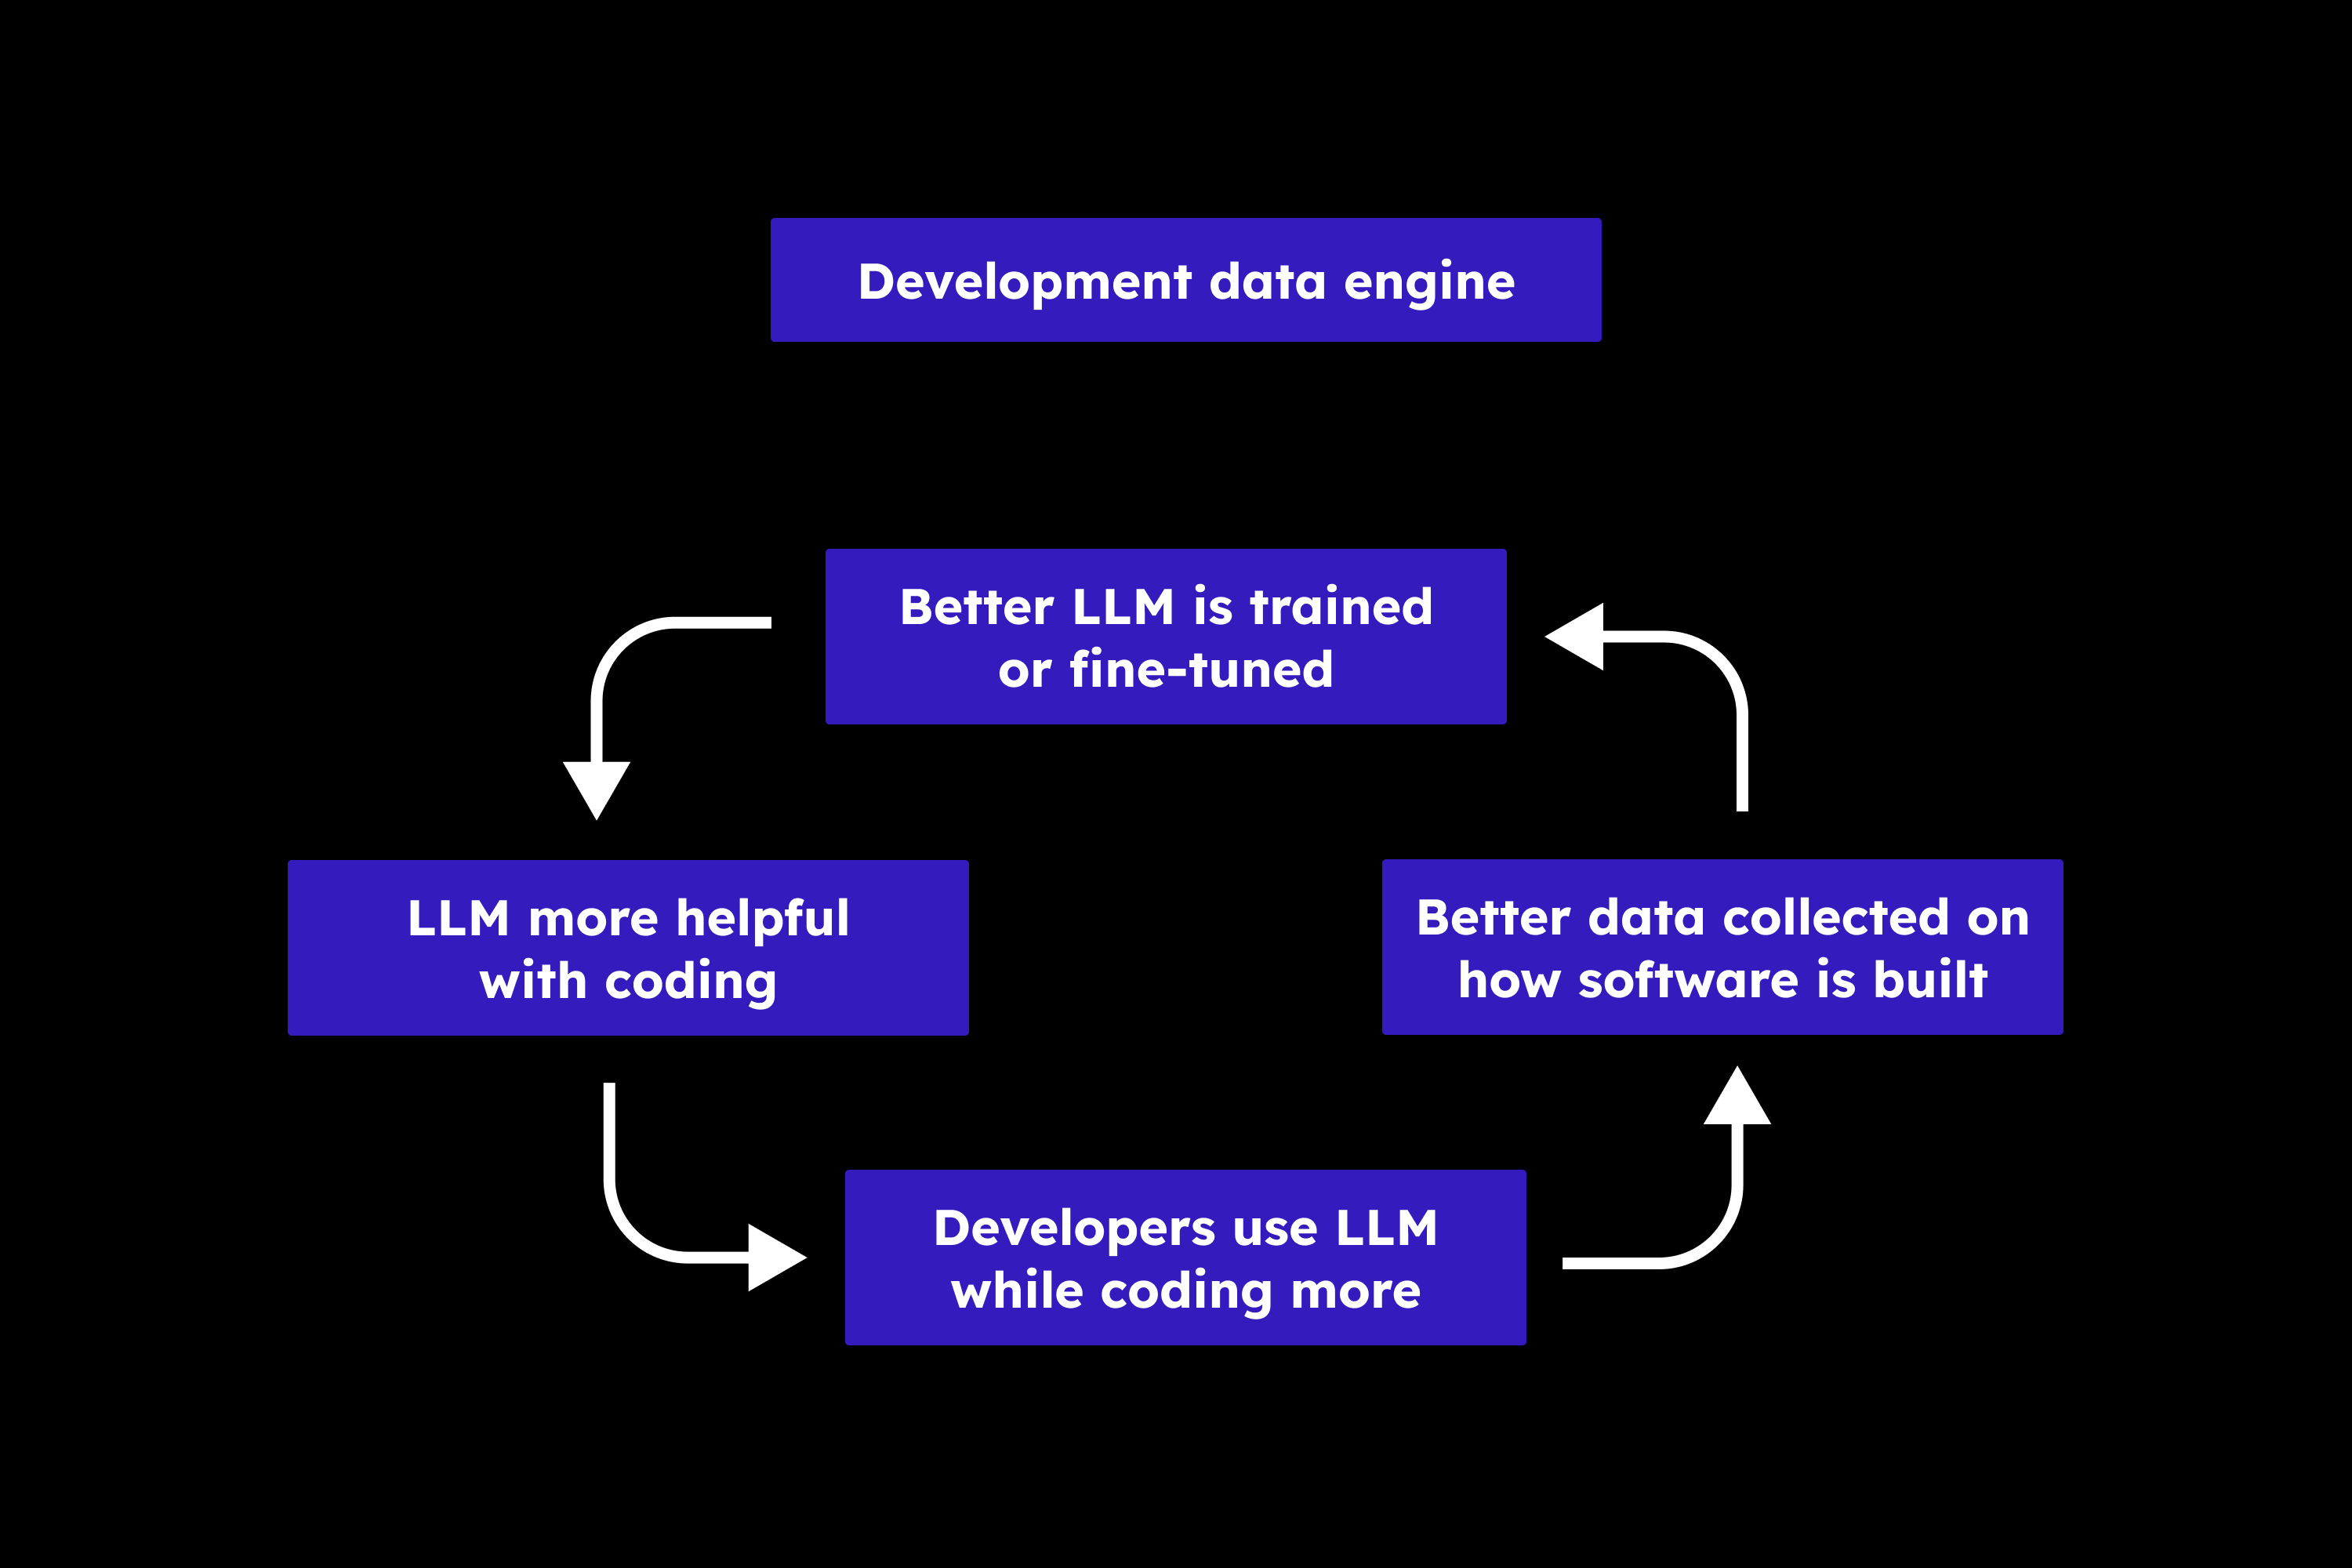
- LLM more helpful with coding (LLM在编码方面更有帮助)
- Developers use LLM while coding more (开发者在编码时更多地使用LLM)
- Better data collected on how software is built (收集到更好的关于软件构建方式的数据)
- Better LLM is trained or fine-tuned (训练或微调更好的LLM)
下一代开发者使用大型语言模型(LLMs)而不是谷歌搜索+ Stack Overflow。
随着时间的推移,开发者的偏好和使用的工具也在不断演进。当前一代的开发者正在用大型语言模型(LLMs)取代之前的Google和Stack Overflow,就像之前的一代人用Google和Stack Overflow取代了传统的参考手册一样。 在这个过渡期中,能够保留和吸引开发者的组织将会:
首先,理解他们的开发者如何使用LLMs,并通过收集开发数据——即他们组织构建软件的方式——来展示使用LLMs的投资回报率(ROI)。
Continue Code LLM Autopilot
Continue
注册 deepseek 的开发平台
OpenAI API
DeepSeek API 使用与 OpenAI 兼容的 API 格式,通过修改配置,您可以使用 OpenAI SDK 来访问 DeepSeek API,或使用与 OpenAI API 兼容的软件。
参数 值 base_url https://api.deepseek.com/v1 api_key 申请 api_key
| 参数 | 值 |
|---|---|
| base_url | https://api.deepseek.com/v1 |
| api_key | YOUR_API_KEY |
模型
| 模型 | 描述 | 上下文长度 |
|---|---|---|
| deepseek-coder | 擅长处理编程任务 | 16K |
| deepseek-chat | 擅长通用对话任务 | 16K |
安装 IntelliJ IDEA 插件 Continue
配置 deepseek-coder { "models": [ { "title": "deepseek api", "provider": "openai", "model": "
Together AI - The fastest cloud platform for building and running generative AI
用于构建和运行生成式人工智能的最快云平台
注册 Together AI 的开发平台
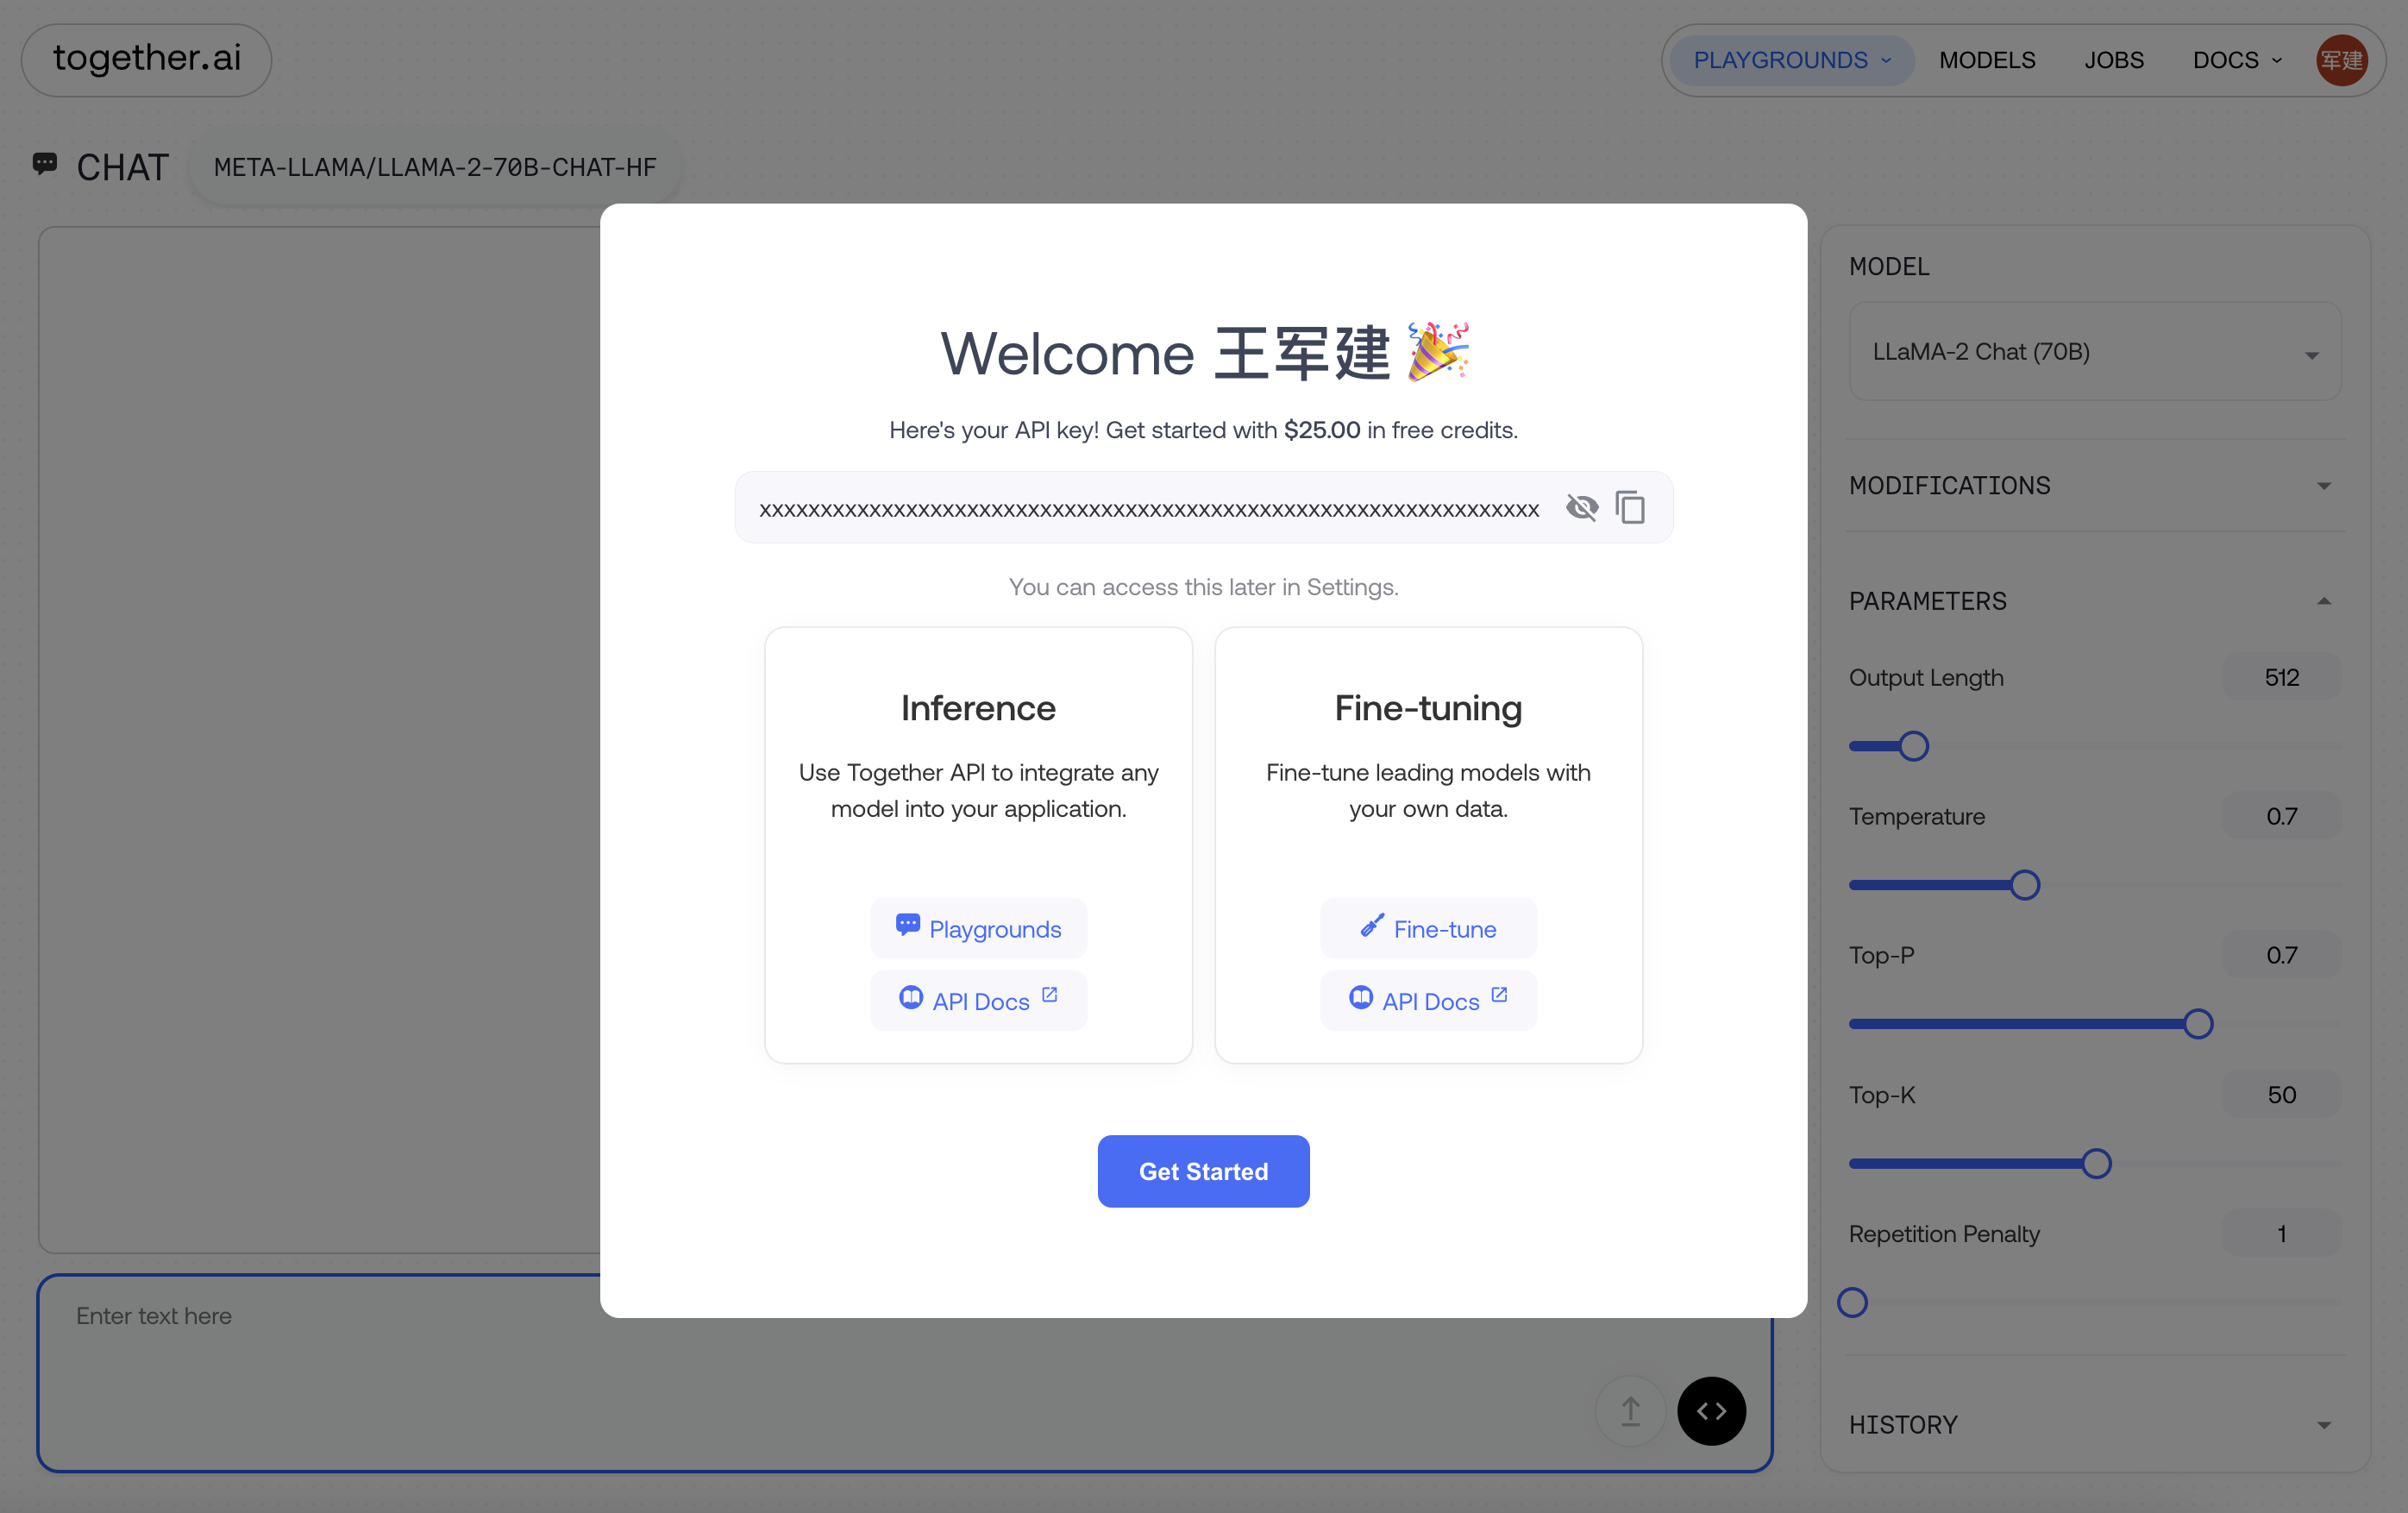
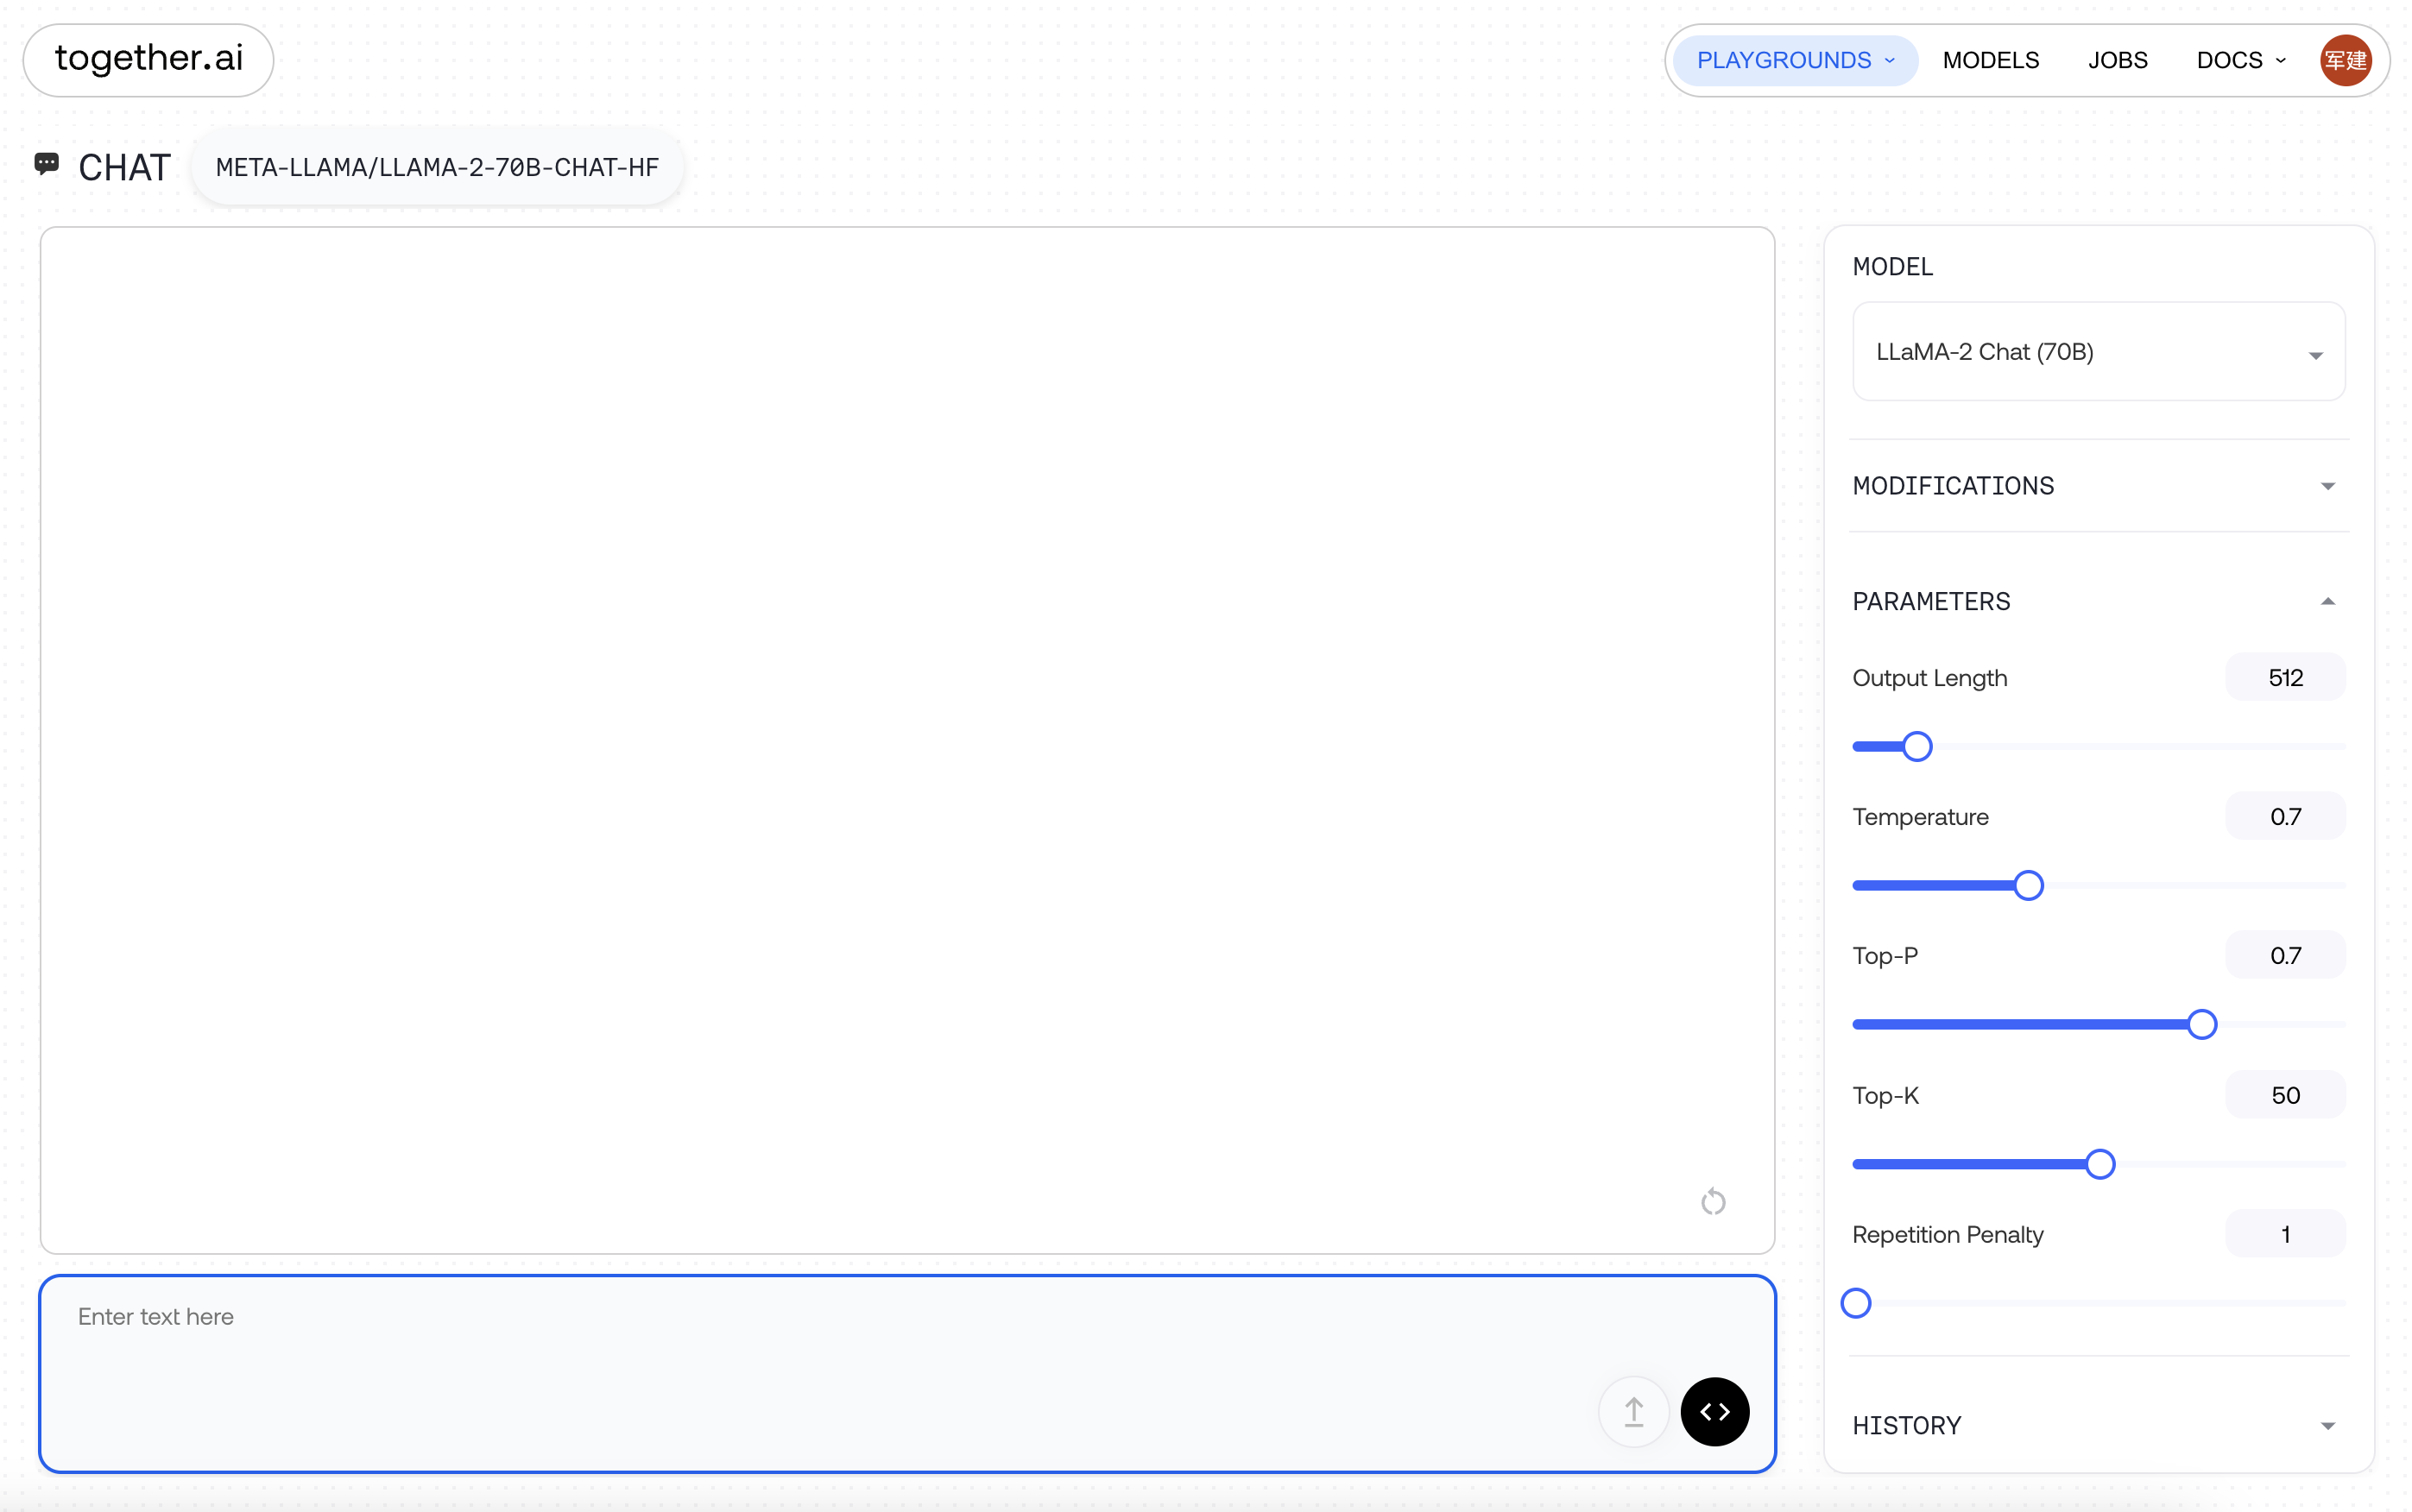
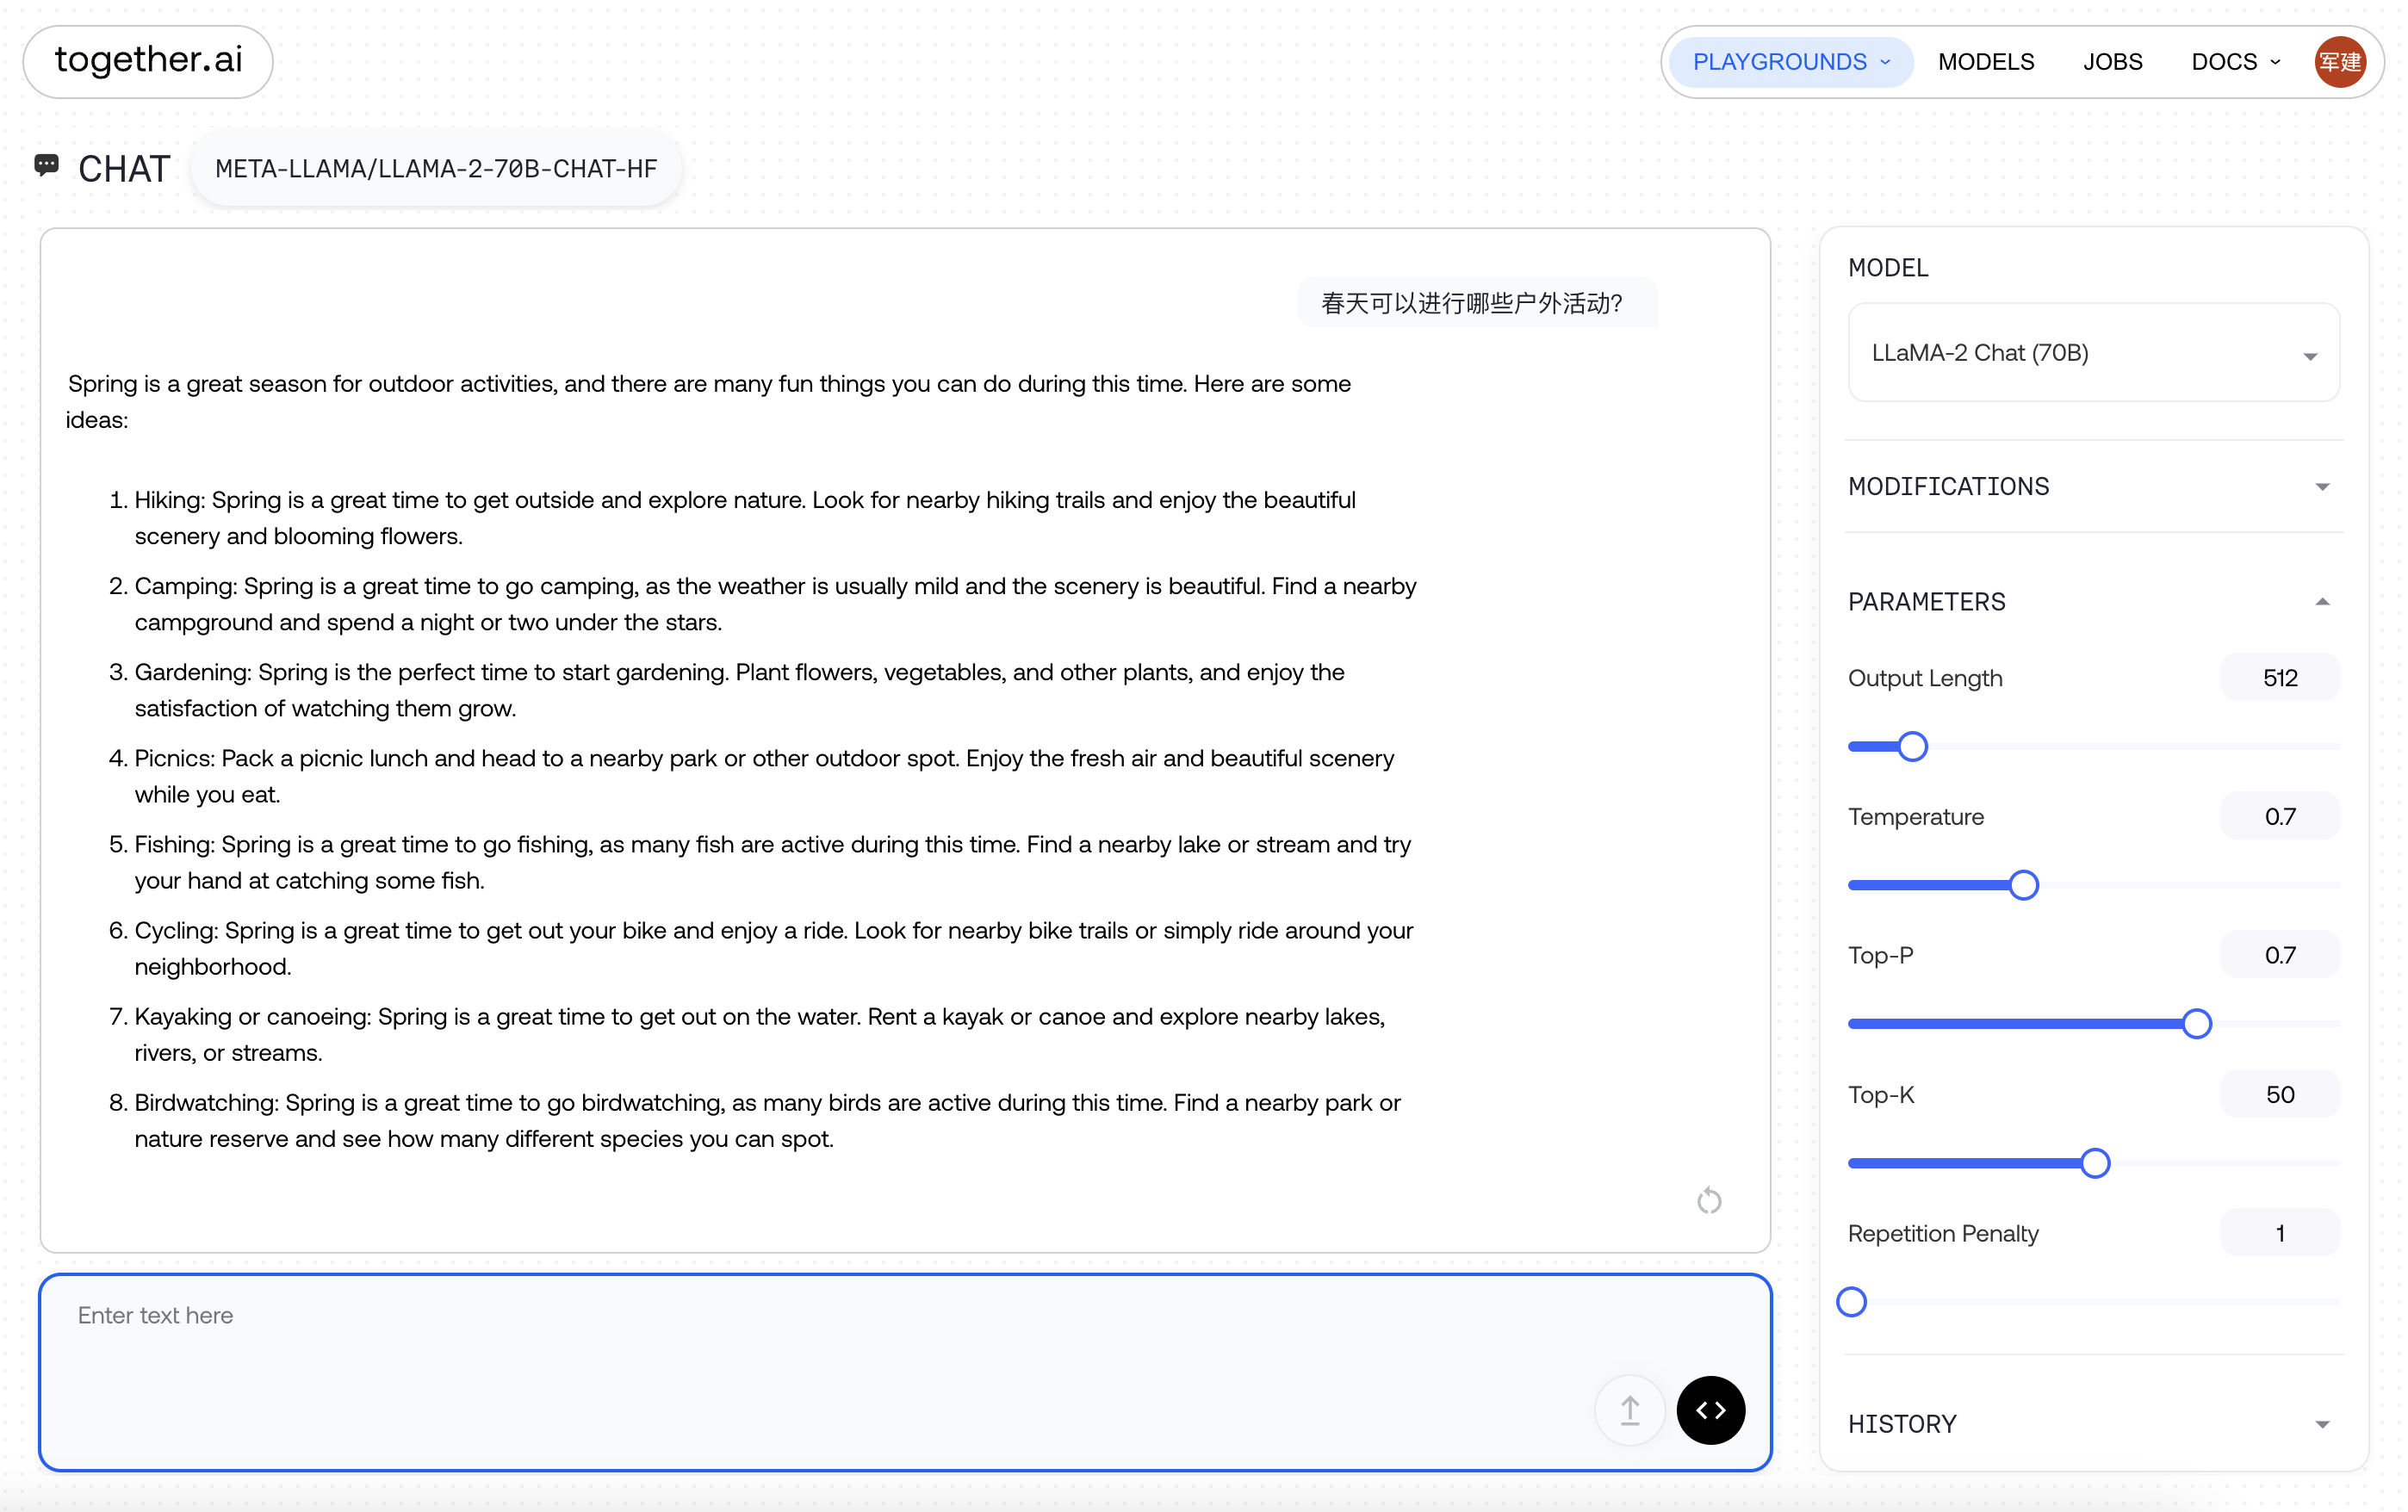

速度非常快
OpenAI API from openai import OpenAI import os TOGETHER_API_KEY = os.environ.get("TOGETHER_API_KEY") client = OpenAI( api_key=TOGETHER_API_KEY, base_url='https://api.together.xyz/v1', ) chat_completion = client.chat.completions.create( messages=[ { "role": "system", "content": "You are an expert travel guide.", }, { "role": "user", "content": "Tell me fun things to do in San Francisco.
LLaMA Factory: Easy and Efficient LLM Fine-Tuning
安装
- pip
git clone https://github.com/hiyouga/LLaMA-Factory.git
cd LLaMA-Factory

python -m venv env
source env/bin/activate

pip install -e .[metrics]
- conda
git clone https://github.com/hiyouga/LLaMA-Factory.git

conda create -n llama_factory python=3.10
conda activate llama_factory

cd LLaMA-Factory
pip install -r requirements.txt
使用 conda 第二次没有安装成功
使用
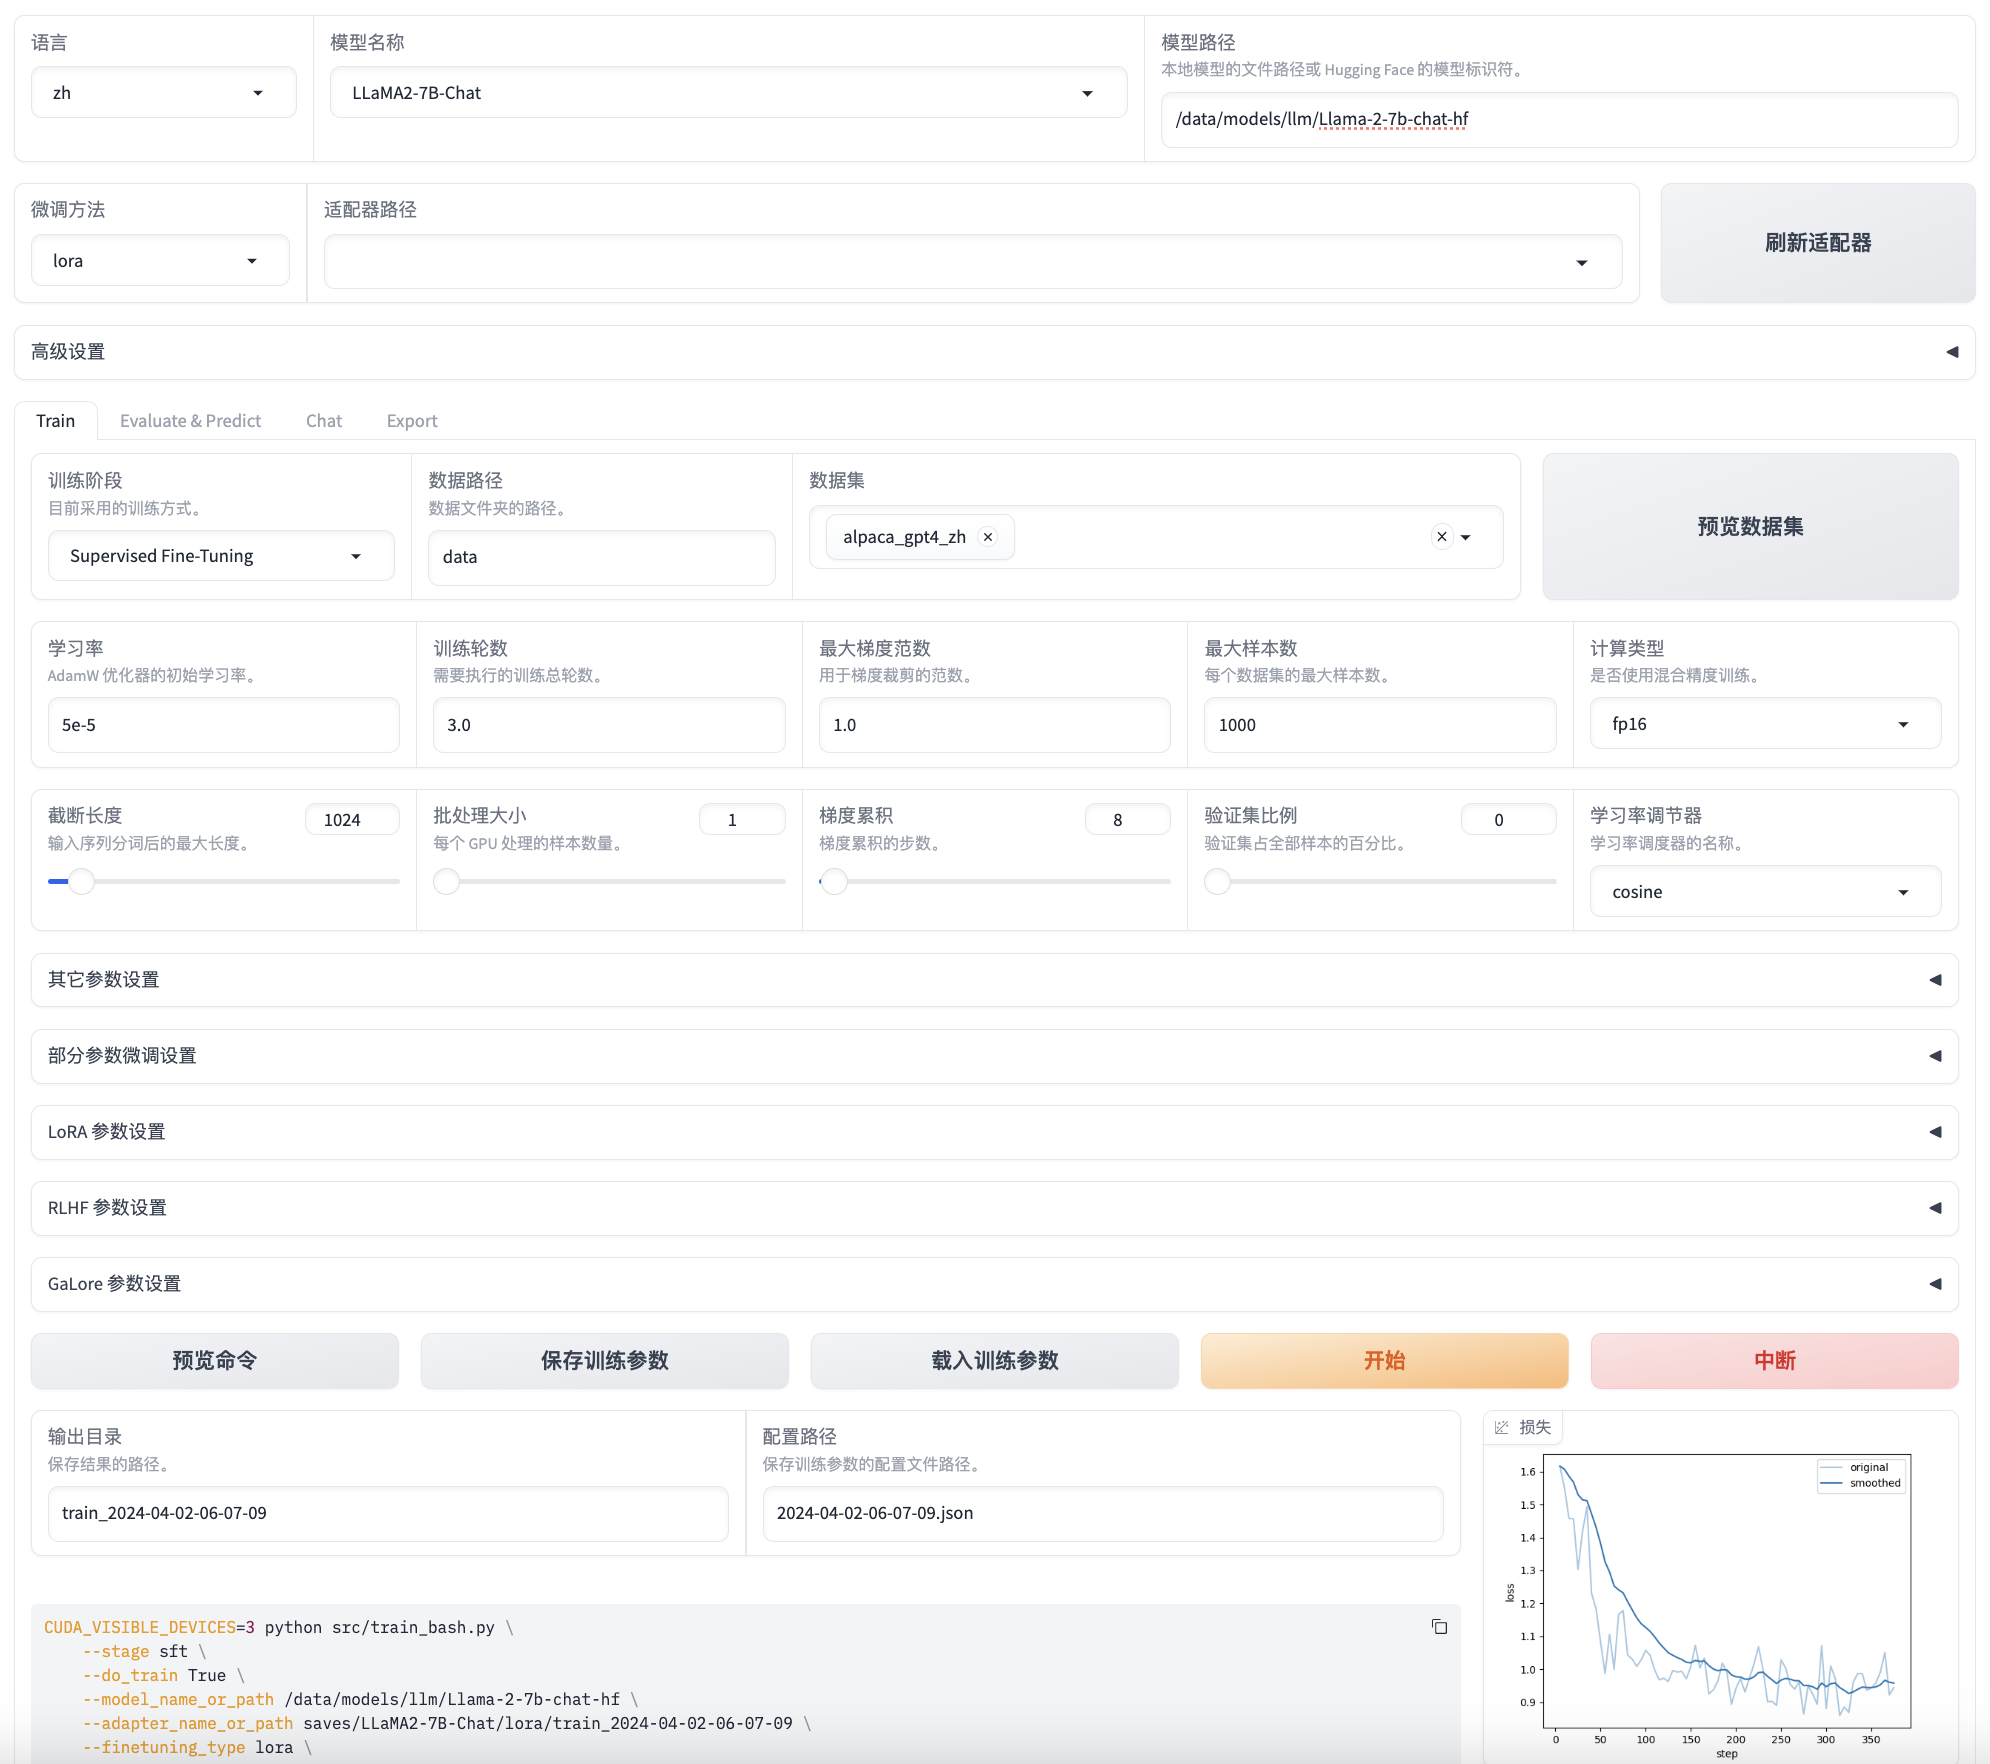
LLaMA Board
本地启动
CUDA_VISIBLE_DEVICES=0 USE_MODELSCOPE_HUB=1 python src/train_web.py
- CUDA_VISIBLE_DEVICES=0: 指定 GPU
- USE_MODELSCOPE_HUB=1: 使用魔搭社区的模型和数据集下载
浏览器访问
微调模型
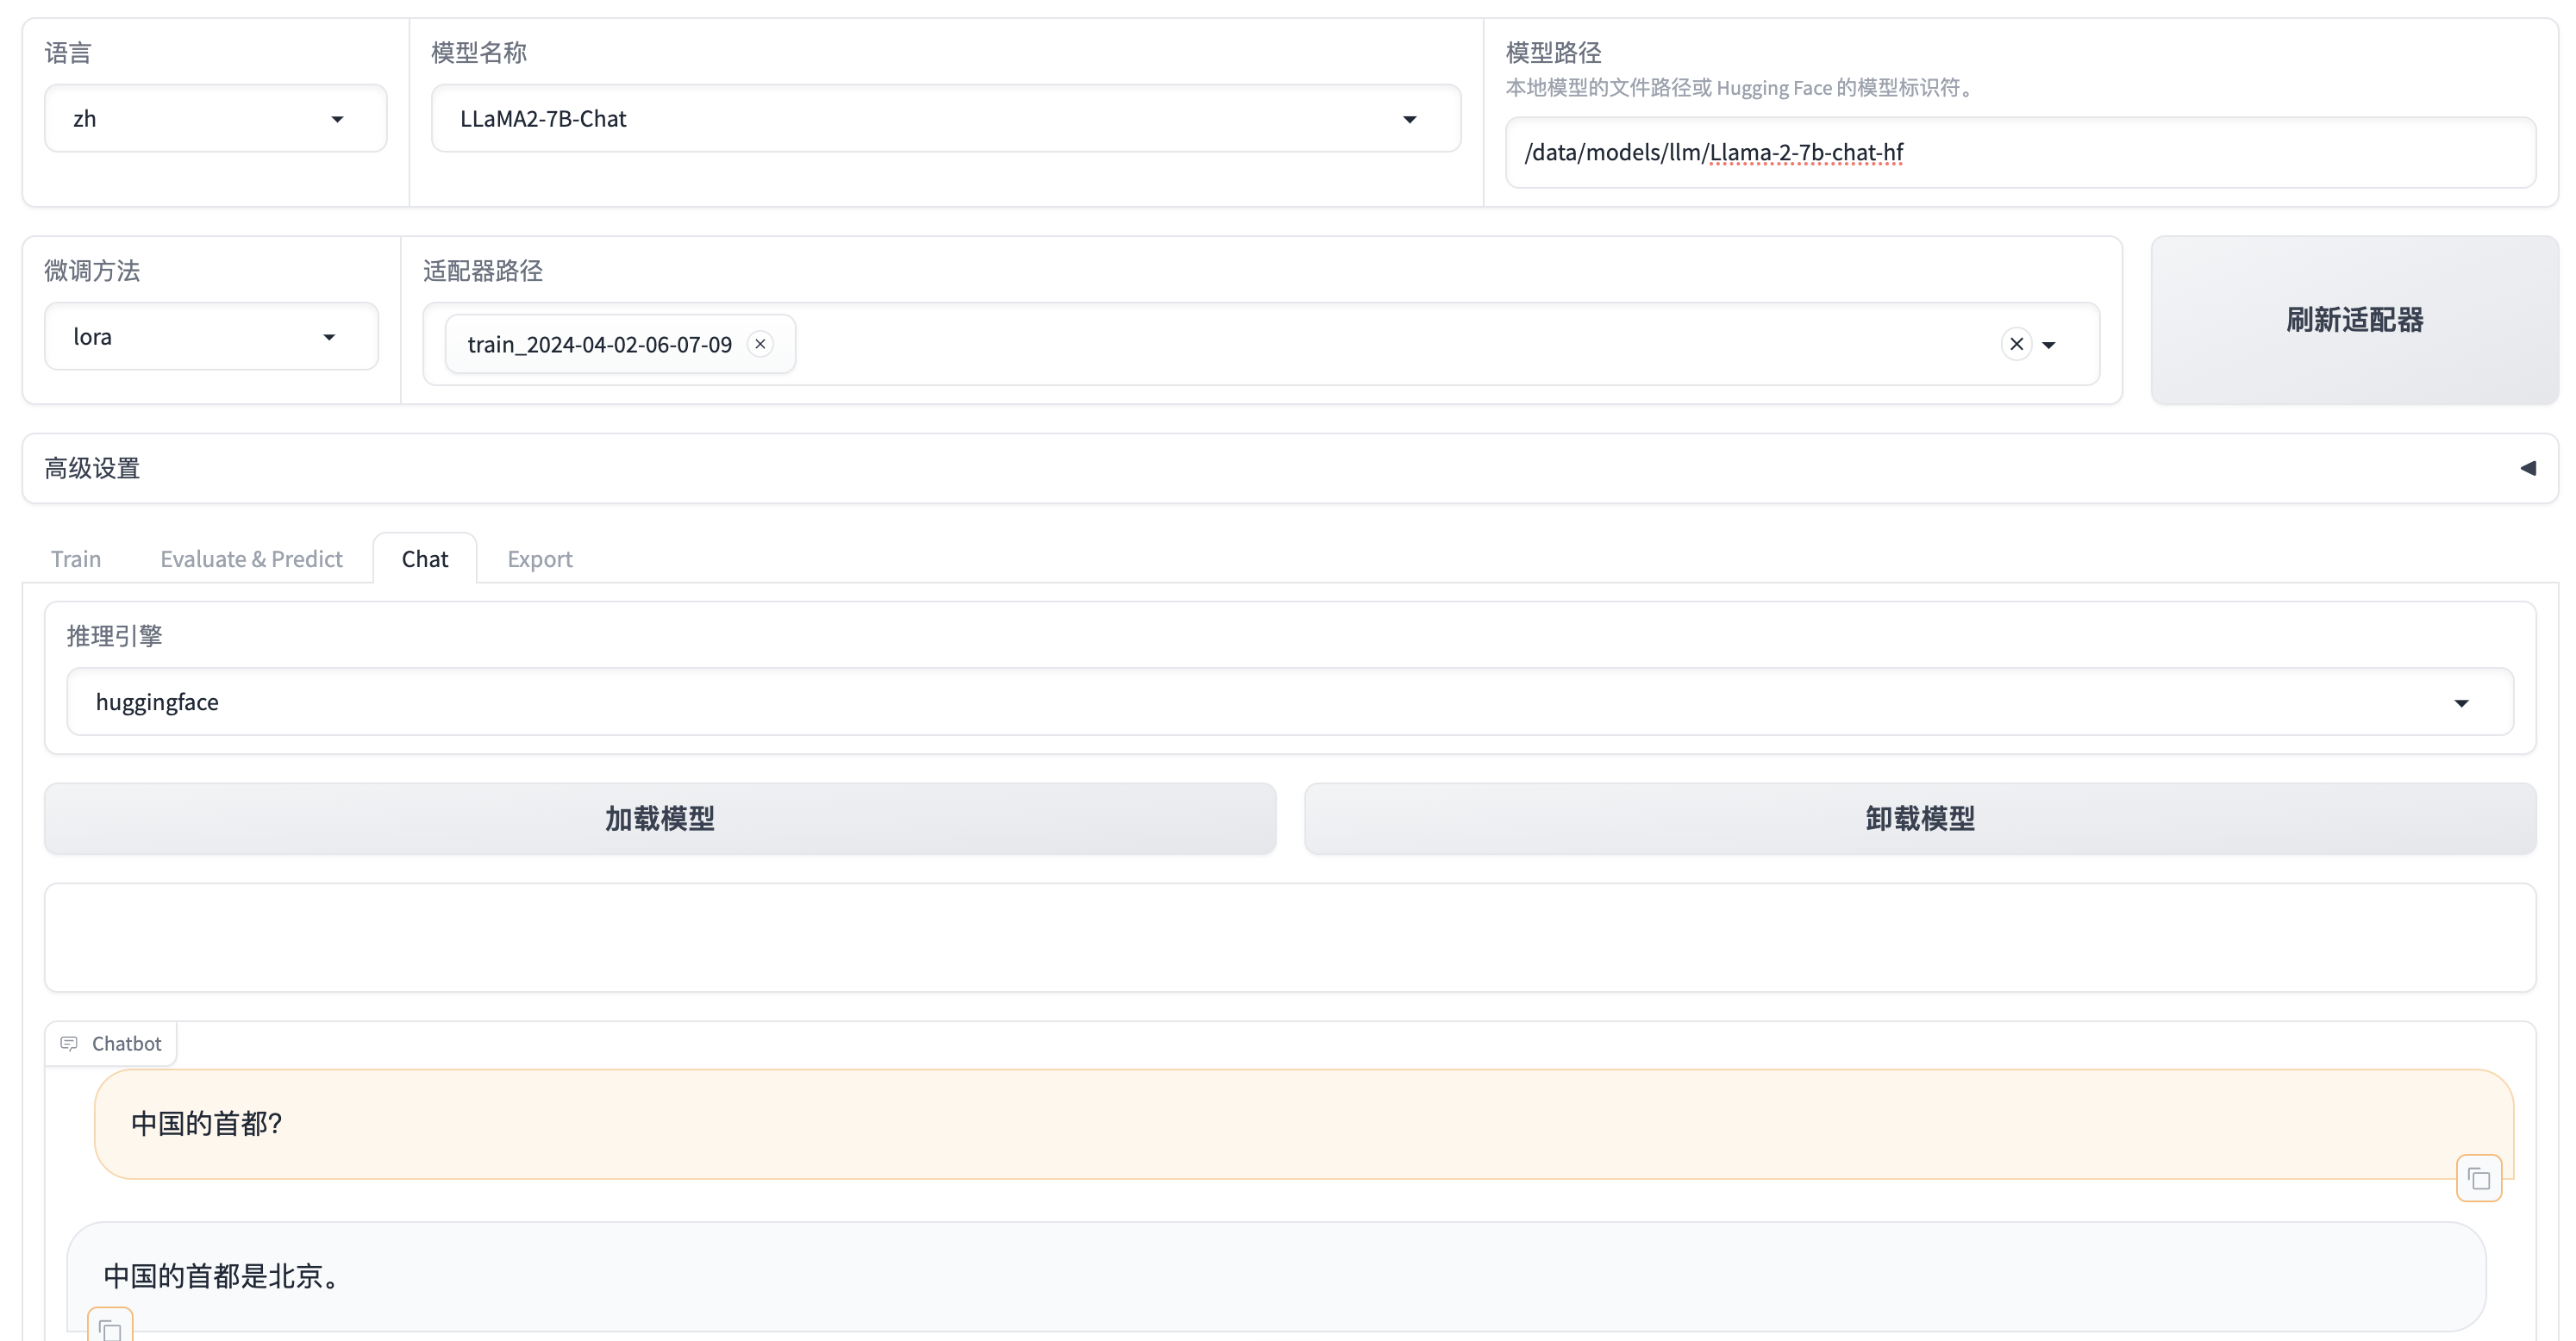
聊天
Prompt Engineering with Llama 2
Prompt Engineering Techniques(提示工程技术)
In-Context Learning (上下文学习)
Standard prompt with instruction (标准提示与指令)
- So far, you have been stating the instruction explicitly in the prompt: (到目前为止,您一直在明确在提示中陈述指令:)
Open Source Models with Hugging Face
Natural Language Processing (NLP)
安装依赖库
pip install transformers
Conversational
vLLM 部署 Qwen1.5 LLM
# (Optional) Create a new conda environment.
conda create -n vllm python=3.9 -y
conda activate vllm

# Install vLLM with CUDA 12.1.
pip install vllm
vLLM 帮助 vLLM 兼容 OpenAI 的 RESTful API 服务器。 可选参数: -h, --help 显示此帮助信息并退出 --host HOST 主机名 --port PORT 端口号 --allow-credentials 允许凭证 --allowed-origins ALLOWED_ORIGINS 允许的来源 --allowed-methods ALLOWED_METHODS 允许的方法 --allowed-headers ALLOWED_HEADERS 允许的头部 --api-key API_KEY 如果提供,服务器将要求在头部中呈现此密钥。 --served-model-name SERVED_MODEL_NAME 在API中使用的模型名称。如果没有指定,模型名称将与huggingface名称相同。 --lora-modules LORA_MODULES [LORA_MODULES ...] LoRA模块配置,格式为名称=路径。可以指定多个模块。
MLX: An array framework for Apple silicon
MLX 介绍
MLX 是一个为 Apple Silicon 芯片上的机器学习研究设计的 array 框架,由 Apple 机器学习研究团队提供。
- 熟悉的 API:MLX 拥有一个与 NumPy 紧密对应的 Python API。MLX 还拥有功能齐全的 C++、C 和 Swift API,这些 API 也紧密地反映了 Python API。MLX 拥有更高级别的包,如 mlx.nn 和 mlx.optimizers,它们的 API 紧密跟随 PyTorch,以简化构建更复杂模型的过程。
- 统一内存:MLX 与其他框架的一个显著区别在于其统一内存模型。MLX 中的数组存在于共享内存中。可以在任何支持的设备类型上执行 MLX 数组的操作,无需数据传输。
- MLX 的设计受到了像 NumPy、PyTorch、Jax 和 ArrayFire 这样的框架的启发。
安装
- pip
pip install mlx
pip install mlx-lm
- conda
conda install -c conda-forge mlx
conda install -c conda-forge mlx-lm
Candle
克隆
git clone https://github.com/huggingface/candle
cd candle
Phi-2
- CPU
生成式AI
机器学习的方法
监督学习(Supervised Learning)
监督学习使用带有标签的训练数据来训练模型。这些标签是预先定义的输出,模型通过学习输入数据与这些输出之间的关系来进行预测。监督学习的任务通常分为两类:分类(预测离散的标签)和回归(预测连续的数值)。常见的监督学习算法包括决策树、逻辑回归、支持向量机(SVM)、神经网络等。监督学习广泛应用于图像识别、语音识别、医疗诊断等领域。
无监督学习(Unsupervised Learning)
无监督学习不依赖于标签数据,而是试图在没有明确指导的情况下发现数据中的结构和模式。它的主要任务包括聚类(将数据分组到不同的簇中)和降维(减少数据的复杂性,同时保留其主要特征)。无监督学习常用于市场细分、社交网络分析、异常检测等场景。算法示例包括K-means聚类、主成分分析(PCA)等。
自监督学习(Self-Supervised Learning)
自监督学习是一种无监督学习的形式,它通过从数据本身生成伪标签来创建监督信号。这种方法通常涉及到设计任务,使得模型能够从数据中学习有用的特征表示,而不需要人工标注。自监督学习在计算机视觉和自然语言处理中尤其流行,例如,通过预测图像的旋转角度或文本的下一个字来训练模型。这种方法有助于减少对大量标注数据的依赖,同时为下游任务提供预训练的模型。
生成式AI(Generative AI) 生成式AI的目标是
Rust 入门
Rust 安装
macOS
- 安装
rustup,它是 Rust 的版本管理工具。
curl --proto '=https' --tlsv1.2 -sSf https://sh.rustup.rs | sudo sh
这里加了
sudo是因为修改配置文件需要权限。
Rustup 元数据和工具链将安装到 Rustup 的主目录,位于:~/.rustup,这可以使用 RUSTUP_HOME 环境变量进行修改。
Cargo 主目录位于:~/.cargo,这可以使用 CARGO_HOME 环境变量进行修改。
cargo、rustc、rustup 等命令安装到 Cargo 的 bin 目录,位于:~/.cargo/bin。
- 更新 Rust
sudo rustup update
- 卸载 Rust
sudo rustup self uninstall
- 查看版本
$ cargo --version
cargo 1.76.0 (c84b36747 2024-01-18)
$ rust rustc --version
rustc 1.76.0 (07dca489a 2024-02-04)
$ rust rustdoc --version
rustdoc 1.76.0 (07dca489a 2024-02-04)
cargo 是 Rust 的构建工具,类似于 npm、pip、go 等。
Kimi(月之暗面)简历的探索
这里使用了 Kimi 月之暗面 对简历这个场景进行了探索,Kimi 支持 128k 的长上下文,超过20万个汉字。
通过简历评估一下这位算法工程师的能力。
上传简历
根据李秀宁的简历,我们可以对她的技能和经验进行以下评估:

1. 编程技能:

她掌握多种编程语言,包括MATLAB、C、C++、Python,这些都是算法开发中常用的语言。
熟练使用多个开发平台,如MATLAB、Visual Studio、Eclipse、Qt、CCS、Pycharm,这表明她具备跨平台开发的能力。
熟悉OpenCV、yolov 5等图像处理库,这些是计算机视觉领域的重要工具。

2. 专业知识:

她掌握了多种信号处理方法,如快速傅里叶变换、短时傅里叶变换、数字滤波器设计等,这些都是信号处理和图像处理领域的基础。
熟悉深度学习框架,如tensorflow、keras、Pytorch,这些是当前人工智能和机器学习领域的主流工具。

3. 工作经验:

// ...
我们需要一位NLP工程师,专注能大模型的应用,她能够胜任? 根据李秀宁的简历,她在图像处理和信号处理方面有丰富的经验和专业知识,但在自然语言处理(NLP)和大模型应用方面的经验并不明显。简历中没有提到她有直接从事NLP项目或使用大模型(如BERT、GPT等)的经验。 NLP工程师通常需要具备以下技能和经验: 1.
DeepSeek-Coder 论文解读
论文
- DeepSeek-Coder: When the Large Language Model Meets Programming -- The Rise of Code Intelligence
- DeepSeek LLM: Scaling Open-Source Language Models with Longtermism
- LLaMA: Open and Efficient Foundation Language Models
- Llama 2: Open Foundation and Fine-Tuned Chat Models
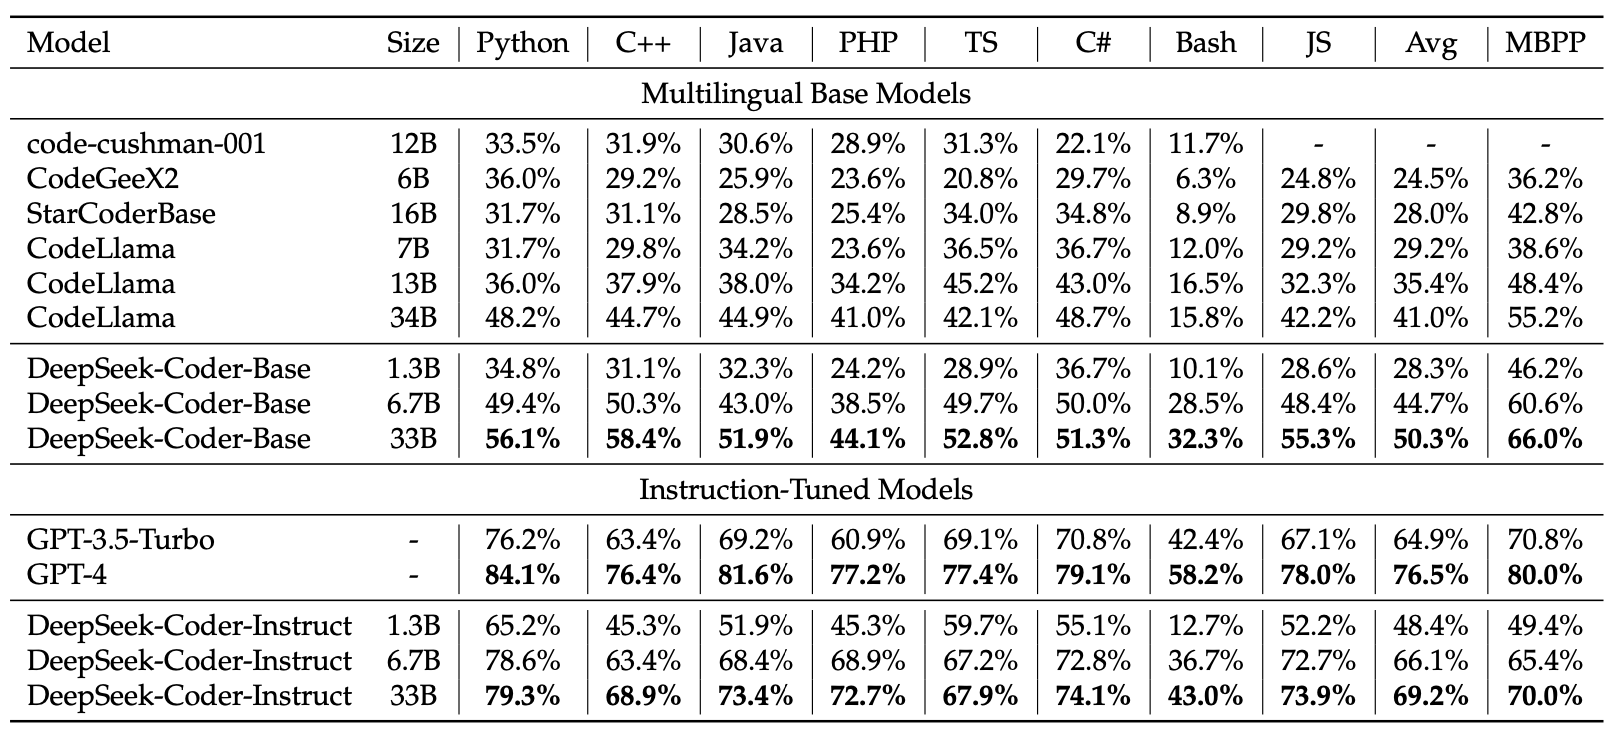
模型的性能
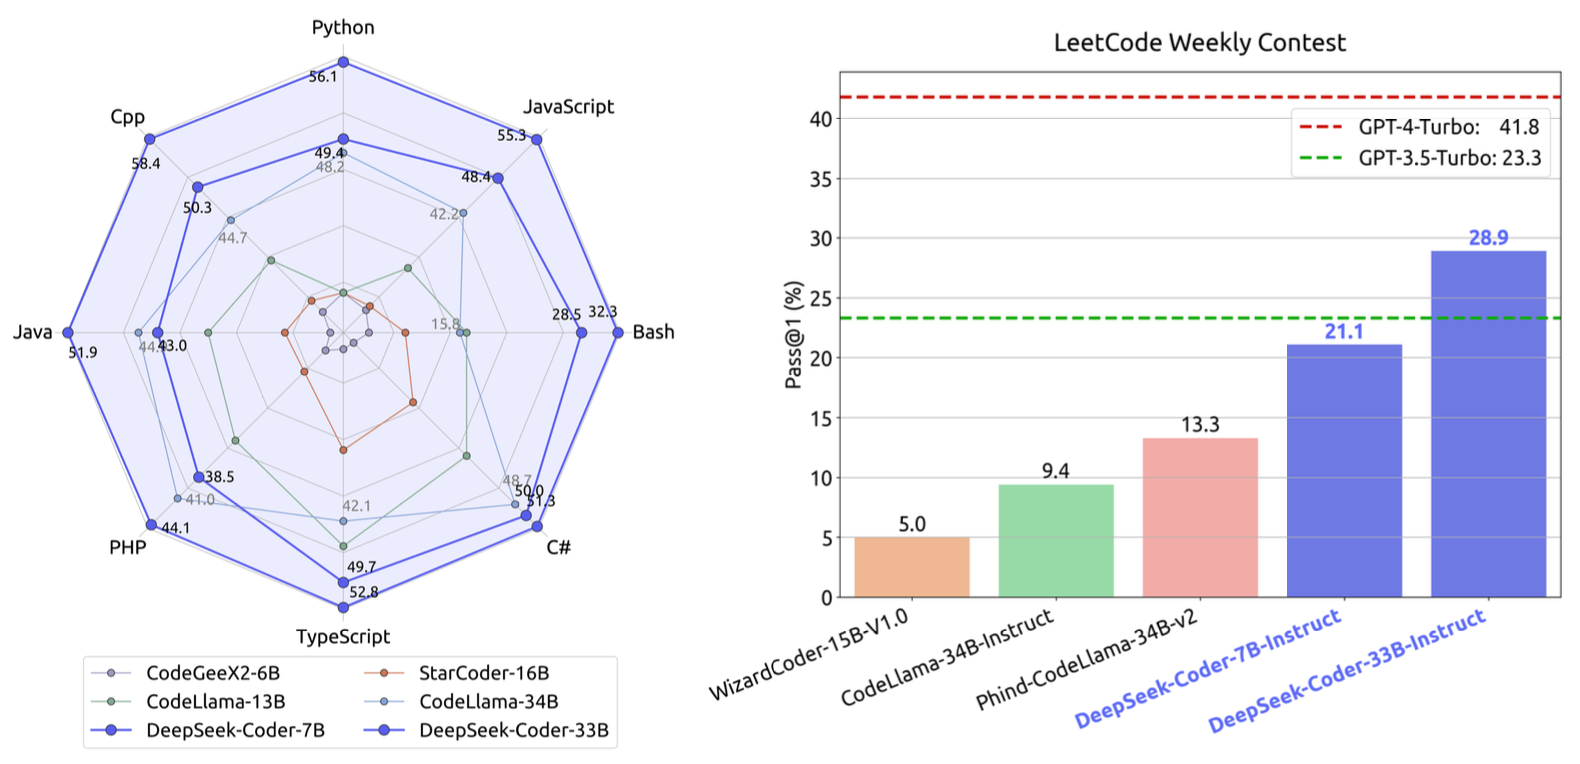
多语言基准性能
训练数据集
数据来源:2023年2月之前在GitHub上创建的公共仓库。
数据集创建过程
- GitHub数据抓取
- 规则过滤
- 依存分析
- 仓库级重复数据删除
- 质量筛选
规则过滤 过滤掉平均行长度超过100个字符或最大行长度超过1000个字符的文件。 移除了字母字符少于25%的文件。 除了XSLT编程语言外,过滤掉在前100个字符中出现字符串 "<?xml_version=" 的文件。 对于HTML文件,考虑可见文本与HTML代码的比例,保留可见文本占代码至少20%且不少于100个字符的文件。 对于包含更多数据的JSON和YAML文件,只保留字符计数在50到5000个字符范围内的文件。
没有找到匹配的文章