在 PyTorch 中融合卷积和批量标准化

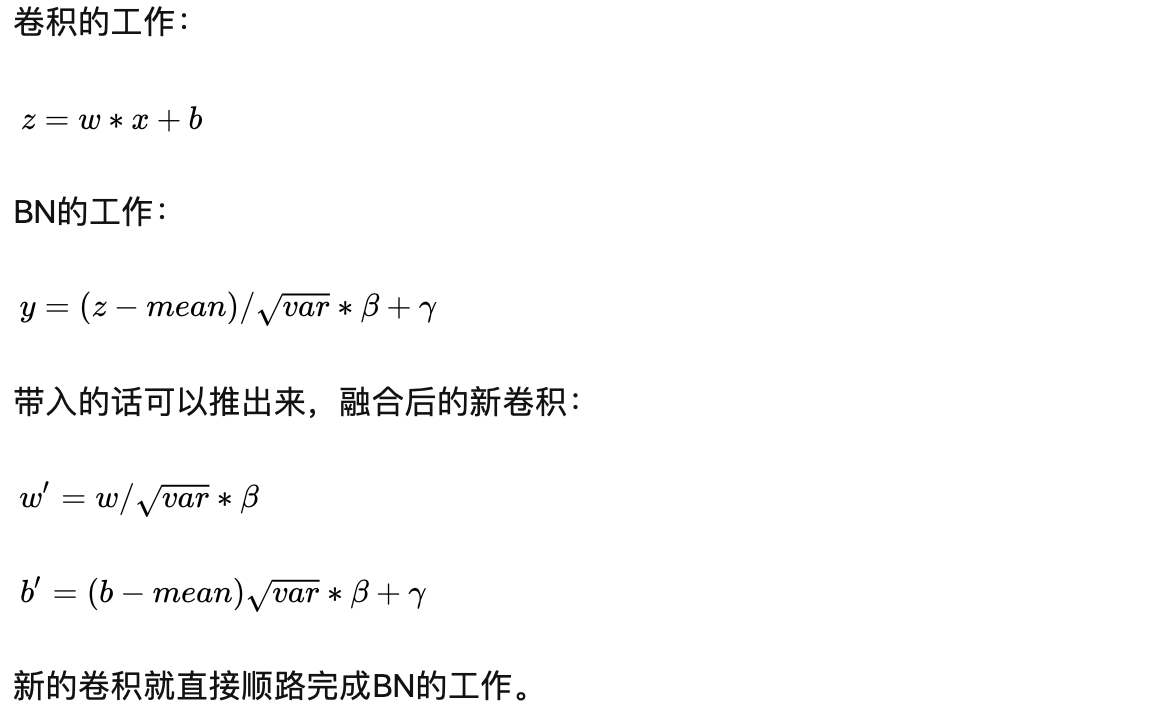
融合卷积和批量标准化的原理

PyTorch 的实现 def fuse_conv_bn_eval(conv, bn, transpose=False): assert(not (conv.training or bn.training)), "Fusion only for eval!" fused_conv = copy.deepcopy(conv) fused_conv.weight, fused_conv.bias = \ fuse_conv_bn_weights(fused_conv.weight, fused_conv.bias, bn.running_mean, bn.running_var, bn.eps, bn.weight, bn.bias, transpose) return fused_conv def fuse_conv_bn_weights(conv_w, conv_b, bn_rm, bn_rv, bn_eps, bn_w, bn_b, transpose=False): if conv_b is None: conv_b = torch.zeros_like(bn_rm) if bn_w is None: bn_w = torch.

命令curl

下载文件

下载单个文件

curl http://book.d2l.ai/_images/catdog.jpg -o catdog.jpg

下载多个文件

curl https://download.01.org/opencv/2021/openvinotoolkit/2021.1/open_model_zoo/models_bin/1/face-detection-retail-0004/FP32/face-detection-retail-0004.xml https://download.01.org/opencv/2021/openvinotoolkit/2021.1/open_model_zoo/models_bin/1/face-detection-retail-0004/FP32/face-detection-retail-0004.bin -o face-detection-retail-0004.xml -o face-detection-retail-0004.bin

下载文件并创建目录 curl --create-dirs https://download.01.org/opencv/2021/openvinotoolkit/2021.

OpenVINO Benchmark Python Tool

性能指标评测工具

该工具使用卷积网络执行推理。性能可以测量两种推理模式:

  • 同步(面向延迟 Latency)
  • 异步(面向吞吐量 Throughput)

帮助信息 -i PATHS_TO_INPUT [PATHS_TO_INPUT ...], --paths_to_input PATHS_TO_INPUT [PATHS_TO_INPUT ...] Optional. Path to a folder with images and/or binaries or to specific image or binary file.It is also allowed to map files to network inputs: input_1:file_1/dir1,file_2/dir2,input_4:file_4/dir4 input_2:file_3/dir3 -m PATH_TO_MODEL, --path_to_model PATH_TO_MODEL Required. Path to an .xml/.onnx file with a trained model or to a .blob file with a trained compiled model. -d TARGET_DEVICE, --target_device TARGET_DEVICE Optional.

OpenVINO Cross Check Tool

交叉检查工具 (Cross Check Tool)

可以比较两个连续模型推理的准确性和性能指标,这些推理在两个不同的受支持的英特尔设备上执行或以不同的精度执行。交叉检查工具可以比较每层或整个模型的指标。

查看帮助信息 $ python cross_check_tool.py -h usage: -------------------------------------------------------------- For cross precision check provide two IRs (mapping files may be needed) run: python3 cross_check_tool.py \ --input path/to/file/describing/input \ --model path/to/model/.xml \ --device device_for_model \ --reference_model path/to/reference_model/.

Deep Learning Accuracy Validation Framework

深度学习准确性验证框架

例子

进入 accuracy_checker 目录

cd open_model_zoo/tools/accuracy_checker

下载数据集

wget https://www.cs.toronto.edu/~kriz/cifar-10-python.tar.gz
tar xvf cifar-10-python.tar.gz -C sample

配置文件结构

models:
  - name: model_name

    launchers:
      - framework: openvino
        adapter: adapter_name

    datasets:
      - name: dataset_name

评估 accuracy_check -c sample/sample_config.yml -m data/test_models/ -s sample/ 2022-05-18 11:18:38.663810: I tensorflow/stream_executor/platform/default/dso_loader.cc:53] Successfully opened dynamic library libcudart.so.11.

Ubuntu 上将 NVIDIA GPU 切换为 Intel 集成显卡 IGD

IGD(Integrated Graphics Device)

操作系统:Ubuntu 18.04,主机有一张 NVIDIA 的独立显卡 GP106 [GeForce GTX 1060 6GB],还有 Intel 酷睿处理器 i5 8500 自带的集成显卡(Intel UHD Graphics 630)。为了更充分的使用独立显卡用于深度学习计算,需要把集成显卡用于显示。在这个过程中遇到了各种各样的问题:

  • 鼠标和键盘失灵。
  • 登录 X Window 时,输入正确的密码不能登录。

BIOS 设置

显卡设置

  • IGD 内置图形显示集成显卡
  • PEG 独立PCI Express接口图形显卡

选择 IGD,保存退出。

配置 X Window 显示显卡设备信息 lspci lspci -k | grep -EA3 'VGA|3D|Display' | | | | | - Only VGA is not good enough, | | | | | because Nvidia mobile adapters | | | | | are shown as 3D and some AMD | | | | | adapters are shown as Display. | | | | --------- Print 3 lines after the regexp match.

NVIDIA 软件栈搭建

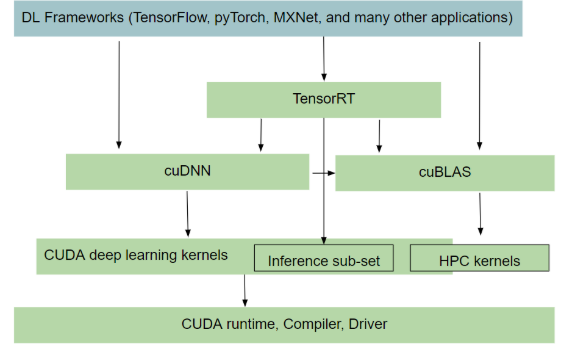
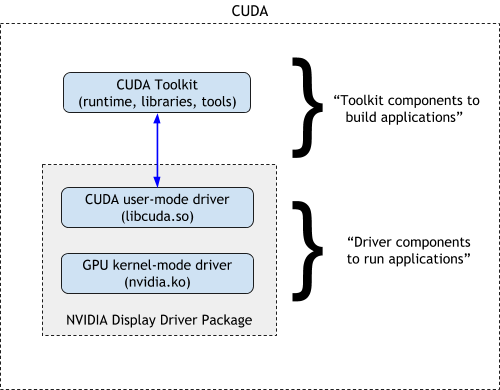
NVIDIA 软件栈

GPU Driver

NVIDIA 驱动程序下载

Ubuntu

  1. 搜索有效的显卡驱动
sudo ubuntu-drivers devices
#搜索匹配
sudo apt search nvidia-
  1. 安装驱动
sudo apt install nvidia-driver-510
  1. 重启系统
sudo reboot
  1. 查看
nvidia-smi
  1. 卸载驱动
sudo apt purge nvidia*

CUDA Toolkit

CUDA Toolkit 自带驱动。

下载

这里下载 run 格式安装包。

CUDA Toolkit 下载

安装

$ sudo sh cuda_xx.x.x_xxx.xx.xx_linux.run

deviceQuery $ ./deviceQuery ./deviceQuery Starting... CUDA Device Query (Runtime API) version (CUDART static linking) Detected 1 CUDA Capable device(s) Device 0: "NVIDIA GeForce GTX 1060 6GB" CUDA Driver Version / Runtime Version 11.6 / 11.

Get Started YOLOv5

Quick Start Examples

Install

# clone
git clone https://github.com/ultralytics/yolov5
cd yolov5

# create virtual python environments
python -m venv yolov5_env
source yolov5_env/bin/activate
python -m pip install --upgrade pip

# install
pip install -r requirements.txt

Inference import torch # Model model = torch.hub.load('ultralytics/yolov5', 'yolov5s') # or yolov5m, yolov5l, yolov5x, custom # Images img = 'https://ultralytics.com/images/zidane.jpg' # or file, Path, PIL, OpenCV, numpy, list # Inference results = model(img) # Results results.print() # or .show(), .save(), .

OpenVINO 神经网络性能分析

网络性能分析

查看每层的性能测量值,可以获得最耗时的层。

实现方式

通过配置收集指定设备上的性能分析

core = Core()
core.set_property(device_name, {"PERF_COUNT": "YES"})

通过推理请求获得性能分析数据

request = compiled_model.create_infer_request()
results = request.infer({0: input_tensor})
prof_info = request.get_profiling_info()

可视化性能分析 def print_infer_request_profiling_info(prof_info): column_max_widths = { 'node_name': 0, 'node_type': 0, 'exec_type': 0 } for node in prof_info: if len(node.node_name) > column_max_widths['node_name'] : column_max_widths['node_name'] = len(node.

OpenVINO 目标检测

目标检测

激活 OpenVINO 开发环境

source openvino_env/bin/activate

预训练模型

  • ssd300 来自 PASCAL VOC2007 的 20 个类别:<omz_dir>/data/dataset_classes/voc_20cl_bkgr.txt

下载模型 $ omz_downloader --name ssd300 ################|| Downloading ssd300 ||################ ========== Downloading /home/wjunjian/openvino/openvino/samples/python/hello_reshape_ssd/public/ssd300/ssd300.tar.gz ... 100%, 95497 KB, 3917 KB/s, 24 seconds passed ========== Unpacking /home/wjunjian/openvino/openvino/samples/python/hello_reshape_ssd/public/ssd300/ssd300.tar.

OpenVINO 图像分类

同步推理

激活 OpenVINO 开发环境

source openvino_env/bin/activate

预训练模型

  • alexnet
  • googlenet-v1 来自 ImageNet 的 1000 个类别:<omz_dir>/data/dataset_classes/imagenet_2012.txt

下载模型 $ omz_downloader --name googlenet-v1 ################|| Downloading googlenet-v1 ||################ ========== Downloading /home/wjunjian/openvino/openvino/samples/python/hello_classification/public/googlenet-v1/googlenet-v1.prototxt ... 100%, 35 KB, 41370 KB/s, 0 seconds passed ========== Downloading /home/wjunjian/openvino/openvino/samples/python/hello_classification/public/googlenet-v1/googlenet-v1.caffemodel ...

Open Model Zoo

Open Model Zoo automation tools

omz_downloader

用于访问预训练深度学习公共模型和英特尔训练模型的集合。

omz_converter

使用模型优化器将存储在原始深度学习框架格式中的 Open Model Zoo 模型转换为 OpenVINO 中间表示 (IR)。

omz_quantizer

用于使用训练后优化工具(Post-Training Optimization Tool)将 IR 格式的全精度模型自动量化为低精度版本。

omz_info_dumper

用于将有关模型的信息转储为机器可读格式。

omz_data_downloader

数据集下载器

查看可用的模型

Open Model Zoo 自动化工具都可以使用参数 --print_all

$ omz_tool --print_all
Sphereface
aclnet
aclnet-int8
action-recognition-0001
age-gender-recognition-retail-0013
alexnet
......
yolo-v3-onnx
yolo-v3-tf
yolo-v3-tiny-onnx
yolo-v3-tiny-tf
yolo-v4-tf
yolo-v4-tiny-tf
yolof
yolox-tiny

OpenVINO 的工作原理

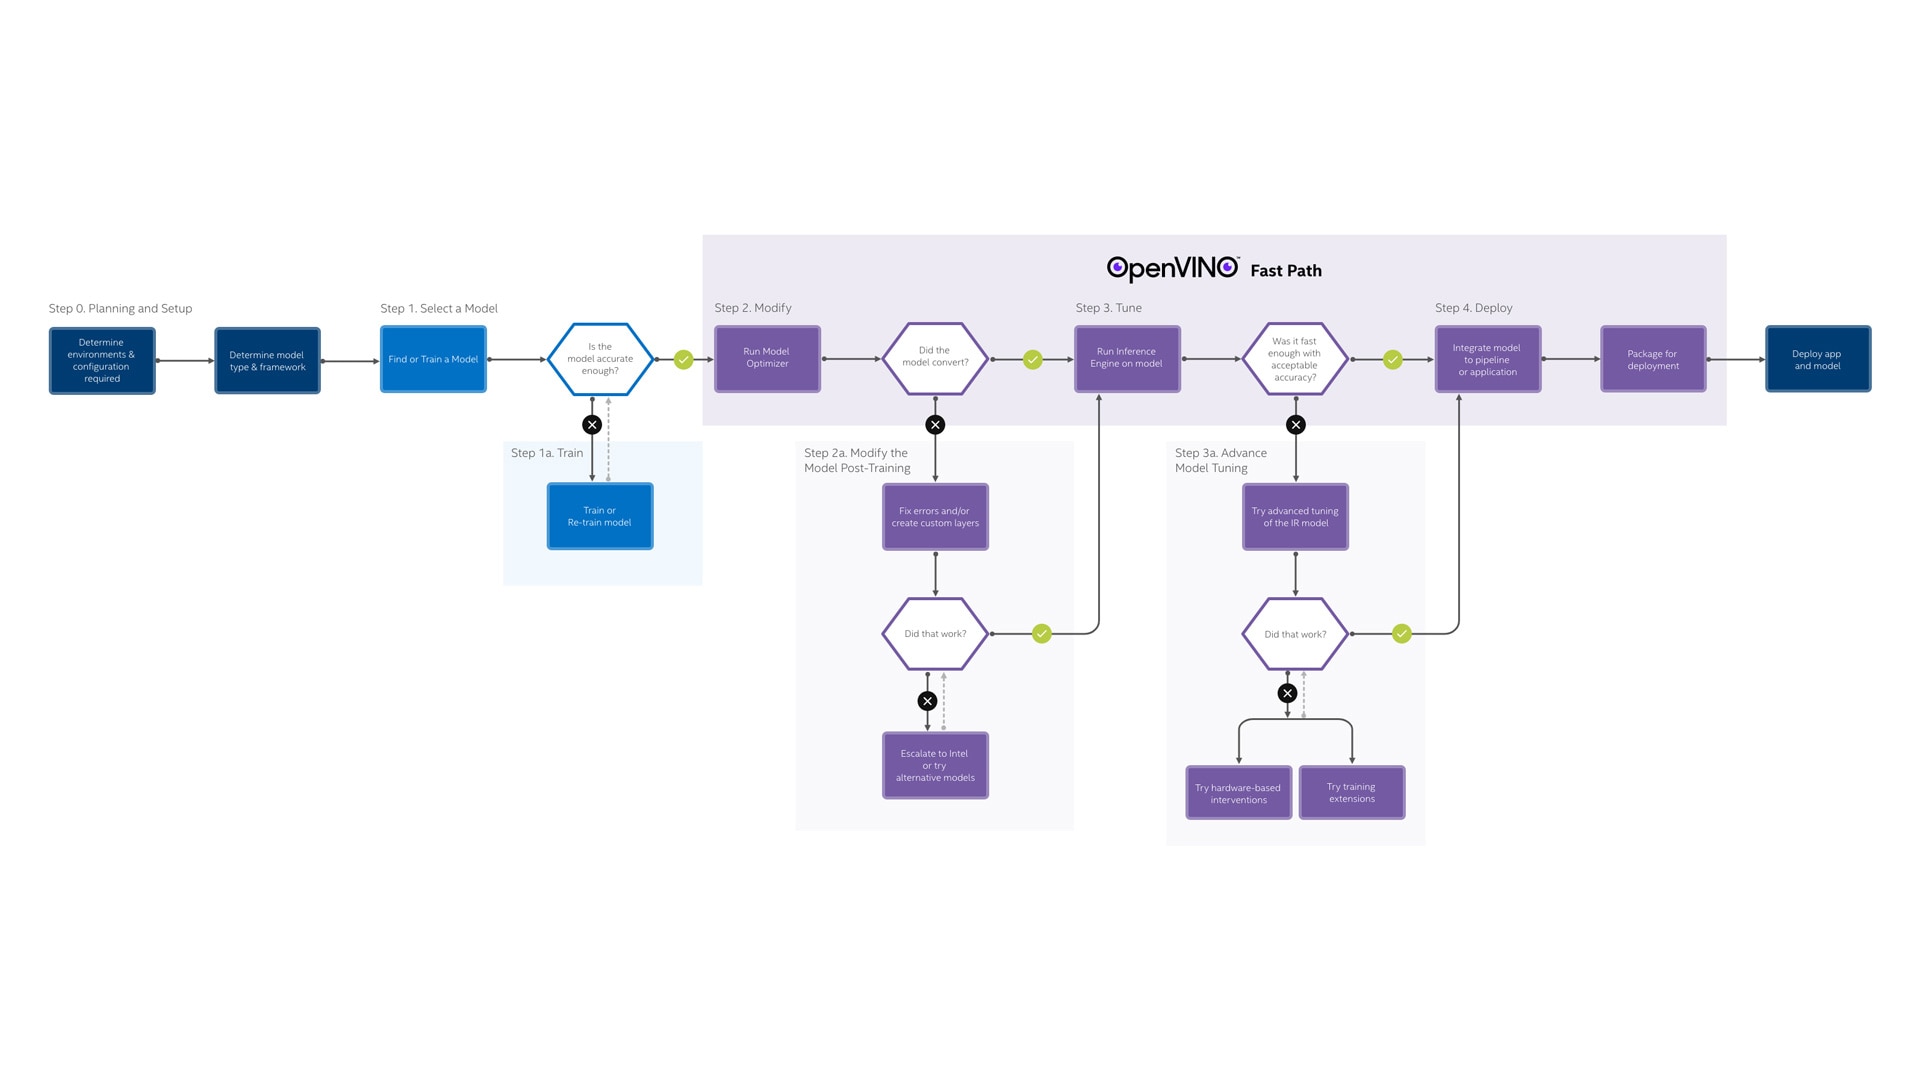
OpenVINO 工作流程

OpenVINO 包含一整套开发和部署工具,本工作流研究从设置和计划解决方案到部署的关键步骤。

🎃 0 计划和设置 ➔ 1 训练模型 ➔ 2 转换和优化 ➔ 3 调整性能 ➔ 4 部署应用程序

0 先决条件:计划和设置

选择您的主机和目标平台,然后选择型号。

确定环境和配置

该工具套件支持 Linux*、Windows*、macOS* 和 Raspbian* 等操作系统。虽然表示形式和代码与目标设备和操作系统无关,但是您可能需要在特定环境中创建部署程序包。

支持的开发平台

  • 开发平台
    • 处理器
      • 第 6 代至 12 代智能英特尔® 酷睿™ 处理器
      • 第 1 代至第 3 代英特尔® 至强® 可扩展处理器
    • 操作系统
      • Ubuntu 18.04 LTS(64 位)
      • Ubuntu 20.04 LTS(64 位)
      • Windows® 10(64 位)
      • Windows* 11(建议用于第 12 代智能英特尔® 酷睿™ 处理器)
      • Red Hat* Enterprise Linux* 8(64 位)
      • macOS* 10.15(64 位)
  • 目标平台
    • 处理器 CPU GPU VPU GNA
    • 操作系统

支持的部署设备 Supported Model Formats 优先选用 FP16,它是最普遍的且性能最佳。 Supported Input Precision 优先选用 U8,它是最普遍的。

Get Started OpenVINO

OpenVINO

Open Visual Inference and Neural network Optimization

OpenVINO 安装

Development

pip 安装

安装 OpenVINO 开发工具

python -m venv openvino_env
  • Linux
source openvino_env/bin/activate
  • Windows
openvino_env\Scripts\activate.bat
python -m pip install --upgrade pip
pip install openvino-dev[onnx,pytorch,kaldi,mxnet,caffe,tensorflow2]==2022.1.0 -i https://mirrors.aliyun.com/pypi/simple/

源代码编译安装(没有成功)👹

Build OpenVINO™ Inference Engine

使用 FastAPI 开发 RESTAPI 服务

创建项目

创建目录

mkdir project
cd project

创建虚拟环境

python -m venv env
source env/bin/activate
# 退出命令 deactivate

创建 requirements.txt 文件

fastapi
python-multipart
aiofiles
uvicorn
gunicorn

安装需要的库

pip install -r requirements.txt -i https://mirrors.aliyun.com/pypi/simple/

项目目录结构

project
├── app
│   ├── __init__.py
│   ├── dependencies.py
│   ├── main.py
│   └── routers
│       ├── __init__.py
│       ├── files.py
│       └── users.py
└── requirements.txt

main.py import uvicorn from fastapi import FastAPI from .routers import users from .routers import files app = FastAPI(title='REST API Interface', version='1.

使用 wrk 对 FastAPI 上传和下载文件的基准测试

服务器 CPU 40核,内存 256G,操作系统 Ubuntu 20.04,Python3.9

RESTAPI 基于 FastAPI 实现的文件上传和下载 router = APIRouter(prefix='/file_benchmarking', tags=['Files']) @router.post('/upload/binary/chunk/async_func/async_r_sync_w', tags=['Upload', 'binary']) async def upload_binary_chunk_async_func_async_r_sync_w(request: Request): file_path = get_random_filename() with open(file_path, "wb") as file: async for chunk in request.stream(): file.write(chunk) return {'file_path': file_path} @router.

Linux 性能优化

CPU

概念

平均负载

单位时间内,系统处于可运行状态和不可中断状态的平均进程数,也就是平均活跃进程数,它和 CPU 使用率并没有直接关系。

当平均负载高于 CPU 数量 70% 的时候,你就应该分析排查负载高的问题了。一旦负载过高,就可能导致进程响应变慢,进而影响服务的正常功能。 70% 这个数字并不是绝对的,最推荐的方法,还是把系统的平均负载监控起来,然后根据更多的历史数据,判断负载的变化趋势。当发现负载有明显升高趋势时,比如说负载翻倍了,你再去做分析和调查。

工具

查看 cpu核数

nproc
lscpu
grep 'model name' /proc/cpuinfo | wc -l

显示平均负载 uptime

uptime、top,显示的顺序是最近1分钟、5分钟、15分钟,从此可以看出平均负载的趋势

$ uptime
 12:51:13 up 754 days,  2:02,  3 users,  load average: 0.41, 0.65, 2.63

持续自动运行命令 watch

watch -d uptime: -d会高亮显示变化的区域

系统压力测试工具 stress

安装

yum install stress -y

strees: --cpu cpu压测选项,-i io压测选项,-c 进程数压测选项,--timeout 执行时间

FastAPI 上传和下载文件的基准测试

使用 FastAPI 实现了文件的上传和下载,部署服务使用了 uvicorn 和 gunicorn+uvicorn 两种方法。

基准测试工具使用的是 wrk

服务器 CPU 40核,内存 256G,操作系统 Ubuntu 20.04,Python3.9

测试流程

使用的测试图片 health.jpg (256kb)

生成测试数据

生成通过 HTTP POST 发送二进制数据的文件。

python make_http_postdata.py make health.jpg postdata
file: /home/wjj/test/postdata
boundary: gouchicao0123456789

创建用于 wrk 的 lua 脚本:postfile.lua

wrk.method = "POST"
local f = io.open("postdata", "rb")
wrk.body   = f:read("*all")
wrk.headers["Content-Type"] = "multipart/form-data; boundary=gouchicao0123456789"

部署 FastAPI 应用 uvicorn uvicorn app.

Install Python3.9 in Ubuntu20.04

问题

基于之前安装 Python3.8 的经验,运行下面的命令就可以成功安装 Python3.9 和 pip,但是这回失败了。

sudo apt install build-essential python3.9 python3.9-dev -y
sudo ln -s /usr/bin/python3.9 /usr/bin/python
curl https://bootstrap.pypa.io/get-pip.py | sudo python -
Traceback (most recent call last):
  File "/home/lnsoft/wjj/get-pip.py", line 33324, in <module>
    main()
  File "/home/lnsoft/wjj/get-pip.py", line 135, in main
    bootstrap(tmpdir=tmpdir)
  File "/home/lnsoft/wjj/get-pip.py", line 111, in bootstrap
    monkeypatch_for_cert(tmpdir)
  File "/home/lnsoft/wjj/get-pip.py", line 92, in monkeypatch_for_cert
    from pip._internal.commands.install import InstallCommand
  File "<frozen zipimport>", line 259, in load_module
  File "/tmp/tmpcw3afq6v/pip.zip/pip/_internal/commands/__init__.py", line 9, in <module>
  File "<frozen zipimport>", line 259, in load_module
  File "/tmp/tmpcw3afq6v/pip.zip/pip/_internal/cli/base_command.py", line 15, in <module>
  File "<frozen zipimport>", line 259, in load_module
  File "/tmp/tmpcw3afq6v/pip.zip/pip/_internal/cli/cmdoptions.py", line 23, in <module>
  File "<frozen zipimport>", line 259, in load_module
  File "/tmp/tmpcw3afq6v/pip.zip/pip/_internal/cli/parser.py", line 12, in <module>
  File "<frozen zipimport>", line 259, in load_module
  File "/tmp/tmpcw3afq6v/pip.zip/pip/_internal/configuration.py", line 26, in <module>
  File "<frozen zipimport>", line 259, in load_module
  File "/tmp/tmpcw3afq6v/pip.zip/pip/_internal/utils/logging.py", line 27, in <module>
  File "<frozen zipimport>", line 259, in load_module
  File "/tmp/tmpcw3afq6v/pip.zip/pip/_internal/utils/misc.py", line 39, in <module>
  File "<frozen zipimport>", line 259, in load_module
  File "/tmp/tmpcw3afq6v/pip.zip/pip/_internal/locations/__init__.py", line 14, in <module>
  File "<frozen zipimport>", line 259, in load_module
  File "/tmp/tmpcw3afq6v/pip.zip/pip/_internal/locations/_distutils.py", line 9, in <module>
ModuleNotFoundError: No module named 'distutils.cmd'