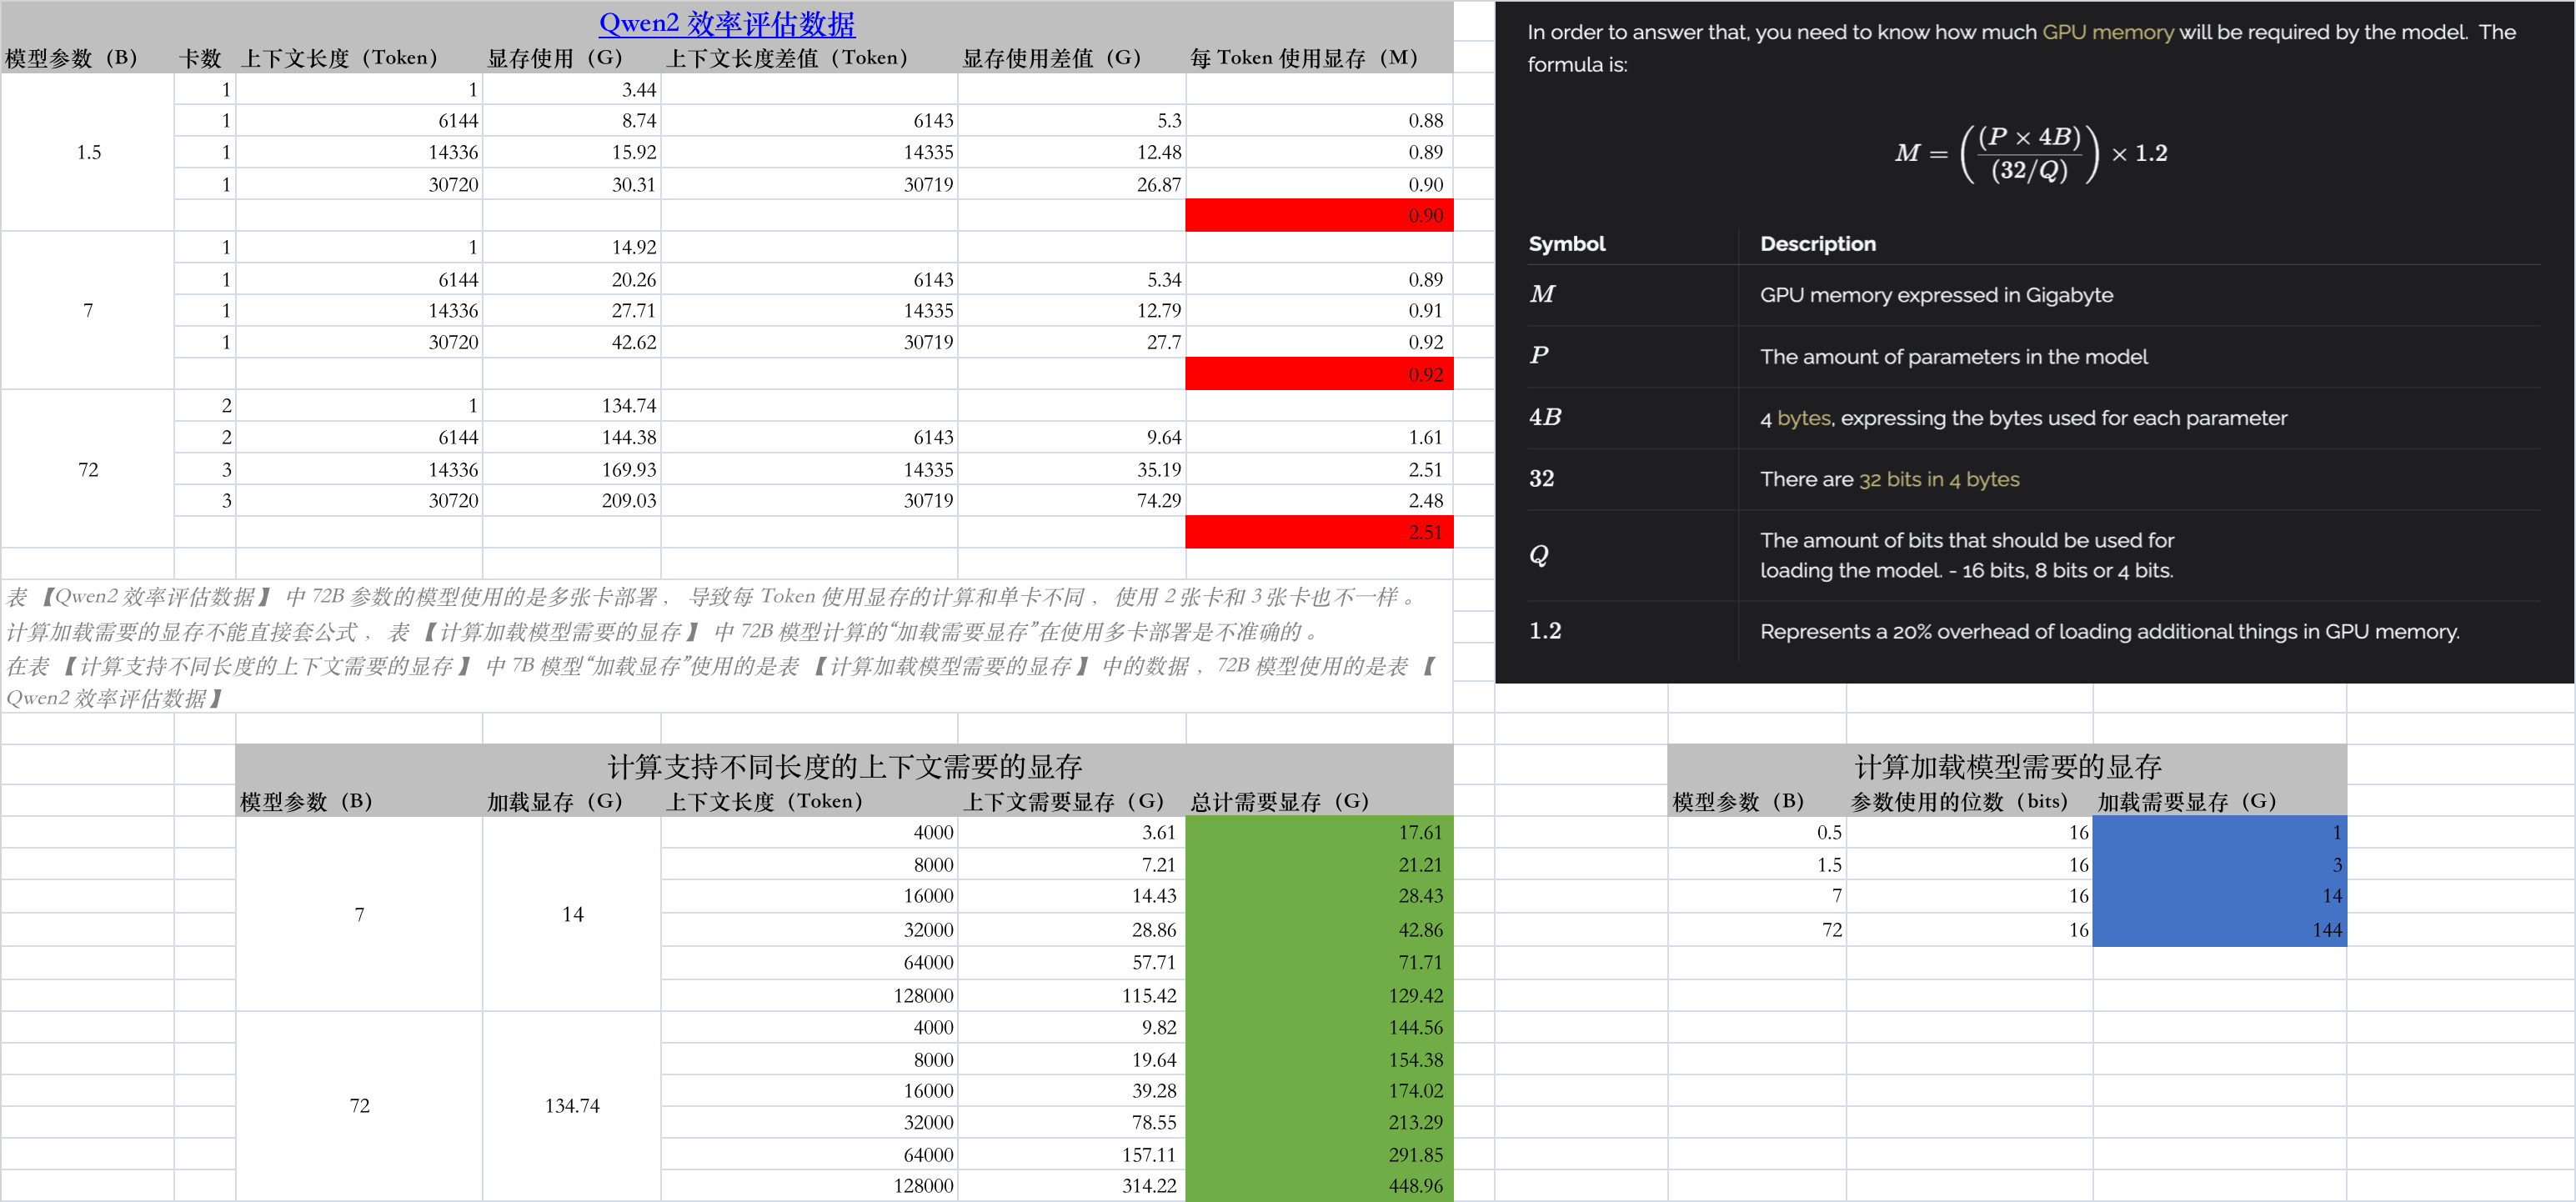
20 篇文章带有标签 “inference”

DeepSeek-V4 全面解读:架构设计与 inference/encoding 源码深度解析

DeepSeek-V4

简介

我们在此发布 DeepSeek-V4 系列的预览版本,包括两个强大的混合专家(MoE)语言模型 —— 总参数量 1.6T(激活 49B)的 DeepSeek-V4-Pro,以及总参数量 284B(激活 13B)的 DeepSeek-V4-Flash,两者均支持长达 一百万 token 的上下文。

DeepSeek-V4 系列在架构与优化方面引入了多项关键升级:

  1. 混合注意力架构:我们设计了一种结合压缩稀疏注意力(CSA)与重度压缩注意力(HCA)的混合注意力机制,大幅提升长上下文处理效率。在 1M token 上下文设定下,DeepSeek-V4-Pro 的单 token 推理 FLOPs 仅为 DeepSeek-V3.2 的 27%,KV 缓存仅占其 10%
  2. 流形约束超连接(mHC):我们引入 mHC 来增强传统的残差连接,在保留模型表达能力的同时,提升信号跨层传播的稳定性。
  3. Muon 优化器:我们采用 Muon 优化器以实现更快的收敛速度和更高的训练稳定性。

两款模型均在大于 32T 的多样化高质量 token 上进行了预训练,并随后执行了全面的后训练流程。后训练采用两阶段范式:首先独立培养领域专属专家(通过 SFT 与基于 GRPO 的强化学习),随后通过 on-policy 蒸馏将不同领域的专长整合至单一模型中。

DeepSeek-V4-Pro-Max 作

vLLM:快速易用的 LLM 推理和服务库

大模型

在下载前,请先通过如下命令安装 ModelScope

pip install modelscope

ModelScope 下载默认存储到 ~/.cache/modelscope/hub(Linux/macOS)或 C:\Users<用户名>.cache\modelscope\hub(Windows)。--local_dir 参数可以指定下载目录。

多模态(Multi-modal)

modelscope download --model Qwen/Qwen2.5-VL-3B-Instruct --local_dir Qwen2.5-VL-3B-Instruct
modelscope download --model Qwen/Qwen2.5-VL-7B-Instruct --local_dir Qwen2.5-VL-7B-Instruct

转录(Transcriptions)

modelscope download --model openai-mirror/whisper-large-v3 --local_dir whisper-large-v3
modelscope download --model openai-mirror/whisper-large-v3-turbo --local_dir whisper-large-v3-turbo

DeepSeek-V3 Technical Report

Abstract(摘要)

We present DeepSeek-V3, a strong Mixture-of-Experts (MoE) language model with 671B total parameters with 37B activated for each token. To achieve efficient inference and cost-effective training, DeepSeek-V3 adopts Multi-head Latent Attention (MLA) and DeepSeekMoE architec- tures, which were thoroughly validated in DeepSeek-V2. Furthermore, DeepSeek-V3 pioneers an auxiliary-loss-free strategy for load balancing and sets a multi-token prediction training objective for stronger performance. We pre-train DeepSeek-V3 on 14.

大模型推理需要多少显存?

计算加载模型需要的显存

模型参数(B) 参数使用的位数(bits) 加载需要显存(G)
0.5 16 1
1.5 16 3
7 16 14
9 16 18
22 16 44
72 16 144

计算支持不同长度的上下文需要的显存

SWIFT: Scalable lightWeight Infrastructure for Fine-Tuning

简介

SWIFT 支持近200种LLM和MLLM(多模态大模型)的训练、推理、评测和部署。开发者可以直接将我们的框架应用到自己的Research和生产环境中,实现模型训练评测到应用的完整链路。我们除支持了PEFT提供的轻量训练方案外,也提供了一个完整的Adapters库以支持最新的训练技术,如NEFTune、LoRA+、LLaMA-PRO等,这个适配器库可以脱离训练脚本直接使用在自己的自定流程中。

安装

git clone https://github.com/modelscope/swift.git
cd swift
pip install -e '.[llm]'

支持的模型类型(model_type)

['chinese-alpaca-2-13b-16k', 'chinese-alpaca-2-13b', 'chinese-alpaca-2-7b-64k', 'chinese-alpaca-2-7b-16k', 'chinese-alpaca-2-7b', 'chinese-alpaca-2-1_3b', 'chinese-llama-2-13b-16k', 'chinese-llama-2-13b', 'ch

Together AI - The fastest cloud platform for building and running generative AI

用于构建和运行生成式人工智能的最快云平台

注册 Together AI 的开发平台

Together AI Playground

速度非常快

Together AI Inference

OpenAI API from openai import OpenAI import os TOGETHER_API_KEY = os.environ.get("TOGETHER_API_KEY") client = OpenAI( api_key=TOGETHER_API_KEY, base_url='https://api.together.xyz/v1&#39;, ) chat_completion = client.chat.completions.create( messages=[ { "role": "system", "content": "You are an expert travel guide.", }, { "role": "user", "content": "Tell me fun things to do in San Francisco.

MLX: An array framework for Apple silicon

MLX 介绍

MLX 是一个为 Apple Silicon 芯片上的机器学习研究设计的 array 框架,由 Apple 机器学习研究团队提供。

  • 熟悉的 API:MLX 拥有一个与 NumPy 紧密对应的 Python API。MLX 还拥有功能齐全的 C++、C 和 Swift API,这些 API 也紧密地反映了 Python API。MLX 拥有更高级别的包,如 mlx.nn 和 mlx.optimizers,它们的 API 紧密跟随 PyTorch,以简化构建更复杂模型的过程。
  • 统一内存:MLX 与其他框架的一个显著区别在于其统一内存模型。MLX 中的数组存在于共享内存中。可以在任何支持的设备类型上执行 MLX 数组的操作,无需数据传输。
  • MLX 的设计受到了像 NumPyPyTorchJaxArrayFire 这样的框架的启发。

安装

  • pip
pip install mlx
pip install mlx-lm
  • conda
conda install -c conda-forge mlx
conda install -c conda-forge mlx-lm

MLX LLMS Examples

MLX Examples

克隆代码

git clone https://github.com/ml-explore/mlx-examples
cd mlx-examples

创建虚拟环境

python -m venv env
source env/bin/activate

pip install -r llms/phi2/requirements.txt
pip install -r llms/qwen/requirements.txt

创建大模型链接 mkdir llms/phi2/microsoft ln -s /Users/junjian/HuggingFace/microsoft/phi-2 llms/phi2/microsoft/phi-2 mkdir llms/qwen/Qwen ln -s /Users/junjian/HuggingFace/Qwen/Qwen-14B-Chat llms/qwen/Qwen/Qwen-14B-Chat ln -s /Users/junjian/HuggingFace/Qwen/Qwen-1_8B llms/qwen/Qwen/Qwen-1_8B ln -s /Users/junjian/HuggingFace/Qwen/Qwen-1_8B-Chat llms/qwen/Qwen/Qwen-1_8

TensorRT-LLM 大模型推理

[TensorRT-LLM][TensorRT-LLM]

TensorRT-LLM 为用户提供了易于使用的 Python API 来定义大型语言模型 (LLM) 并构建包含最先进优化的 TensorRT 引擎,以便在 NVIDIA GPU 上高效地执行推理。 TensorRT-LLM 还包含用于创建执行这些 TensorRT 引擎的 Python 和 C++ 运行时的组件。

Build TensorRT-LLM

# TensorRT-LLM uses git-lfs, which needs to be installed in advance.
apt-get update && apt-get -y install git git-lfs

git clone https://github.com/NVIDIA/TensorRT-LLM.git
cd TensorRT-LLM
git submodule update --init --recursive
git lfs install
git lfs pull

make -C docker release_build

Ultralytics YOLOv8 推理速度对比

CPU

服务器信息

lscpu

Architecture:                    x86_64
CPU op-mode(s):                  32-bit, 64-bit
Byte Order:                      Little Endian
Address sizes:                   46 bits physical, 48 bits virtual
CPU(s):                          40
On-line CPU(s) list:             0-39
Thread(s) per core:              2
Core(s) per socket:              10
Socket(s):                       2
NUMA node(s):                    2
Vendor ID:                       GenuineIntel
CPU family:                      6
Model:                           79
Model name:                      Intel(R) Xeon(R) CPU E5-2640 v4 @ 2.40GHz
Stepping:                        1
CPU MHz:                         1201.687
CPU max MHz:                     3400.0000
CPU min MHz:                     1200.0000
BogoMIPS:                        4788.86
Virtualization:                  VT-x
L1d cache:                       640 KiB
L1i cache:                       640 KiB
L2 cache:                        5 MiB
L3 cache:                        50 MiB
NUMA node0 CPU(s):               0-9,20-29
NUMA node1 CPU(s):               10-19,30-39
Vulnerability Itlb multihit:     KVM: Mitigation: Split huge pages
Vulnerability L1tf:              Mitigation; PTE Inversion; VMX conditional cache flushes, SMT vulnerable
Vulnerability Mds:               Mitigation; Clear CPU buffers; SMT vulnerable
Vulnerability Meltdown:          Mitigation; PTI
Vulnerability Spec store bypass: Mitigation; Speculative Store Bypass disabled via prctl and seccomp
Vulnerability Spectre v1:        Mitigation; usercopy/swapgs barriers and __user pointer sanitization
Vulnerability Spectre v2:        Mitigation; Full generic retpoline, IBPB conditional, IBRS_FW, STIBP conditional, RSB filling
Vulnerability Srbds:             Not affected
Vulnerability Tsx async abort:   Mitigation; Clear CPU buffers; SMT vulnerable
Flags:                           fpu vme de pse tsc msr pae mce cx8 apic sep mtrr pge mca cmov pat pse36 clflush dts acpi mmx fxsr sse sse2 ss ht tm pbe syscall nx pdpe1gb rdtscp lm constant_tsc arch_perfmon pebs bts rep_good nop
                                 l xtopology nonstop_tsc cpuid aperfmperf pni pclmulqdq dtes64 ds_cpl vmx smx est tm2 ssse3 sdbg fma cx16 xtpr pdcm pcid dca sse4_1 sse4_2 x2apic movbe popcnt tsc_deadline_timer aes xsave avx f16c 
                                 rdrand lahf_lm abm 3dnowprefetch cpuid_fault epb cat_l3 cdp_l3 invpcid_single pti intel_ppin ssbd ibrs ibpb stibp tpr_shadow vnmi flexpriority ept vpid ept_ad fsgsbase tsc_adjust bmi1 hle avx2 sme
                                 p bmi2 erms invpcid rtm cqm rdt_a rdseed adx smap intel_pt xsaveopt cqm_llc cqm_occup_llc cqm_mbm_total cqm_mbm_local dtherm ida arat pln pts md_clear flush_l1d

在 MacBook Pro M2 Max 上安装 OpenVINO

安装 OpenVINO(手动编译)

brew install cmake
brew install automake
brew install --build-from-source libtool
brew install --build-from-source libunistring
brew install --build-from-source libidn2
brew install --build-from-source wget
brew install --build-from-source libusb

sudo conda install scons -y                                                                        

# 克隆时把依赖的子模块进行克隆(先克隆OpenVINO,再进行子模块克隆失败)
git clone --depth 1 --recurse-submodules https://github.com/openvinotoolkit/openvino.git

cd openvino
python3 -m pip install -r src/bindings/python/wheel/requirements-dev.txt

# 安装OpenCV(可选)
sudo conda install -c conda-forge opencv

mkdir build && cd build

# 配置(-DOPENVINO_EXTRA_MODULES=../openvino_contrib/modules/arm_plugin 好像不需要)
cmake -DCMAKE_BUILD_TYPE=Release ..

# 编译
cmake --build . --config Release --parallel $(sysctl -n hw.ncpu)
**没有生成 wheel**

# 安装
sudo mkdir /opt/openvino
sudo cmake -DCMAKE_INSTALL_PREFIX=/opt/openvino -P cmake_install.cmake

# 查看可用设备
./bin/arm64/Release/hello_query_device 
[ INFO ] Build ................................. 2023.0.0-1-b300df1be6c
[ INFO ] 
[ INFO ] Available devices: 
[ INFO ] CPU
[ INFO ] 	SUPPORTED_PROPERTIES: 
[ INFO ] 		Immutable: SUPPORTED_METRICS : SUPPORTED_METRICS SUPPORTED_CONFIG_KEYS RANGE_FOR_ASYNC_INFER_REQUESTS RANGE_FOR_STREAMS
[ INFO ] 		Immutable: SUPPORTED_CONFIG_KEYS : LP_TRANSFORMS_MODE DUMP_GRAPH PERF_COUNT CPU_THROUGHPUT_STREAMS CPU_BIND_THREAD CPU_THREADS_NUM CPU_THREADS_PER_STREAM BIG_CORE_STREAMS SMALL_CORE_STREAMS THREADS_PER_STREAM_BIG THREADS_PER_STREAM_SMALL SMALL_CORE_OFFSET ENABLE_HYPER_THREAD NUM_STREAMS INFERENCE_NUM_THREADS AFFINITY
[ INFO ] 		Mutable: PERF_COUNT : YES
[ INFO ] 		Immutable: AVAILABLE_DEVICES : NEON
[ INFO ] 		Immutable: FULL_DEVICE_NAME : arm_compute::NEON
[ INFO ] 		Immutable: OPTIMIZATION_CAPABILITIES : FP16 FP32
[ INFO ] 		Immutable: RANGE_FOR_ASYNC_INFER_REQUESTS : 1 12 1
[ INFO ] 		Mutable: PERFORMANCE_HINT : ""
[ INFO ] 		Immutable: RANGE_FOR_STREAMS : 1 12
[ INFO ] 		Mutable: CPU_THROUGHPUT_STREAMS : 1
[ INFO ] 		Mutable: CPU_BIND_THREAD : NO
[ INFO ] 		Mutable: CPU_THREADS_NUM : 0
[ INFO ] 		Mutable: CPU_THREADS_PER_STREAM : 12
[ INFO ] 		Mutable: BIG_CORE_STREAMS : 0
[ INFO ] 		Mutable: SMALL_CORE_STREAMS : 0
[ INFO ] 		Mutable: THREADS_PER_STREAM_BIG : 0
[ INFO ] 		Mutable: THREADS_PER_STREAM_SMALL : 0
[ INFO ] 		Mutable: SMALL_CORE_OFFSET : 0
[ INFO ] 		Mutable: ENABLE_HYPER_THREAD : YES
[ INFO ] 		Mutable: NUM_STREAMS : 1
[ INFO ] 		Mutable: INFERENCE_NUM_THREADS : 0
[ INFO ] 		Mutable: AFFINITY : NONE
[ INFO ] 

OpenVINO Benchmark Python Tool

性能指标评测工具

该工具使用卷积网络执行推理。性能可以测量两种推理模式:

  • 同步(面向延迟 Latency)
  • 异步(面向吞吐量 Throughput)

帮助信息 -i PATHS_TO_INPUT [PATHS_TO_INPUT ...], --paths_to_input PATHS_TO_INPUT [PATHS_TO_INPUT ...] Optional. Path to a folder with images and/or binaries or to specific image or binary file.It is also allowed to map files to network inputs: input_1:file_1/dir1,file_2/dir2,input_4:file_4/dir4 input_2:file_3/dir3 -m PATH_TO_MODEL, --path_to_model PATH_TO_MODEL Required. Path to an .xml/.onnx file with a trained model or to a .blob file with a trained compiled model. -d TARGET_DEVICE, --target_device TARGET_DEVICE Optional.

OpenVINO Cross Check Tool

交叉检查工具 (Cross Check Tool)

可以比较两个连续模型推理的准确性和性能指标,这些推理在两个不同的受支持的英特尔设备上执行或以不同的精度执行。交叉检查工具可以比较每层或整个模型的指标。

查看帮助信息 $ python cross_check_tool.py -h usage: -------------------------------------------------------------- For cross precision check provide two IRs (mapping files may be needed) run: python3 cross_check_tool.py \ --input path/to/file/describing/input \ --model path/to/model/.xml \ --device device_for_model \ --reference_model path/to/reference_model/.

OpenVINO 目标检测

目标检测

激活 OpenVINO 开发环境

source openvino_env/bin/activate

预训练模型

  • ssd300 来自 PASCAL VOC2007 的 20 个类别:<omz_dir>/data/dataset_classes/voc_20cl_bkgr.txt

下载模型 $ omz_downloader --name ssd300 ################|| Downloading ssd300 ||################ ========== Downloading /home/wjunjian/openvino/openvino/samples/python/hello_reshape_ssd/public/ssd300/ssd300.tar.gz ... 100%, 95497 KB, 3917 KB/s, 24 seconds passed ========== Unpacking /home/wjunjian/openvino/openvino/samples/python/hello_reshape_ssd/public/ssd300/ssd300.tar.

OpenVINO 图像分类

同步推理

激活 OpenVINO 开发环境

source openvino_env/bin/activate

预训练模型

  • alexnet
  • googlenet-v1 来自 ImageNet 的 1000 个类别:<omz_dir>/data/dataset_classes/imagenet_2012.txt

下载模型 $ omz_downloader --name googlenet-v1 ################|| Downloading googlenet-v1 ||################ ========== Downloading /home/wjunjian/openvino/openvino/samples/python/hello_classification/public/googlenet-v1/googlenet-v1.prototxt ... 100%, 35 KB, 41370 KB/s, 0 seconds passed ========== Downloading /home/wjunjian/openvino/openvino/samples/python/hello_classification/public/googlenet-v1/googlenet-v1.caffemodel ...

Get Started OpenVINO

OpenVINO

Open Visual Inference and Neural network Optimization

OpenVINO 安装

Development

pip 安装

安装 OpenVINO 开发工具

python -m venv openvino_env
  • Linux
source openvino_env/bin/activate
  • Windows
openvino_env\Scripts\activate.bat
python -m pip install --upgrade pip
pip install openvino-dev[onnx,pytorch,kaldi,mxnet,caffe,tensorflow2]==2022.1.0 -i https://mirrors.aliyun.com/pypi/simple/

源代码编译安装(没有成功)👹

Build OpenVINO™ Inference Engine

使用PaddleOCR进行文字识别

安装

pip install paddleocr

测试

import cv2
import numpy as np

from paddleocr import PaddleOCR


ocr = PaddleOCR(use_angle_cls=True)
image_path = 'test.jpg'
img = cv2.imread(image_path)

img_gray = cv2.cvtColor(img, cv2.COLOR_BGR2GRAY)
img_gray1 = img_gray[:,:, np.newaxis]
img_gray3 = np.concatenate([img_gray1, img_gray1, img_gray1], axis=-1)

texts = ocr.ocr(img_gray3)
for text in texts:
    """
    box   坐标1         坐标2
          坐标4         坐标3
    """
    box = text[0]
    t = text[1][0]
    score = text[1][1]

可视化(图像上画出文本和得分) import os import shutil import cv2 import numpy as np import uuid from PIL import ImageFo