命令open
指定浏览器打开链接
open -a Safari http://stackoverflow.com/
open -a Firefox http://stackoverflow.com/
open -a Chrome http://stackoverflow.com/
参考资料
指定浏览器打开链接
open -a Safari http://stackoverflow.com/
open -a Firefox http://stackoverflow.com/
open -a Chrome http://stackoverflow.com/
参考资料
下载文件
下载单个文件
curl http://book.d2l.ai/_images/catdog.jpg -o catdog.jpg
下载多个文件
curl https://download.01.org/opencv/2021/openvinotoolkit/2021.1/open_model_zoo/models_bin/1/face-detection-retail-0004/FP32/face-detection-retail-0004.xml https://download.01.org/opencv/2021/openvinotoolkit/2021.1/open_model_zoo/models_bin/1/face-detection-retail-0004/FP32/face-detection-retail-0004.bin -o face-detection-retail-0004.xml -o face-detection-retail-0004.bin
下载文件并创建目录 curl --create-dirs https://download.01.org/opencv/2021/openvinotoolkit/2021.
该工具使用卷积网络执行推理。性能可以测量两种推理模式:
帮助信息 -i PATHS_TO_INPUT [PATHS_TO_INPUT ...], --paths_to_input PATHS_TO_INPUT [PATHS_TO_INPUT ...] Optional. Path to a folder with images and/or binaries or to specific image or binary file.It is also allowed to map files to network inputs: input_1:file_1/dir1,file_2/dir2,input_4:file_4/dir4 input_2:file_3/dir3 -m PATH_TO_MODEL, --path_to_model PATH_TO_MODEL Required. Path to an .xml/.onnx file with a trained model or to a .blob file with a trained compiled model. -d TARGET_DEVICE, --target_device TARGET_DEVICE Optional.
可以比较两个连续模型推理的准确性和性能指标,这些推理在两个不同的受支持的英特尔设备上执行或以不同的精度执行。交叉检查工具可以比较每层或整个模型的指标。
查看帮助信息 $ python cross_check_tool.py -h usage: -------------------------------------------------------------- For cross precision check provide two IRs (mapping files may be needed) run: python3 cross_check_tool.py \ --input path/to/file/describing/input \ --model path/to/model/.xml \ --device device_for_model \ --reference_model path/to/reference_model/.
深度学习准确性验证框架
进入 accuracy_checker 目录
cd open_model_zoo/tools/accuracy_checker
下载数据集
wget https://www.cs.toronto.edu/~kriz/cifar-10-python.tar.gz
tar xvf cifar-10-python.tar.gz -C sample
配置文件结构
models:
  - name: model_name

    launchers:
      - framework: openvino
        adapter: adapter_name

    datasets:
      - name: dataset_name
评估 accuracy_check -c sample/sample_config.yml -m data/test_models/ -s sample/ 2022-05-18 11:18:38.663810: I tensorflow/stream_executor/platform/default/dso_loader.cc:53] Successfully opened dynamic library libcudart.so.11.
IGD(Integrated Graphics Device)
操作系统:Ubuntu 18.04,主机有一张 NVIDIA 的独立显卡 GP106 [GeForce GTX 1060 6GB],还有 Intel 酷睿处理器 i5 8500 自带的集成显卡(Intel UHD Graphics 630)。为了更充分的使用独立显卡用于深度学习计算,需要把集成显卡用于显示。在这个过程中遇到了各种各样的问题:
BIOS 设置
显卡设置
选择 IGD,保存退出。
配置 X Window 显示显卡设备信息 lspci lspci -k | grep -EA3 'VGA|3D|Display' | | | | | - Only VGA is not good enough, | | | | | because Nvidia mobile adapters | | | | | are shown as 3D and some AMD | | | | | adapters are shown as Display. | | | | --------- Print 3 lines after the regexp match.
NVIDIA 软件栈
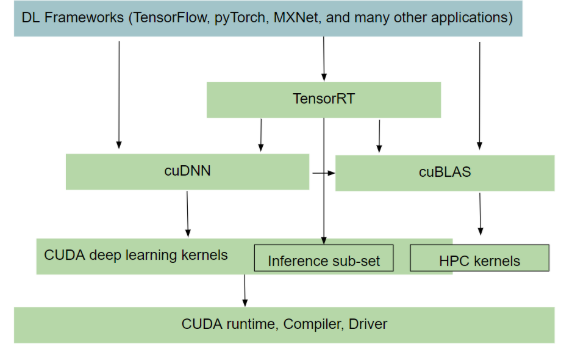
GPU Driver
Ubuntu
sudo ubuntu-drivers devices
#搜索匹配
sudo apt search nvidia-
sudo apt install nvidia-driver-510
sudo reboot
nvidia-smi
sudo apt purge nvidia*
CUDA Toolkit
CUDA Toolkit 自带驱动。
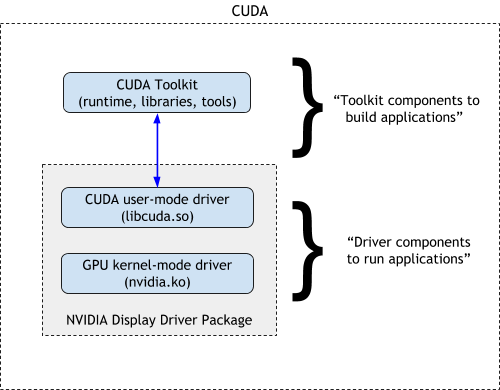
下载
这里下载 run 格式安装包。
安装
$ sudo sh cuda_xx.x.x_xxx.xx.xx_linux.run
deviceQuery $ ./deviceQuery ./deviceQuery Starting... CUDA Device Query (Runtime API) version (CUDART static linking) Detected 1 CUDA Capable device(s) Device 0: "NVIDIA GeForce GTX 1060 6GB" CUDA Driver Version / Runtime Version 11.6 / 11.
Install
# clone
git clone https://github.com/ultralytics/yolov5
cd yolov5

# create virtual python environments
python -m venv yolov5_env
source yolov5_env/bin/activate
python -m pip install --upgrade pip

# install
pip install -r requirements.txt
Inference import torch # Model model = torch.hub.load('ultralytics/yolov5', 'yolov5s') # or yolov5m, yolov5l, yolov5x, custom # Images img = 'https://ultralytics.com/images/zidane.jpg' # or file, Path, PIL, OpenCV, numpy, list # Inference results = model(img) # Results results.print() # or .show(), .save(), .
没有找到匹配的文章
