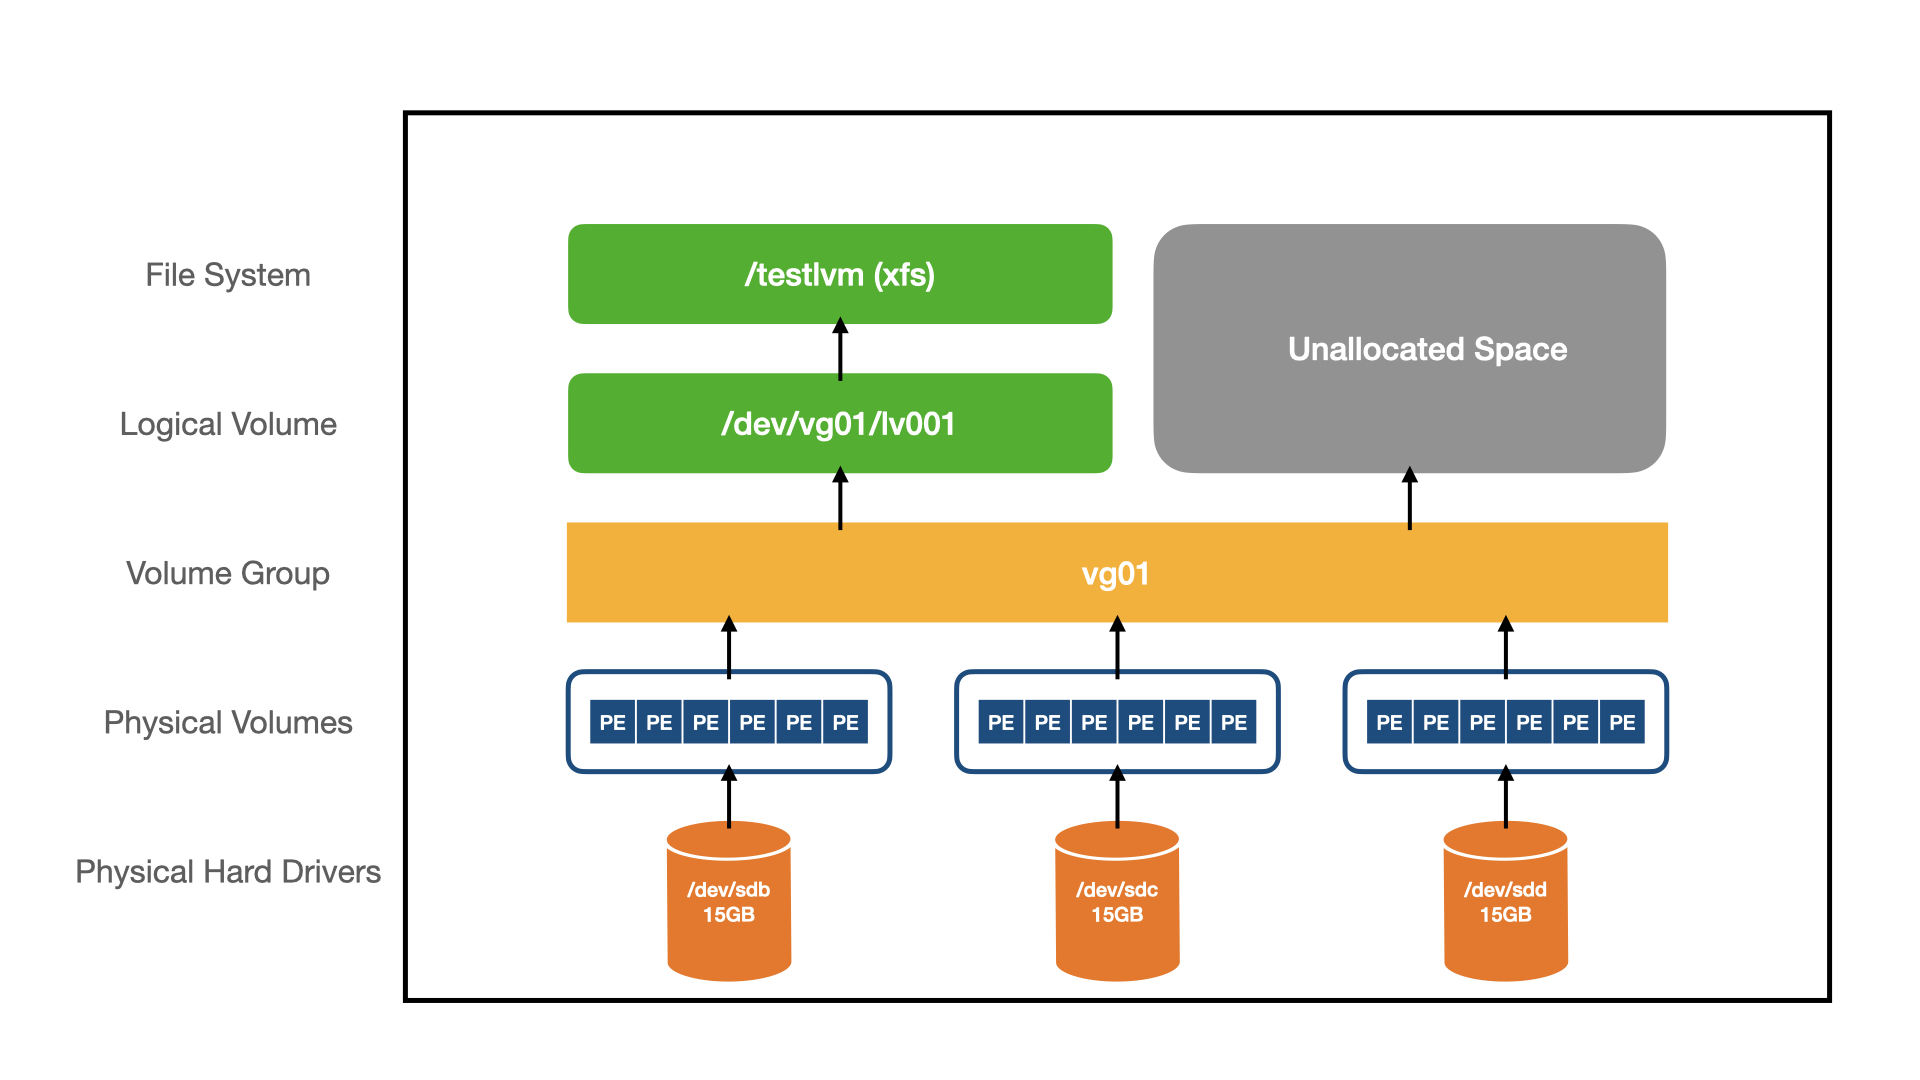
66 篇文章带有标签 “Linux”

GPU 服务器不能访问

13 号 上午 GPU 服务器突然不能访问了,可以通过 CPU 服务器访问 GPU 服务器。这一周一直在查找问题,这里记录一下过程。

  • CPU 服务器
traceroute cpu1
traceroute to cpu1 (172.16.33.157), 64 hops max, 52 byte packets
 1  * * *
 2  172.16.136.2 (172.16.136.2)  7.827 ms  4.712 ms  3.162 ms
 3  * * *
 4  cpu1 (172.16.33.157)  8.619 ms  4.205 ms  4.982 ms

使用 wrk 对 FastAPI 上传和下载文件的基准测试

服务器 CPU 40核,内存 256G,操作系统 Ubuntu 20.04,Python3.9

wrk 的 lua 脚本:postfile_formdata.lua

wrk.method = "POST"
local f = io.open("postdata", "rb")
wrk.body   = f:read("*all")
wrk.headers["Content-Type"] = "multipart/form-data; boundary=gouchicao0123456789"

wrk 的 lua 脚本:postfile_json.lua

wrk.method = "POST"
local f = io.open("postdata.json", "rb")
wrk.body   = f:read("*all")
wrk.headers["Content-Type"] = "application/json"

/file_benchmarking/upload/binary/chunk/async_func/async_rw wrk -c100

Linux 性能优化

当平均负载高于 CPU 数量 70% 的时候,你就应该分析排查负载高的问题了。一旦负载过高,就可能导致进程响应变慢,进而影响服务的正常功能。 70% 这个数字并不是绝对的,最推荐的方法,还是把系统的平均负载监控起来,然后根据更多的历史数据,判断负载的变化趋势。当发现负载有明显升高趋势时,比如说负载翻倍了,你再去做分析和调查。

$ uptime
 12:51:13 up 754 days,  2:02,  3 users,  load average: 0.41, 0.65, 2.63

strees: --cpu cpu压测选项,-i io压测选项,-c 进程数压测选项,--timeout 执行时间

  • mpstat 是一个常用的多核 CPU 性能分析工具,用来实时查看每个 CPU 的性能指标,以及所有 CPU 的平均指标。-P ALL监视所有cpu
  • pidstat 是一个常用的进程性能分析工具,用来实时查看进程的 CPU、内存、I/O 以及上下文切换等性能指标。-u 显示cpu利用率

运行 uptime 查看平均负载的变化情况

$ watch -d uptime
 13:00:09 up 754 days,  2:11,  3 users,  load average: 2.84, 1.87, 2.24

运行 mpstat 查看 CPU 使用率的变化情况 # -P ALL 表示监控所有CPU,后面数字5表示间隔

FastAPI 上传和下载文件的基准测试

使用 FastAPI 实现了文件的上传和下载,部署服务使用了 uvicorn 和 gunicorn+uvicorn 两种方法。

基准测试工具使用的是 wrk

服务器 CPU 40核,内存 256G,操作系统 Ubuntu 20.04,Python3.9

stream 异步读取上传的文件,同步写入 tempfile.NamedTemporaryFile() 生成的文件。 http://172.16.33.159:8000/files/upload/stream/async_read_and_memory_write stream 异步读取上传的文件,同步写入磁盘文件。 http://172.16.33.159:8000/files/upload/stream/async_read_and_disk_write stream 异步读取上传的文件,异步写入磁盘文件。 http://172.16.33.159:8000/files/upload/stream/async_read_and_async_write 异步全量读取上传的文件,异步写入磁盘文件。 http://172.16.33.159:8000/files/upload/single 异步全量读取上传的文件,异步写入磁盘文件。(API 函数定义时没有使用 async) http://172.16.33.

Install Python3.9 in Ubuntu20.04

在看到这个错误,首先想到的就是安装包 python3.9-distutils,但是在安装的时候看到它依赖的安装包都是 python3.8 的。没有找到更好的解决方法,这里找到一个解释

I believe this is a bug in Debian's Python package. Their modifications to Python have been a source of a long standing debate: https://gist.github.com/tiran/2dec9e03c6f901814f6d1e8dad09528e has a lot of discussion.
I think that is the issue, Ubuntu packages are inconsistent, i.e. python3.8 and python3.9 bring different set of modules, as well as have different set of decencies, while all that should really differ is just Python version. Same applies for python3.[89]-minimal. However, all 4 are consentient in one thing - not having sys.prefix/lib/pythonX.Y/site-packages in sys.path
To have that (and distutils) sorted, one needs to install a collection of python3 packages, but those are Python3.8 (and bring tons of semi-random libraries and so).

All Ubuntu provided Python3.[89] 'installations' have ensurepip removed. I think, the 'logic' is to force people to use python3-pip that (unless --no-install-recommends is used) brings whole tone of things including make, cpp and perl(!)

I strongly recommend filing an issue with Debian and Ubuntu for this -- while pip can do things to paper over the issue, the fundamental problem is that the Python installation is not proper. Part of the problem is that Debian users don't ask Debian's maintainers to make fixes for the things they break.
I will consider that.

manually installing distutils
How did you do this? If you've used what is available in CPython's source tree, then you've installed an incompatible distutils for the Python interpreter -- Debian relies on patches they make to distutils to keep things working.
Installing might be a bit of overstatement, since I am working with Docker container I am doing:

COPY --from=python:3.9-slim /usr/local/lib/python3.9/distutils /usr/lib/python3.9/distutils
I would do FROM python:3.9-slim but I have to rely on specific 'base' container.
python:3.9-slim has FROM debian:bullseye-slim

命令 nc

  1. 发送 HTTP 请求。
curl http://ip:port/
GET /?name=wjj HTTP/1.1
Host: 127.0.0.1:8000
User-Agent: curl/7.61.1
Accept: */*
POST /users_by_json HTTP/1.1
Host: 127.0.0.1:8000
User-Agent: curl/7.61.1
Accept: */*
Content-Type: application/json
Content-Length: 36

{
    "name": "wjj",
    "age": 40
}

基于健康码识别的 FastAPI 同步和异步函数的基准测试

健康码识别服务使用了 FastAPI 进行开发的,本周主要工作是为了对健康码识别的服务进行性能调优。接口函数使用了 async 关键字,但是内部的实现并没有使用 await。由于改写成异步代码需要时间,这里并没有改写代码,只是删除了 async 关键字。部署服务使用了 uvicorn 和 gunicorn+uvicorn 两种方法。

基准测试工具使用的是 ab

  • 4 个进程可以发挥到最佳效果
  • 8 个进程已经到了上限了
  • 在部署这种密集计算的应用下,gunicorn + uvicorn 并没有比 uvicorn 强,但如果您需要管理进程,它们就是最佳组合。
  • 通过基准测试发现,最大的瓶颈不是 GPU,而且 CPU,GPU 一张卡的负载还没有 40 核 CPU 的负载高。

异步(使用了 async 关键字)函数,在压测的过程中基本上不会失败(Failed),同步函数,在压测过程中会经常失败,随着并发数的增加而增加。目前还没有找到原因

我删库了, rm -rf *

今天,我“删库”了......

/data$ ll logs/
rm -rf *

我在根目录查看子目录的信息,确认是想删除的数据,然后顺手执行了 rm -rf * ,杯具产生了......

拼命补救,没成功......

查看目录或文件的 inode id

$ ls -id /
2 /

$ ls -id /usr/
28966913 /usr/

$ ls -id /usr/bin/bash
28967390 /usr/bin/bash

命令tr

$ df -h
Filesystem      Size  Used Avail Use% Mounted on
udev            126G     0  126G   0% /dev
tmpfs            26G  4.0M   26G   1% /run
/dev/sda2       548G   50G  471G  10% /
tmpfs           126G     0  126G   0% /sys/fs/cgroup
/dev/sda1       511M  7.9M  504M   2% /boot/efi
/dev/sdb1       2.0T  4.7G  1.9T   1% /data
$ df -h | tr a-z A-Z

使用终端浏览Markdown和HTML

sudo pip install grip
sudo apt install lynx

grip -b README.md
lynx http://localhost:6419/
sudo apt install pandoc
pandoc README.md -t plain | less
sudo apt install lynx
sudo apt install pandoc

pandoc index.html | lynx -stdin
sudo pip install grip

grip -b index.html

Linux下查看img文件内容

img 磁盘镜像文件

  1. 挂载分区
$ sudo mount -o loop,offset=201326592 sdcard.img /mnt/
  1. 查看分区内容
$ ls /mnt/
bin  boot  dev  etc  home  lib  lost+found  media  mnt  opt  proc  root  run  sbin  srv  sys  tmp  usr  var

命令man help info

  • man man
......
    下表显示了手册的 章节 号及其包含的手册页类型。

    1   可执行程序或 shell 命令
    2   系统调用(内核提供的函数)
    3   库调用(程序库中的函数)
    4   特殊文件(通常位于 /dev)
    5   文件格式和规范,如 /etc/passwd
    6   游戏
    7   杂项(包括宏包和规范,如 man(7),groff(7))
    8   系统管理命令(通常只针对 root 用户)
    9   内核例程 [非标准]
......
  • 查看指定章节
man 7 man
man man.7
  • 寻找所有匹配(-a, --all 寻找所有匹配的手册页)
man -a passwd
--Man-- 下一页: passwd(5) [ 查看 (return) | 跳过 (Ctrl-D) | 退出 (Ctrl-C) ]
  • 内部命令使用 help
help cd
cd --help
  • 外部命令使用 help
ls --help
info cd

命令base64

  • 解码(正确,这里之所以正确是因为base64过滤了。)
$ echo 'YWRtaW4=' | base64 -d
admin[username@hostname ~]$
  • 编码(错误,这是因为 echo 输出字符后会在后面再输出换行符。)
$ echo 'admin' | base64
YWRtaW4K
  • 方法一:使用 printf 命令。
$ printf 'admin' | base64
YWRtaW4=
  • 方法二:可以通过参数 -n 告诉 echo 不输出换行符。
$ echo -n 'admin' | base64
YWRtaW4=

方法三:可以通过参数 -e 告诉 echo 启用反斜杠转义的解释。

SSH X11 Forwarding

  • 验证
xclock
xeyes

  • 配置XAuth
$ vim ~/.ssh/config
Host *
    XAuthLocation /opt/X11/bin/xauth
  • SSH登录,可以尝试使用 ssh -X -vv 查看更多的失败信息。
$ ssh -X username@hostname
(base) username@hostname:~$ gedit