DeepSeek Harness 产物浏览器插件开发最佳实践
本文档以
@wangjunjian/dsh-artifact-viewer为实例,系统梳理 DeepSeek Harness(DSH)bundle 插件的开发方法:工作原理、架构设计、构建打包、测试、发布自动化,以及开发和发布过程中实际踩过的坑。
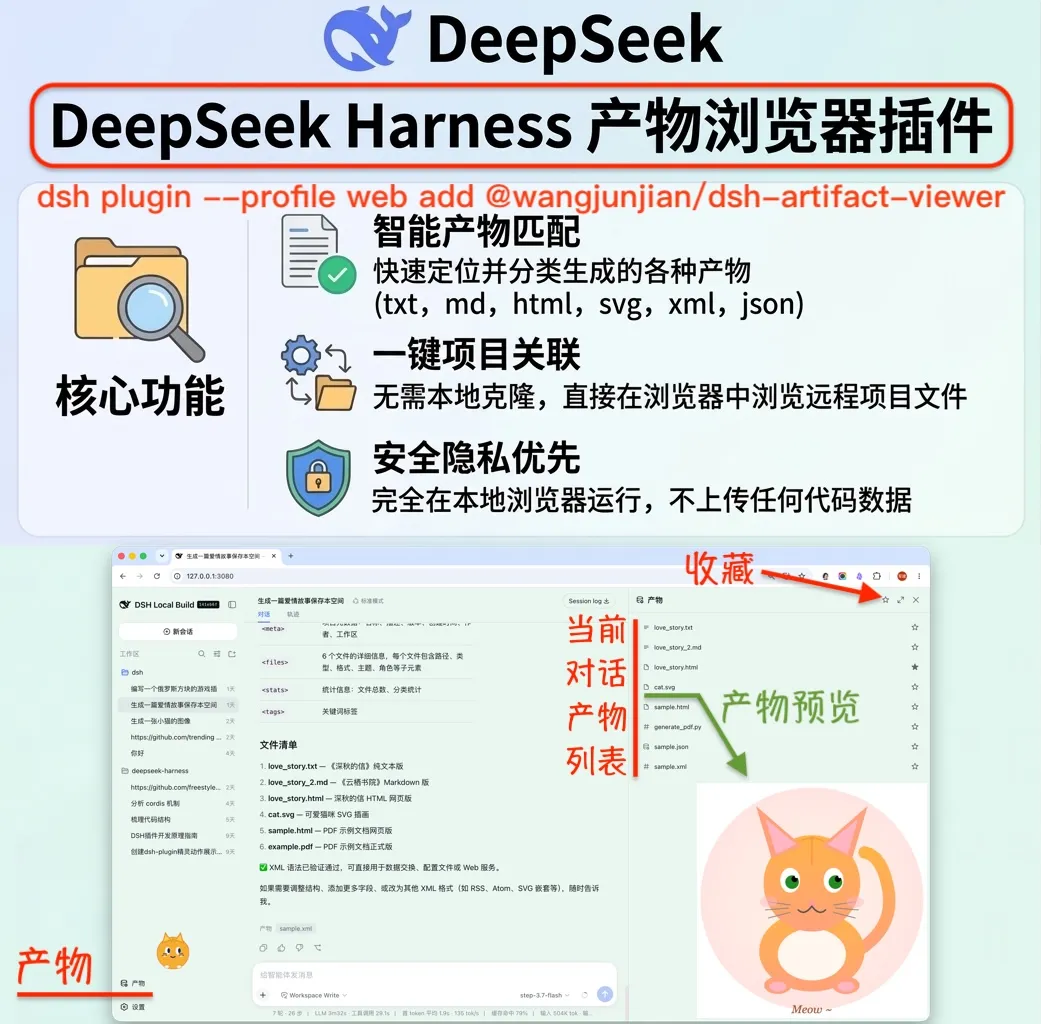
1. 工作原理
Bundle 插件是什么
DSH 的 bundle 插件是一个普通 npm 包,通过 package.json 里的 dsh 字段声明自己:
{
  "dsh": {
    "bundle": { "patch": "./cordis.patch.yml" },
    "client": {
      "platform": "web",
      "inject": ["@deepseek-ai/dsh-client-runtime"],
      "external": ["@deepseek-ai/dsh-client-ui-primitives"]
    }
  }
}
dsh.bundle.patch:指向一个 cordis patch 文件,负责把插件注册进 loader 树。dsh.client:声明浏览器半部分的运行平台、注入依赖和 external 包。
加载链路
-
用户执行
dsh plugin --profile web add <pkg>,CLI 实际是把pnpm add转发到 profile 目录(~/.dsh/profiles/web/),然后对账dsh.profile.bundles:安装了 且声明了dsh.bundle的包追加进 bundles 列表,卸载的移出。 -
DSH 启动时按 bundles 列表逐层应用各包的
cordis.patch.yml。本插件的 patch 只有 一行 insert:- insert: - id: artifact-viewer name: '@wangjunjian/dsh-artifact-viewer' -
loader 加载包的 Node 入口(
lib/index.js,即 host 半部分),调用apply(ctx, config)。 -
浏览器端由 web shell 通过
window.__ModuleLoader__.load(...)加载 client bundle (lib/client.js),模块表里冻结了 react、cordis 等共享依赖。
配置覆盖
用户可以在 profile 的 cordis.patch.yml 里按 id 覆盖插件配置:
- id: artifact-viewer
  config:
    enabled: true
2. 架构设计:host 端与 client 端分离
DSH 插件由两个半部分组成:
- Host 半部分(
src/index.ts):在 Node 端运行,负责持久化数据、文件系统访问、 RPC 注册。 - Client 半部分(
src/client/index.ts):在浏览器端运行,负责注册 slot、渲染 UI、响应用户交互。
实践要点
- host 端通过
connection.rpc.handle(channel, handler, { authority: 'loopback' })暴露本地 RPC。 - client 端通过
ctx.slots.inject监听 slot 声明,并通过ctx.slots.register注册组件。 - 跨端通信只走 RPC 通道,不要在 client 端直接访问 Node API。
- 用 schemastery 定义 config schema 并给出默认值,
apply()里读到的就是带默认值的配置。
3. 开发要点
3.1 RPC 通道命名
踩坑:最初使用 /plugin/artifact-viewer 作为 RPC channel,DSH 启动时报错:
connection: invalid or reserved RPC channel "/plugin/artifact-viewer"
推荐做法:
- 不要使用
/plugin/*前缀,该前缀被 DSH 保留。 - 使用应用自定义的短路径,例如
/artifact-viewer。 - 在 client 和 host 端使用同一个常量,避免拼写不一致。
3.2 Slot 注册与优先级
踩坑:注册 conversation.message.images 时使用默认优先级,报错:
single slot "conversation.message.images" already has a registration at priority 0
推荐做法:
- 替换 single slot 时,设置
priority: -1以 shadow 默认实现。 - additive slot(如
sidebar.footer.action、conversation.session.header.actions) 通常不需要调整优先级,按order排序即可。 - 在注册前先用
ctx.slots.inject声明注入,确保依赖的 slot 已存在。
3.3 状态管理
- 使用
@deepseek-ai/dsh-client-runtime/client提供的defineStore创建面板状态。 - actions 是 Immer draft mutator,写法简洁且类型安全。
- 通过
createArtifactViewerStore().create()可在测试中获得真实 store 实例,无需 mock hook。
3.4 会话与书签
获取当前会话:
- 通过
ctx.sessions.list.getSnapshot().current获取当前会话 ID。 - 使用
ctx.sessions.binding(sessionId).session订阅会话快照。 - 封装为
CurrentSessionSource便于组件消费。
持久化收藏:
- 收藏数据保存在 DSH home 下的
~/.dsh/storages/artifact-viewer/bookmarks.json, 通过@deepseek-ai/dsh-home-paths解析,支持$DSH_HOME覆盖。 - 写文件时使用
writeFile(tmp)+rename(tmp, file),保证原子性。 - bookmark 记录中保留
sessionId,用于后续”跳转回源会话”功能。 - 以
fs.realpath规范化projectPath作为存储 key,避免 macOS 上/var/foldersvs/private/var/folders这类符号链接差异导致不同浏览器读写分裂。
跳转源会话:
- 注入
ctx.sessions.open(sessionId)到面板 face。 - 只在收藏(bookmarks)标签页显示”打开对话”按钮,当前会话产物不需要。
3.5 UI 设计原则
侧边栏按钮:
- 注册到
sidebar.footer.action,样式参考 DSH 设置按钮,保持左对齐和一致的尺寸。 - 区分
wide和 rail 模式,rail 模式下只显示图标。
右侧面板:
- 注册到
shell.overlay,默认以悬浮面板形式展示。 - 标题栏从左到右:产物图标/标题、预览标签页、操作按钮(收藏、放大、关闭)。
- 操作按钮右对齐,使用图标按钮减少视觉噪音。
标签页行为:
- 点击产物列表中的文件打开新标签页,已打开则激活。
- 标签页标题自适应宽度,超出时隐藏最早标签,关闭后自动释放空间。
- 标签页本身使用真实
<button>,而不是div role="button",满足 a11y。
文件预览:
| 类型 | 推荐渲染方式 |
|---|---|
| HTML/HTM | 沙箱 iframe |
| Markdown | MarkdownText |
| 图片/SVG | <img> |
| 源代码/JSON | CodeBlock,但隐藏自带标题和复制按钮,自行控制样式 |
| 纯文本 | <pre> |
- 文本文件读取后先校验 UTF-8(
TextDecoderfatal 模式),避免二进制文件显示乱码。 - 二进制文件走 base64 通道。
3.6 拦截会话中的文件链接
DSH 本身提供了多个展示生成文件的可点击表面,默认行为是调用宿主默认应用打开。为了 让这些链接都走插件自己的预览面板,推荐在面板组件里注册一个全局 capture 阶段点击 监听器,而不是替换每一个 slot。
原因:
conversation.chat.turnTail、conversation.message.images、tool.call.toolview等 slot 彼此独立,逐个替换工作量大。- 默认的
FileMutationRow等组件未 export,替换会丢失 diff 预览等原生功能。 - 事件委托只需识别 DOM 特征,不影响 DSH 默认渲染。
需要拦截的表面:
| 表面 | DOM 特征 | 路径来源 |
|---|---|---|
| 工具行文件链接 | className 包含 fileLink 的 <button> | textContent |
ui-deliverables 产物 chip | [data-produced-files-row] 内的 <button> | title |
| 结束语文件提及 | className 包含 fileMention 的 <button> | title |
| Markdown 本地链接 | <a> 的 href | getAttribute('href') |
行内 <code> 绝对路径 | <code>(排除 <pre> 内) | textContent |
实现要点:
- 使用
document.addEventListener('click', handler, true)在 capture 阶段拦截, 然后preventDefault()+stopPropagation(),确保 DSH 原生的openFile不会执行。 - 对
<a>要跳过http/https/ftp/mailto/data/blob等外部 URL;对file://前缀 做剥离。 - 把路径写入共享 store 的
pendingOpenPath,再用useEffect异步解析:- 以
/开头的视为绝对路径;否则按相对路径拼上projectPath。 - 先在当前会话已采集的 artifact 中匹配,命中则直接打开;未命中则创建临时
DisplayItem预览。
- 以
- 全局监听器只在面板组件挂载期间存在,依赖
actions(DSH store 的 actions 是稳定的)。
注意事项:
~/路径在浏览器端无法直接展开,建议要么在 host RPC 增加展开端点,要么暂时不拦截。- 只拦截有明显文件特征的 DOM,避免把普通链接、命令、锚点也抢走。
- 捕获阶段拦截后,
<code>文本的复制/选择行为会受影响;若后续需要保留选择,可在 handler 里区分单击与拖拽。
3.7 背景与全屏适配
踩坑:用户设置背景图片后,面板放大到全屏会出现背景”重叠加模糊”。
解决方案:
- 检测当前主题背景:
getComputedStyle(body).getPropertyValue('--dsw-alias-bg-base')是否包含url(/transparent- 或
getComputedStyle(body).backgroundImage !== 'none'
- 如果是图片/透明背景,给全屏面板添加
.opaque类,使用静态不透明色并移除backdrop-filter。 - 纯色背景时保留半透明毛玻璃效果。
3.8 图标与视觉一致性
- 优先使用
@deepseek-ai/dsh-client-ui-primitives提供的图标。 - 需要自定义图标时(如五角星收藏),保持 16×16 viewBox、1.4 strokeWidth、一致的 圆角/连接风格。
- 所有自定义 SVG 图标统一风格,避免视觉大小不一。
4. 构建与打包
DSH 共享的 clientBundle 预设未对外发布,插件需要在自己的 tsdown.config.ts 里
复刻同样的产物格式。
4.1 tsdown 配置要点
- client bundle 输出为 CJS 格式,通过
banner/footer/intro包裹成__ModuleLoader__.load({ id, factory })形式注册到浏览器模块表。 - 将
react、react-dom、@deepseek-ai/cordis等模块表内包声明为 external (deps.neverBundle),其余依赖全部内联。 - 对 CSS Modules 使用
lightningcss编译(cssModules: { pattern: '[hash]_[local]' }), 并通过虚拟模块把 CSS 注入为插件自己的<style data-plugin-css>标签,附带去重判断。 - tsc 只编译 TS 不拷贝样式表,resolveId 里要把
lib/路径映射回src/再读 CSS。 define里注入process.env.NODE_ENV和import.meta.env.MODE,避免浏览器端 引用未定义变量。
4.2 Purity gate
- 在 tsdown plugin 的
resolveId中检查@deepseek-ai/*导入:凡不在模块表白名单 里的直接 throw,阻止其被内联,避免运行时 scope tag 不匹配。 - 类型导入在编译期已被擦除,不会误伤。
4.3 TypeScript 配置
module/moduleResolution用NodeNext,源码里相对导入写.js后缀。declarationDir单独输出到lib/types,与 JS 产物分离。- 产物(
lib/)不提交 git:.gitignore忽略之,npm 包内容由files字段控制。
5. 测试
Host 端测试
- 使用
vitest+ 临时目录,测试 RPC handler 的读写、文件预览、错误码。 - mock
connection.rpc.handle收集 handler。
Client 端测试
- 使用
@testing-library/react+jsdom,用environmentMatchGlobs按文件后缀 切换环境。 - 注意 DSH 与插件项目可能存在两个 React 副本,需在
vitest.config.ts中配置 alias 指向本项目的 react/react-dom。路径必须用fileURLToPath(new URL('./node_modules/...', import.meta.url))之类的方式从配置文件位置解析,不要写绝对路径——否则换机器或 CI 直接挂掉。 - 避免直接测试依赖 DSH module loader 的组件;优先测试纯 props 组件。
6. 发布到 npm
6.1 package.json 检查清单
name:scoped 包(如@wangjunjian/dsh-artifact-viewer)。publishConfig.access: "public":scoped 包默认 private,必须显式声明。exports:同时给出types和default;额外导出./cordis.patch.yml(loader 需要读它)和./package.json。files:白名单控制发布内容(lib/、patch、README、LICENSE、docs)。peerDependencies:react 和@deepseek-ai/*全部声明为 peer,由宿主提供;dependencies只放真正需要随包安装的(如 schemastery)。packageManager:固定 pnpm 版本,供 CI 的pnpm/action-setup自动读取。scripts.prepare:tsc -b && tsdown,保证从 git 安装或npm publish时产物总是新的。
6.2 发布前验证
pnpm run lint && pnpm run typecheck && pnpm run test && pnpm run build
npm pack --dry-run   # 检查 tarball 内容是否符合预期
6.3 首次发布与 2FA
- 账号开了 2FA(Authorization and Publishing 模式)时,本机
npm publish需要--otp=<code>,或一个勾选了 “Bypass two-factor authentication” 的 granular token。 - granular token 的 “Packages and scopes” 必须覆盖目标 scope;发布尚不存在的新包 时如果 token 只授权了指定的已有包,会得到误导性的 404。
- 注意 npm 已宣布将逐步限制 bypass-2FA token 用于直接发布,长期方案是 trusted publishing(见下节)。
- 刚发布成功立刻
npm view可能 404,registry 元数据有几分钟的传播延迟;可先用 带 token 的请求确认包已存在。
7. GitHub Actions 自动化发布
本项目有两个工作流(.github/workflows/)。
7.1 CI(ci.yml)
- 触发:push 到 main + 所有 PR。
- 步骤:
pnpm/action-setup→actions/setup-node(cache: pnpm)→pnpm install --frozen-lockfile→ lint → typecheck → test → build。 - Node 版本与本地保持一致(22)。
name: CI

on:
  push:
    branches: [main]
  pull_request:

permissions:
  contents: read

jobs:
  check:
    runs-on: ubuntu-latest
    steps:
      - uses: actions/checkout@v4

      - uses: pnpm/action-setup@v4

      - uses: actions/setup-node@v4
        with:
          node-version: 22
          cache: pnpm

      - run: pnpm install --frozen-lockfile
      - run: pnpm run lint
      - run: pnpm run typecheck
      - run: pnpm run test
      - run: pnpm run build
7.2 发布(release.yml)
- 触发:GitHub Release 发布时(
release: types: [published]),而不是 tag push—— Release 流程更清晰,且天然带上版本语义。 - 权限:
contents: read+id-token: write(OIDC 必需)。 - 先完整跑一遍 lint/typecheck/test/build,再:
- 校验版本一致性:release tag(去掉
v前缀)必须等于 package.json 的version,不一致直接 fail,防止发错版本。 - 升级 npm CLI:trusted publishing 要求 npm ≥ 11.5.1,而 Node 22 自带 npm 10,
需要
npm install -g npm@latest。 npm publish --provenance --access public。
- 校验版本一致性:release tag(去掉
name: Publish

on:
  release:
    types: [published]

permissions:
  contents: read
  id-token: write # required for npm trusted publishing (OIDC)

jobs:
  publish:
    runs-on: ubuntu-latest
    steps:
      - uses: actions/checkout@v4

      - uses: pnpm/action-setup@v4

      - uses: actions/setup-node@v4
        with:
          node-version: 22
          cache: pnpm

      # Trusted publishing requires npm >= 11.5.1; Node 22 ships npm 10.
      - name: Upgrade npm for trusted publishing
        run: npm install -g npm@latest

      - run: pnpm install --frozen-lockfile
      - run: pnpm run lint
      - run: pnpm run typecheck
      - run: pnpm run test
      - run: pnpm run build

      - name: Verify release tag matches package.json version
        run: |
          tag="${GITHUB_REF_NAME#v}"
          version="$(node -p "require('./package.json').version")"
          if [ "$tag" != "$version" ]; then
            echo "release tag '${GITHUB_REF_NAME}' does not match package.json version '${version}'"
            exit 1
          fi

      - name: Publish to npm
        run: npm publish --provenance --access public
7.3 npm Trusted Publishing 配置(一次性)
OIDC 免 token 发布必须在 npm 侧登记信任关系,否则最后一步会报 ENEEDAUTH:
- 包必须先已存在于 npm(首次发布可以先本地手动发一版)。
- 打开
https://www.npmjs.com/package/<pkg>/access→ Trusted Publishers → GitHub Actions,填写:- Organization or user:如
wang-junjian - Repository:如
dsh-artifact-viewer - Workflow filename:
release.yml - Environment:留空
- Allowed actions:勾选
Allow npm publish
- Organization or user:如
- 之后每次发版:bump version → commit/push → 在 GitHub 创建 Release → 工作流自动 完成发布(具体命令见下节)。
7.4 日常发版流程(完整命令序列)
每次发布新版本,按顺序执行:
# 1. bump package.json 的 version(如 0.2.0 → 0.2.1),提交并推送
git commit -am "release: v0.2.1"
git tag v0.2.1
git push origin main --tags

# 2. 创建 GitHub Release —— 这是触发发布工作流的关键一步,
#    必须在 tag push 之后单独执行(tag 本身不是 Release)
gh release create v0.2.1 --title "v0.2.1" --notes "本次变更说明"

# 3. 观察发布结果
gh run watch --workflow=Publish      # 或在 Actions 页面查看
npm view <pkg> version               # 确认 latest 已更新(新包有几分钟传播延迟)
也可以在 GitHub 网页上操作:Releases → “Draft a new release” → 选择已推送的 tag →
Publish release,效果与 gh release create 完全相同。
易错点:gh release create 用的是已存在的 tag,不会重复打 tag;如果 tag 忘了
push,gh release create 会提示选择或创建 tag,注意核对指向的 commit。
踩坑记录:git push --tags 不会触发 release: [published]——tag 只是 Git 引用,
GitHub Release 是独立的对象。只 push tag 时 Actions 里只会出现 CI 工作流(显示名是
commit message,如 “release: v0.2.1”,容易被误认为发布已成功),Publish 工作流不会
运行,Releases 页面也没有对应条目。发布失败后(例如 trusted publisher 尚未配置),
配置好原因并在 Actions 页面 “Re-run failed jobs” 即可,无需重建 Release。
8. 安装与升级注意事项
8.1 peer dependency 警告是正常的
dsh plugin add 时 pnpm 会警告插件缺少 react、@deepseek-ai/* 等 peer 依赖——
这是预期行为:profile 目录不安装这些包,运行时由 web shell 的模块表提供。
只要警告而不是错误,就不用管。
8.2 包改名/换 scope 后的重复注册
踩坑:包从 @wang-junjian/dsh-artifact-viewer 改名为 @wangjunjian/dsh-artifact-viewer
后,profile 的 dsh.profile.bundles 里同时存在新旧两个条目(旧条目是 link: 本地
检出的遗留),两个包的 cordis.patch.yml 都 insert id: artifact-viewer,启动报错:
duplicate loader entry id: artifact-viewer
原因:dsh plugin 按依赖键名对账 bundles 列表,旧的 link 依赖键仍然能解析出
patch 文件,不会被自动清理。
修复:移除旧依赖即可,对账逻辑会自动把它从 bundles 里删掉:
dsh plugin --profile web remove @wang-junjian/dsh-artifact-viewer
教训:插件改名或换 scope 后,提醒用户先 remove 旧包名再 add 新包名。
9. 代码规范
- 使用 Biome 进行 lint 和 format,配置
lineWidth: 120、单引号、trailing commas。 - package.json 中提供
lint、lint:fix、format脚本。 - 提交前至少跑通
lint、typecheck、build、test。
10. 调试技巧
- 插件报错时优先查看 DSH 启动日志,常见错误:
- RPC channel 被保留
- single slot 优先级冲突
- module table 外部包被内联
- loader entry id 重复(bundle 被注册两次)
- 浏览器控制台查看
window.__ModuleLoader__可确认插件 bundle 是否加载。 - 样式问题先检查 CSS 变量是否被 DSH 主题正确赋值。
dsh plugin add的实际效果可以直接检查 profile 目录 (~/.dsh/profiles/web/package.json)里的dependencies和dsh.profile.bundles。
11. 推荐开发流程
- 在
src/index.ts实现 host 端 RPC。 - 在
src/client/index.ts注册 slot 并注入所需 face。 - 实现具体组件,保持组件纯 props,便于测试。
- 添加/更新 locale 文案。
- 运行
pnpm run lint、pnpm run typecheck、pnpm run build、pnpm test。 - 在 DSH 中通过
dsh plugin --profile web add <path>安装并验证。 - 迭代 UI 细节,注意主题背景和暗色模式。
- 发布:bump package.json 的 version →
git commit -am "release: vX.Y.Z"→git tag vX.Y.Z→git push origin main --tags→gh release create vX.Y.Z --title "vX.Y.Z" --notes "..."(详见 7.4)。