MCPHub 自定义服务器配置及内网部署(一)
本文档重点介绍了如何在内网(离线)集成和配置一个名为 “mcp-server-time” 的特定 MCP 服务器。首先指导用户如何 获取 MCPHub 容器的 Python 环境信息,包括版本和平台标签,以便下载兼容的 Python 包。接着,文档详细阐述了如何使用 pip download 命令 下载服务器及其依赖包,并解释了各个命令参数的用途。最后,展示了如何通过 编辑 custom/servers.json 和 custom/mcp_settings.json 文件 来自定义 MCP 服务器市场配置和运行时设置,并给出了 Docker Compose 配置示例,以实现自定义配置的替换并部署。
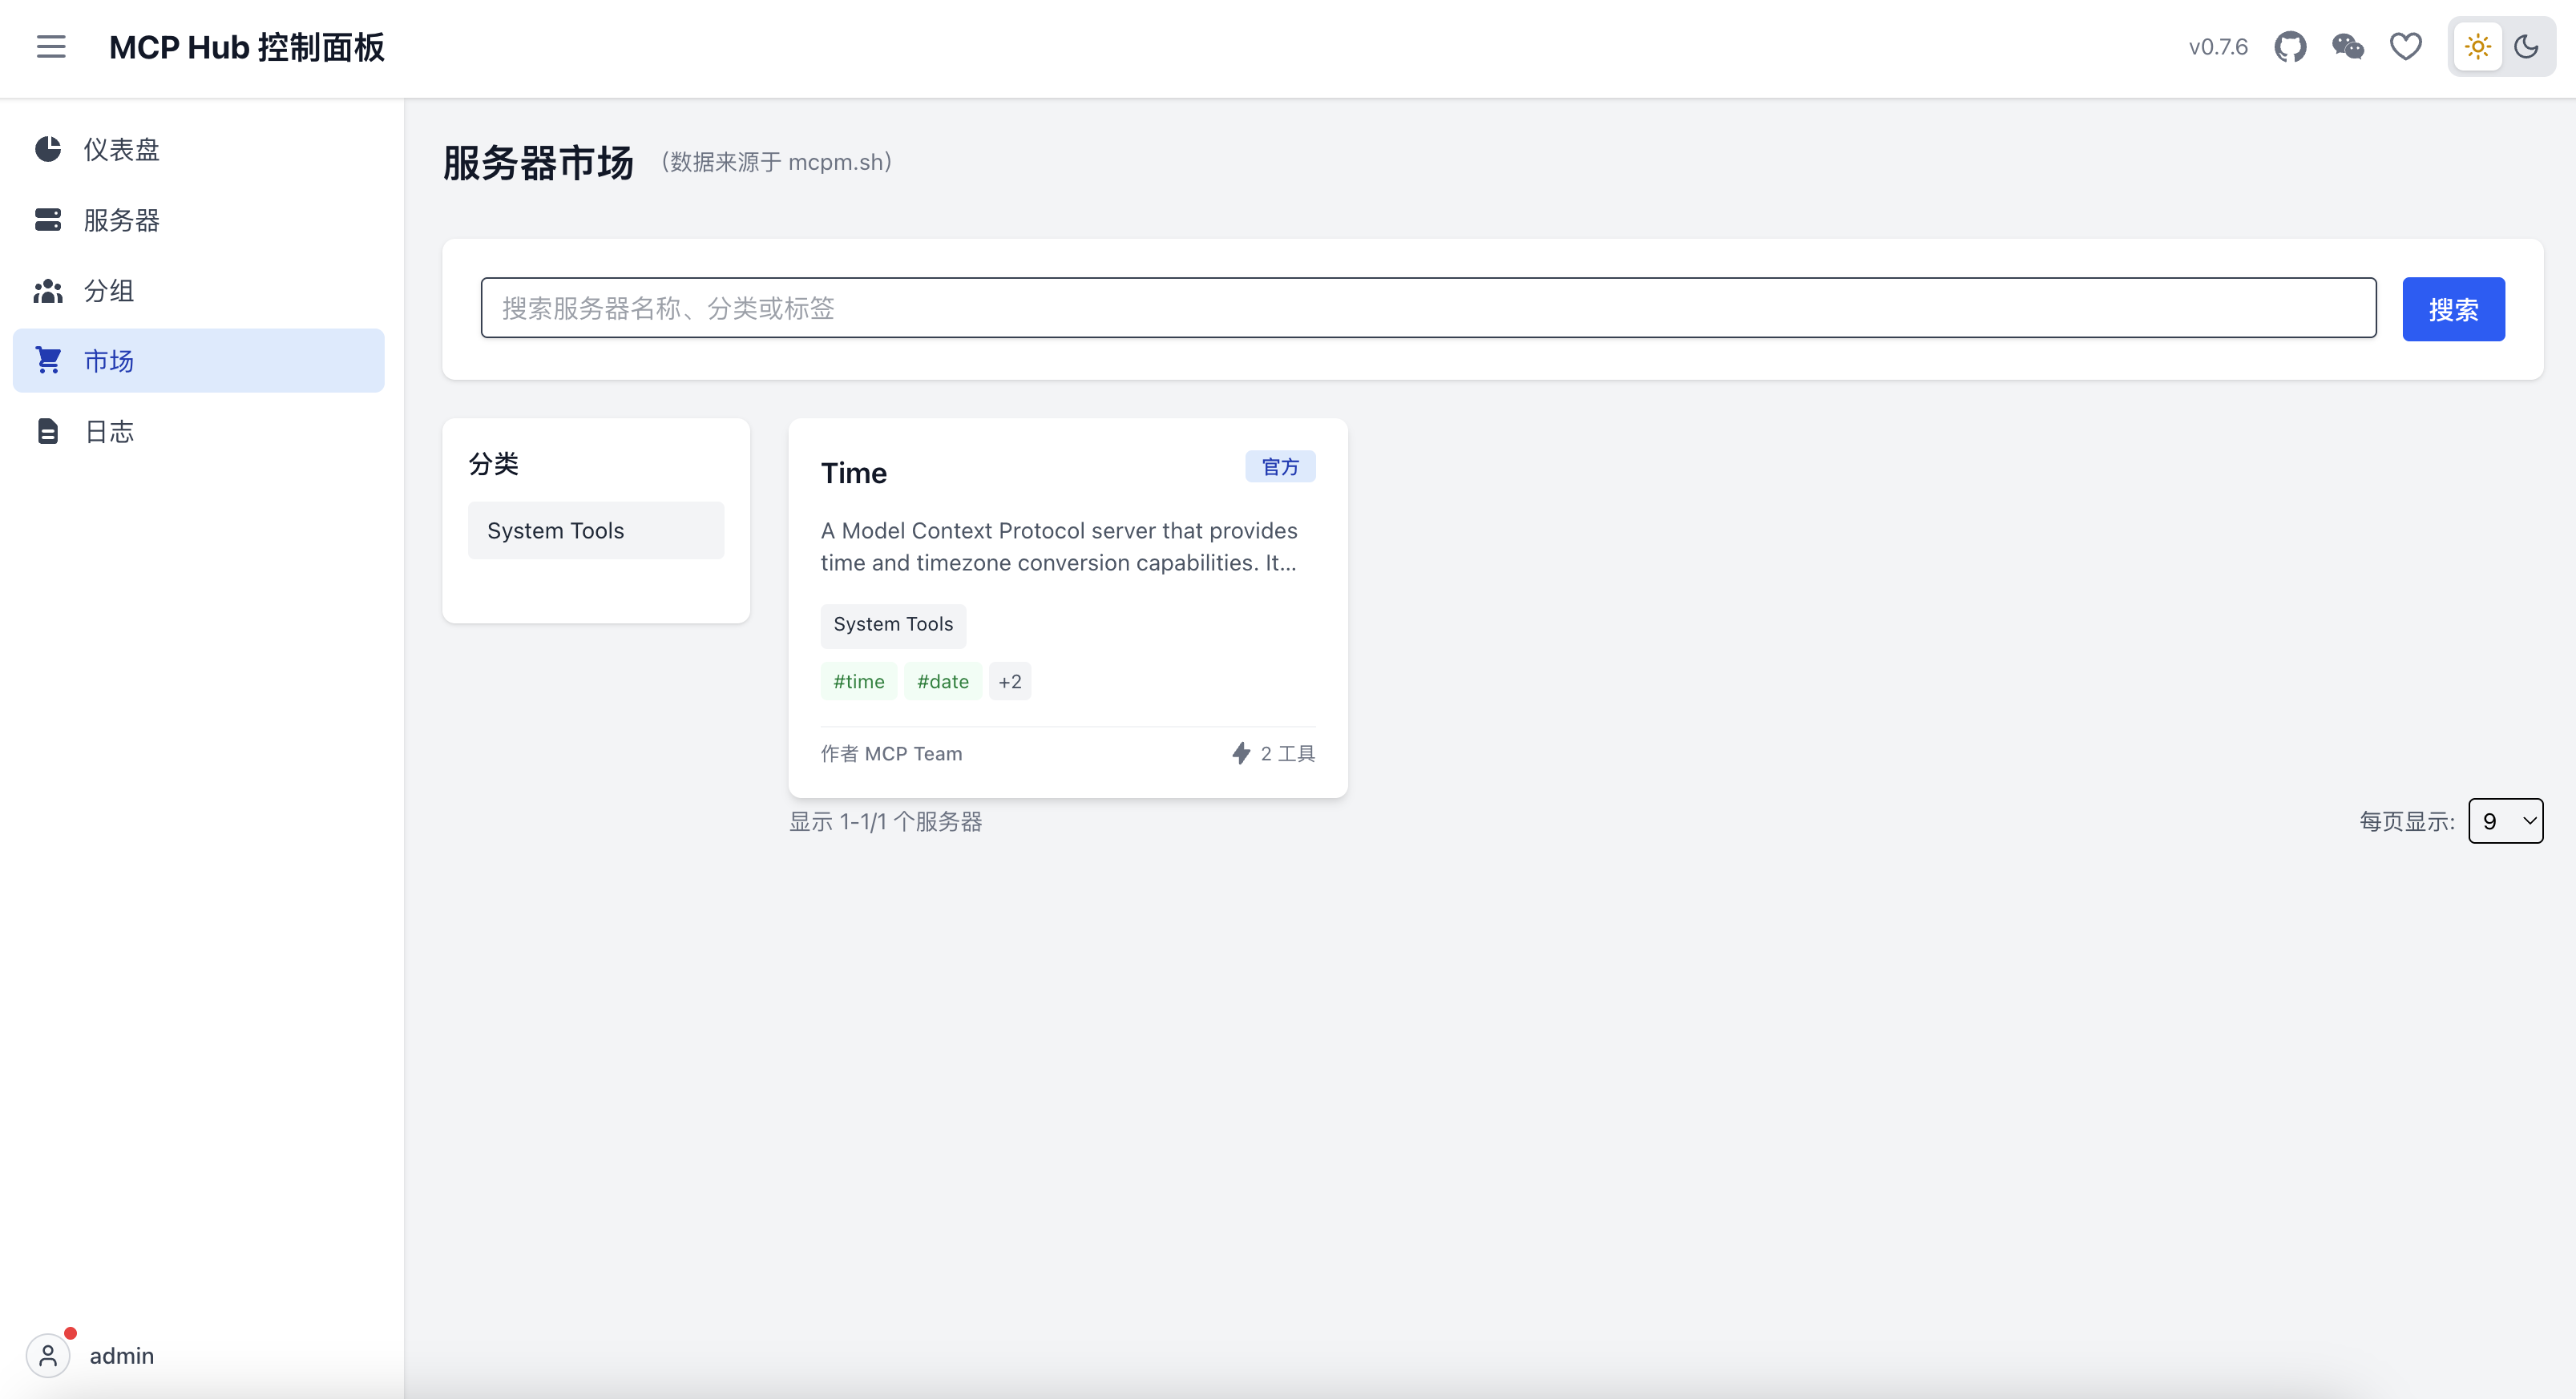
这里使用 mcp-server-time 作为示例。
查看 MCPHub 容器的 Python 环境信息(版本和平台)
进入 MCPHub 容器
docker exec -it mcphub bash
安装 packaging 库
pip install packaging
编辑 get_info.py
import sysconfig
import platform
from packaging.tags import platform_tags

def get_python_and_platform_info():
    """
    获取当前 Python 版本和平台标签信息。
    """
    # 获取 Python 版本
    # sysconfig.get_python_version() 返回 "X.Y" 格式,例如 "3.9"
    python_version = sysconfig.get_python_version()

    # 获取平台标签
    # platform_tags() 返回一个生成器,包含多个兼容的平台标签
    # 我们通常关心其中一个或全部,这里为了简洁,可以转换为列表
    current_platform_tags = list(platform_tags())

    print(f"当前的 Python 版本是: {python_version}")
    print(f"当前的平台标签是 (用于 --platform 参数):")
    for tag in current_platform_tags:
        print(f"  - {tag}")

    print("\n注意: 对于 --platform 参数,通常会选择最通用或最匹配的标签。")
    print("例如,在 Linux 上可能会看到 'manylinux_xxxx_x86_64' 标签。")

if __name__ == "__main__":
    get_python_and_platform_info()
运行脚本
python get_info.py
当前的 Python 版本是: 3.13
当前的平台标签是 (用于 --platform 参数):
  - manylinux_2_36_aarch64
  - manylinux_2_35_aarch64
  - manylinux_2_34_aarch64
  - manylinux_2_33_aarch64
  - manylinux_2_32_aarch64
  - manylinux_2_31_aarch64
  - manylinux_2_30_aarch64
  - manylinux_2_29_aarch64
  - manylinux_2_28_aarch64
  - manylinux_2_27_aarch64
  - manylinux_2_26_aarch64
  - manylinux_2_25_aarch64
  - manylinux_2_24_aarch64
  - manylinux_2_23_aarch64
  - manylinux_2_22_aarch64
  - manylinux_2_21_aarch64
  - manylinux_2_20_aarch64
  - manylinux_2_19_aarch64
  - manylinux_2_18_aarch64
  - manylinux_2_17_aarch64
  - manylinux2014_aarch64
  - linux_aarch64

注意: 对于 --platform 参数,通常会选择最通用或最匹配的标签。
例如,在 Linux 上可能会看到 'manylinux_xxxx_x86_64' 标签。
下载 MCP 服务器及其依赖包(pip)
在容器内下载(无需指定版本和平台)
pip download \
    --only-binary :all: \
    --implementation cp \
    --dest /app/registry/python \
    mcp-server-time
在容器外或其他兼容环境下载(需指定版本和平台)
pip download \
    --only-binary :all: \
    --platform manylinux2014_aarch64 \
    --python-version 3.13 \
    --implementation cp \
    --dest /app/registry/python \
    mcp-server-time
这个命令的目的是 下载 mcp-server-time 包的预编译二进制版本(通常是 .whl 文件),该版本兼容 manylinux2014_aarch64 平台上的 Python 3.13 (CPython 实现),并将其保存到 /app/registry/python 目录下。
pip download 命令参数详解
pip download- 这是
pip命令的一个子命令,用于下载 Python 包及其所有依赖项到本地目录,而不进行安装。这对于在没有互联网连接的环境中安装包非常有用。
- 这是
--platform manylinux2014_aarch64- 这个选项指定了你希望下载的包所针对的 目标操作系统平台。
manylinux2014_aarch64是一个标准化标签,用于表示在各种 Linux 发行版上都兼容的 Linux 二进制轮子 (wheels)。它确保你下载的包在符合这个manylinux标准的 x86-64 架构的 Linux 系统上可以运行。
--python-version 3.13- 这个选项指定了你希望下载的包所针对的 Python 版本。
- 在这里,它意味着下载的
mcp-server-time包必须是为 Python 3.13 构建或兼容的版本。
--only-binary :all:- 这个选项告诉
pip只下载二进制包(即.whl文件)。 :all:表示对所有包都应用此规则,即不下载任何源代码包 (sdist,通常是.tar.gz或.zip文件)。这通常是为了确保部署环境的一致性,因为二进制包在安装时不需要编译步骤。
- 这个选项告诉
--implementation cp- 这个选项指定了你希望下载的包所针对的 Python 实现。
cp代表 CPython,它是最常用和标准的 Python 实现。这确保你下载的包是为 CPython 而不是其他 Python 实现(如 Jython、IronPython 或 PyPy)构建的。
--dest /app/registry/python- 这个选项指定了所有下载的包及其依赖项将要保存的 目标目录。
- 在这里,
mcp-server-time包及其任何依赖包都会被下载并存放到/app/registry/python目录下。
mcp-server-time- 这是你希望下载的 Python 包的名称。
总结来说,这个命令的目的是精确地获取 mcp-server-time 这个 Python 包的一个特定二进制版本,该版本在特定平台和 Python 环境下是可用的,并将其存储在一个指定的本地文件夹中,以便后续的离线安装或部署。
自定义 MCPHub 配置
配置 MCP 服务器市场 (custom/servers.json)
{
  "time": {
    "name": "time",
    "display_name": "Time",
    "description": "A Model Context Protocol server that provides time and timezone conversion capabilities. It automatically detects the system's timezone and offers tools for getting current time and converting between timezones.",
    "repository": {
      "type": "git",
      "url": "https://github.com/modelcontextprotocol/servers"
    },
    "homepage": "https://github.com/modelcontextprotocol/servers/tree/main/src/time#readme",
    "author": {
      "name": "MCP Team"
    },
    "license": "MIT",
    "categories": [
      "System Tools"
    ],
    "tags": [
      "time",
      "timezone",
      "date",
      "converter"
    ],
    "arguments": {
      "TZ": {
        "description": "Environment variable to override the system's default timezone",
        "required": false,
        "example": "America/New_York"
      }
    },
    "installations": {
      "uvx": {
        "type": "uvx",
        "command": "uvx",
        "args": [
          "--offline",
          "--no-index",
          "--from=/app/registry/python/mcp-servers/mcp_server_time-0.6.2-py3-none-any.whl",
          "--find-links=/app/registry/python",
          "mcp-server-time",
          "--local-timezone=Asia/Shanghai"
        ],
        "description": "Install and run using uvx (recommended)",
        "recommended": true
      }
    },
    "tools": [
      {
        "name": "get_current_time",
        "description": "Get current time in a specific timezones",
        "inputSchema": {
          "type": "object",
          "properties": {
            "timezone": {
              "type": "string",
              "description": "IANA timezone name (e.g., 'America/New_York', 'Europe/London'). Use local timezone if no timezone provided by the user."
            }
          },
          "required": [
            "timezone"
          ]
        }
      },
      {
        "name": "convert_time",
        "description": "Convert time between timezones",
        "inputSchema": {
          "type": "object",
          "properties": {
            "source_timezone": {
              "type": "string",
              "description": "Source IANA timezone name (e.g., 'America/New_York', 'Europe/London'). Use local timezone if no source timezone provided by the user."
            },
            "time": {
              "type": "string",
              "description": "Time to convert in 24-hour format (HH:MM)"
            },
            "target_timezone": {
              "type": "string",
              "description": "Target IANA timezone name (e.g., 'Asia/Tokyo', 'America/San_Francisco'). Use local timezone if no target timezone provided by the user."
            }
          },
          "required": [
            "source_timezone",
            "time",
            "target_timezone"
          ]
        }
      }
    ],
    "examples": [
      {
        "title": "Current time",
        "description": "Get the current time in a specific timezone",
        "prompt": "What time is it in Tokyo right now?"
      },
      {
        "title": "Time conversion",
        "description": "Convert time between timezones",
        "prompt": "Convert 3:30 PM EST to Paris time."
      }
    ],
    "is_official": true
  }
}
自定义 MCP 服务器配置
配置 MCP 服务器运行时设置 (custom/mcp_settings.json)
{
  "mcpServers": {
    "time": {
      "command": "uvx",
      "args": [
        "--offline",
        "--no-index",
        "--from=/app/registry/python/mcp-servers/mcp_server_time-0.6.2-py3-none-any.whl",
        "--find-links=/app/registry/python",
        "mcp-server-time",
        "--local-timezone=Asia/Shanghai"
      ],
      "env": {}
    }
  },
  "users": [
    {
      "username": "admin",
      "password": "$2b$10$hPTLF/QOzCekVf2sOleFbemqtZFxA1M4HdwLVnr8LruNH2kvonC2O",
      "isAdmin": true
    }
  ],
  "systemConfig": {
    "routing": {
      "enableGlobalRoute": true,
      "enableGroupNameRoute": true,
      "enableBearerAuth": false,
      "bearerAuthKey": "0IBOE3PrkU6sK7PNdhUNzUyb5KbMSubd"
    },
    "install": {
      "pythonIndexUrl": "",
      "npmRegistry": ""
    }
  },
  "groups": []
}
Docker Compose 配置
编辑 docker-compose.yml
version: '3.8'

services:
  mcphub-postgres:
    image: pgvector/pgvector:pg17
    container_name: mcphub-postgres
    environment:
      POSTGRES_DB: mcphub
      POSTGRES_USER: mcphub
      POSTGRES_PASSWORD: your_password
    volumes:
      - ./postgres:/var/lib/postgresql/data # 持久化 PostgreSQL 数据

  mcphub:
    image: samanhappy/mcphub
    container_name: mcphub
    ports:
      - "3000:3000"
    volumes:
      - ./custom/registry:/app/registry
      - ./custom/servers.json:/app/servers.json
      - ./custom/mcp_settings.json:/app/mcp_settings.json
    depends_on:
      - mcphub-postgres # 确保 mcphub-postgres 启动后再启动 mcphub
    environment:
      # 在这里更新 dbUrl,使用 mcphub-postgres 作为主机名
      MCPHUB_DB_URL: postgresql://mcphub:your_password@mcphub-postgres:5432/mcphub
部署 MCPHub
docker compose up