---
layout: single
title: "FastChat 部署多模型"
date: 2023-10-24 08:00:00 +0800
categories: [AI 与大模型, 编程开发]
tags: [FastChat, LangChain, Vicuna, ChatGLM2-6B, 分布式]
---
* [Chatbot Arena](https://chat.lmsys.org/)
* [FastChat](https://github.com/lm-sys/FastChat)
* [LMSYS BLOG](https://lmsys.org/blog/)
* [Use AutoGen for Local LLMs](https://microsoft.github.io/autogen/blog/2023/07/14/Local-LLMs/)
## 安装
### pip
```shell
pip install "fschat[model_worker,webui]"
```
### 源代码
**这种方式安装比较容易调试,适合开发者。**
克隆代码
```shell
git clone https://github.com/lm-sys/FastChat.git
cd FastChat
```
创建环境
```shell
python -m venv env
source env/bin/activate
```
安装
```shell
pip install --upgrade pip # enable PEP 660 support
pip install -e ".[model_worker,webui]"
pip install -U transformers==4.33.0 # AttributeError: 'ChatGLMTokenizer' object has no attribute 'tokenizer'
```
* [AttributeError: 'ChatGLMTokenizer' object has no attribute 'tokenizer'](https://huggingface.co/THUDM/chatglm2-6b/discussions/87)
## 模型
### vicuna-7b-v1.5
[HuggingFace vicuna-7b-v1.5](https://huggingface.co/lmsys/vicuna-7b-v1.5)
指定 HuggingFace 模型名称,会自动下载模型。
```shell
python -m fastchat.serve.model_worker --model-path lmsys/vicuna-7b-v1.5 --device cpu
```
[ModelScope vicuna-7b-v1.5](https://www.modelscope.cn/models/AI-ModelScope/vicuna-7b-v1.5/)
HuggingFace 在国内不能访问,可以使用 ModelScope 的镜像。
```shell
git clone https://modelscope.cn/AI-ModelScope/vicuna-7b-v1.5.git
```
* [ModelScope 模型的下载](https://www.modelscope.cn/docs/%E6%A8%A1%E5%9E%8B%E7%9A%84%E4%B8%8B%E8%BD%BD)
### ChatGLM2-6B
直接从 HuggingFace 下载模型
```shell
git clone https://huggingface.co/THUDM/chatglm2-6b
```
## 推理
### 命令行
```shell
python3 -m fastchat.serve.cli --model-path chatglm2-6b --device cpu
```
## 部署服务
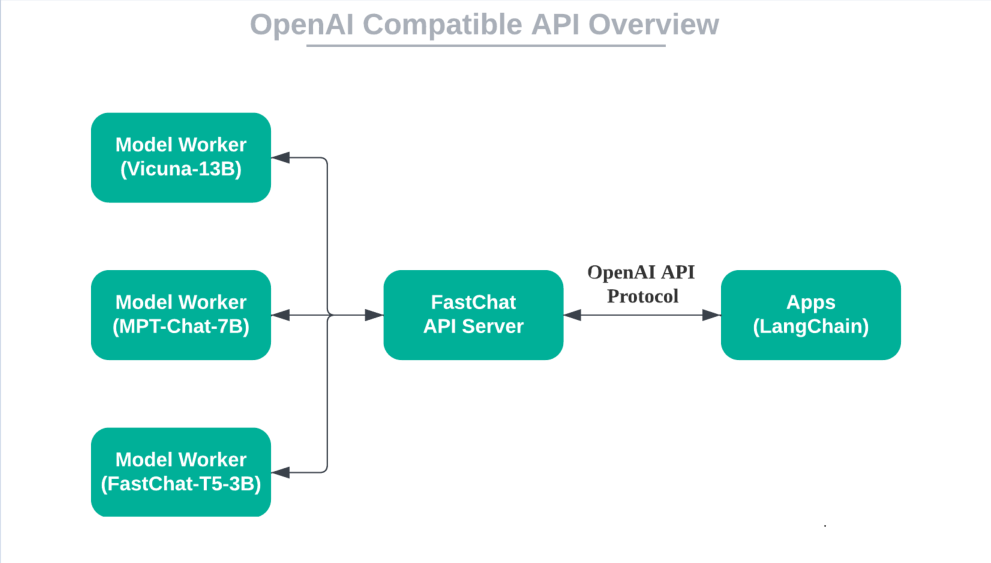
### FastChat Server 架构图

### 分步部署
#### 启动 Controller
```shell
python -m fastchat.serve.controller
```
#### 启动 Model Worker
可以部署多个,包括相同的模型,也可以部署不同的模型。`--gpus` 参数出错,还未解决,所以这里在命令前使用了环境变量 `CUDA_VISIBLE_DEVICES`。
```shell
CUDA_VISIBLE_DEVICES=2 python -m fastchat.serve.model_worker --model-path chatglm2-6b --port 21002 --worker-address http://localhost:21002
CUDA_VISIBLE_DEVICES=3 python -m fastchat.serve.model_worker --model-path chatglm2-6b --port 21003 --worker-address http://localhost:21003
python -m fastchat.serve.model_worker --model-names "gpt-3.5-turbo,text-davinci-003,text-embedding-ada-002" --model-path vicuna-7b-v1.5 --device cpu --port 21004 --worker-address http://localhost:21004
```
如果使用了下面的 `代码修改` 后,可以不用指定 `--worker-address` 参数。
```shell
CUDA_VISIBLE_DEVICES=2 python -m fastchat.serve.model_worker --model-path chatglm2-6b --port 21002
CUDA_VISIBLE_DEVICES=3 python -m fastchat.serve.model_worker --model-path chatglm2-6b --port 21003
python -m fastchat.serve.model_worker --model-names "gpt-3.5-turbo,text-davinci-003,text-embedding-ada-002" --model-path vicuna-7b-v1.5 --device cpu --port 21004
```
**vicuna-7b-v1.5 用了 26G 的内存**
8位量化模型,需要添加参数 `--load-8bit`。
```shell
python -m fastchat.serve.model_worker \
--model-path chatglm2-6b --port 21004 \
--worker-address http://localhost:21004 \
--load-8bit
```
显存使用情况
- **初始:** 6446MiB / 15360MiB
- **显存:** 7458MiB / 15360MiB
- **Volatile GPU-Util:** 100%
#### 启动 OpenAI API Server
可以用于和 LangChain 集成。
```shell
python -m fastchat.serve.openai_api_server --host 0.0.0.0 --port 8000
```
#### 测试
* models 接口
```shell
curl http://localhost:8000/v1/models | jq
```
* completions 接口
```shell
curl http://localhost:8000/v1/completions \
-H "Content-Type: application/json" \
-d '{
"model": "chatglm2-6b",
"prompt": "你好",
"temperature": 0.3
}' | jq
```
```json
{
"id": "cmpl-3LSrp7xjZmCxuqUqCHdweR",
"object": "text_completion",
"created": 1699926717,
"model": "chatglm2-6b",
"choices": [
{
"index": 0,
"text": ",我是人工智能助手。 根据你的描述,你想要查询关于“人工智能”",
"logprobs": null,
"finish_reason": "stop"
}
],
"usage": {
"prompt_tokens": 4,
"total_tokens": 20,
"completion_tokens": 16
}
}
```
* chat/completions 接口
```shell
curl http://localhost:8000/v1/chat/completions \
-H "Content-Type: application/json" \
-d '{
"model": "chatglm2-6b",
"messages": [{"role": "user", "content": "你好"}],
"temperature": 0.3
}' | jq
```
```json
{
"id": "chatcmpl-3vzgGYm2QVSnDJqrLSe6Hp",
"object": "chat.completion",
"created": 1699926765,
"model": "chatglm2-6b",
"choices": [
{
"index": 0,
"message": {
"role": "assistant",
"content": "你好👋!我是人工智能助手 ChatGLM2-6B,很高兴见到你,欢迎问我任何问题。"
},
"finish_reason": "stop"
}
],
"usage": {
"prompt_tokens": 17,
"total_tokens": 45,
"completion_tokens": 28
}
}
```
* embeddings 接口
```shell
curl http://localhost:8000/v1/embeddings \
-H "Content-Type: application/json" \
-d '{
"input": "用于生成嵌入文本的字符串。",
"model": "chatglm2-6b"
}' | jq
```
```json
{
"object": "list",
"data": [
{
"object": "embedding",
"embedding": [
-0.0038084269035607576,
0.0007477423641830683,
......
-0.002232820028439164,
0.0010205521248281002
],
"index": 0
}
],
"model": "chatglm2-6b",
"usage": {
"prompt_tokens": 11,
"total_tokens": 11
}
}
```
### 一键部署
#### 代码修改
这个项目部署起来太麻烦了,需要修改代码,才能部署成功。我这里主要是想实现:
1. 部署多个 ChatGLM2-6B 模型
2. 每个模型部署在不同的 GPU 上
[fastchat/serve/model_worker.py](https://github.com/lm-sys/FastChat/blob/main/fastchat/serve/model_worker.py)
参数 `--worker-address` 使用了默认值,并不会跟着 `--host` 和 `--port` 的改变而改变。
```py
parser.add_argument("--worker-address", type=str, default="http://localhost:21002")
```
```py
def create_model_worker():
#......
args = parser.parse_args()
args.worker_address = f"http://localhost:{args.port}" # 增加代码
#......
```
[fastchat/serve/launch_all_serve.py](https://github.com/lm-sys/FastChat/blob/main/fastchat/serve/launch_all_serve.py)
```py
# 增加了 gpus 参数
def launch_worker(item, gpus=None):
#......
args.model_path, args.worker_host, args.worker_port = item.split("@")
if gpus: # 给 args.gpus 赋值
args.gpus = gpus # 这里直接使用 2 或 3 会报错,需要使用 2,3,和 fastchat.serve.model_worker 中的代码有关
#......
def _gpus_sequence_adjust(gpus, first_gpu):
"""
gpus 顺序调整,把 first_gpu 放在第一个位置。
如:gpus=0,1,2 first_gpu=1
gpus = _gpus_sequence_adjust(gpus, first_gpu)
调整后:gpus=1,0,2
"""
gpus = gpus.split(',')
gpus.remove(first_gpu)
gpus = [first_gpu] + gpus
return ','.join(gpus)
def launch_all():
#......
if isinstance(args.model_path_address, str):
launch_worker(args.model_path_address)
else:
gpus = args.gpus.split(',')
if len(args.model_path_address) == len(gpus):
# 每个模型部署在不同的 GPU 上
for model_path_address, gpu in zip(args.model_path_address, gpus):
print(f"loading model:{model_path_address}, gpu id:{gpu}")
launch_worker(model_path_address, _gpus_sequence_adjust(args.gpus, gpu))
else:
for idx, item in enumerate(args.model_path_address):
print(f"loading {idx}th model:{item}")
launch_worker(item)
#......
```
#### 部署
`model_path_address 格式为:模型路径@模型地址@模型端口`
```shell
python -m fastchat.serve.launch_all_serve \
--controller-host localhost --controller-port 21001 \
--model-path-address chatglm2-6b@localhost@21002 chatglm2-6b@localhost@21003 \
--gpus 2,3 \
--limit-worker-concurrency 10 \
--server-host 0.0.0.0 --server-port 8000
```
### 高级配置
#### 环境变量
* 超时设置(Timeout):如果遇到超时错误,可以调整超时时长。
```shell
export FASTCHAT_WORKER_API_TIMEOUT=
```
* 批量大小(Batch Size):如果遇到内存不足 (OOM) 错误,可以设置较小的批量大小。
```shell
export FASTCHAT_WORKER_API_EMBEDDING_BATCH_SIZE=1
```
* [Vicuna LLM: Why It's the Next Big Thing in LocalLLM](https://cheatsheet.md/llm-leaderboard/vicuna-llm)
#### 参数
* --model-path 本地文件夹或 Hugging Face 模型名称。(can be a local folder or a Hugging Face repo name.)
* --limit-worker-concurrency 限制每个模型的并发数,默认:5
## LLM.int8 混合精度量化
### 安装依赖包
```shell
pip install bitsandbytes
pip install accelerate
pip install scipy
```
### 修改代码 `fastchat/model/model_adapter.py`
- FastChat 0.2.32
```py
315 if (device == "cuda" and num_gpus == 1 and not cpu_offloading) or device in (
316 "mps",
317 "xpu",
318 "npu",
319 ):
320 pass #model.to(device)
733 model = AutoModel.from_pretrained(
734 model_path, trust_remote_code=True, load_in_8bit=True, **from_pretrained_kwargs
735 )
```
- FastChat 0.2.33
```py
321 if (device == "cuda" and num_gpus == 1 and not cpu_offloading) or device in (
322 "mps",
323 "xpu",
324 "npu",
325 ):
326 pass #model.to(device) # wjj
749 class ChatGLMAdapter(BaseModelAdapter):
750 """The model adapter for THUDM/chatglm-6b, THUDM/chatglm2-6b"""
751
752 def match(self, model_path: str):
753 return "chatglm" in model_path.lower()
754
755 def load_model(self, model_path: str, from_pretrained_kwargs: dict):
756 revision = from_pretrained_kwargs.get("revision", "main")
757 if "chatglm3" in model_path.lower():
758 tokenizer = AutoTokenizer.from_pretrained(
759 model_path,
760 encode_special_tokens=True,
761 trust_remote_code=True,
762 revision=revision,
763 )
764 else:
765 tokenizer = AutoTokenizer.from_pretrained(
766 model_path, trust_remote_code=True, revision=revision
767 )
768 model = AutoModel.from_pretrained(
769 model_path, trust_remote_code=True, load_in_8bit=True, **from_pretrained_kwargs # wjj
770 )
771 return model, tokenizer
```
### 显存使用情况
- **初始:** 7404MiB / 15360MiB
- **显存:** 7658MiB / 15360MiB
- **Volatile GPU-Util:** 40%
**感觉效果比上面的 `--load-8bit` 量化好一些,不过要修改源代码。**
## vLLM 集成
* [vLLM Quickstart](https://vllm.readthedocs.io/en/latest/getting_started/quickstart.html)
* [vLLM Integration](https://github.com/lm-sys/FastChat/blob/main/docs/vllm_integration.md)
### [安装](https://vllm.readthedocs.io/en/latest/getting_started/installation.html)
```shell
pip install vllm
```
### 启动 vLLM Worker
```shell
python -m fastchat.serve.vllm_worker --model-path vicuna-7b-v1.5
```
FastChat 的版本更新不及时,vLLM 新版本中已经删除了 AsyncLLMEngine,所以会报错:
```shell
from vllm import AsyncLLMEngine
ImportError: cannot import name 'AsyncLLMEngine' from 'vllm' (unknown location)
```
* [vLLM v0.2.0](https://github.com/vllm-project/vllm/releases/tag/v0.2.0)
## LangChain 集成
FastChat API 服务器可以通过 OpenAI API 协议与基于 OpenAI API 的应用程序进行交互。这意味着开放模型可以用作替代品,而无需修改代码。
### OpenAI 兼容 API
### 集成
```py
from langchain.llms import OpenAIChat
llm = OpenAIChat(model_name="chatglm2-6b",
openai_api_base="http://localhost:8000/v1",
openai_api_key="EMPTY") # EMPTY or NULL
```
* [Building a Truly "Open" OpenAI API Server with Open Models Locally](https://lmsys.org/blog/2023-06-09-api-server/)
* [Local LangChain with FastChat](https://github.com/lm-sys/FastChat/blob/main/docs/langchain_integration.md)
* [LangChain 101: Part 1. Building Simple Q&A App](https://towardsai.net/p/machine-learning/langchain-101-part-1-building-simple-qa-app)
## 关闭服务
### 关闭所有服务
```shell
python -m fastchat.serve.shutdown_serve --down all
```
### 关闭 Controller
```shell
python -m fastchat.serve.shutdown_serve --down controller
```
### 关闭 Model Worker
```shell
python -m fastchat.serve.shutdown_serve --down model_worker
```
### 关闭 OpenAI API Server
```shell
python -m fastchat.serve.shutdown_serve --down openai_api_server
```
### 杀进程的方法
`process_name` 为运行的命令行,可以是部分。
* 方法一
```shell
kill -9 $(pgrep -f process_name)
```
* 方法二
```shell
ps -eo user,pid,command|grep process_name|grep -v grep|awk '{{print $2}}'|xargs kill -9
```
## 参考资料
* [fastchat/serve/controller.py](https://github.com/lm-sys/FastChat/blob/main/fastchat/serve/controller.py)
* [fastchat/serve/model_worker.py](https://github.com/lm-sys/FastChat/blob/main/fastchat/serve/model_worker.py)
* [fastchat/serve/launch_all_serve.py](https://github.com/lm-sys/FastChat/blob/main/fastchat/serve/launch_all_serve.py)
* [fastchat/serve/shutdown_serve.py](https://github.com/lm-sys/FastChat/blob/main/fastchat/serve/shutdown_serve.py)
* [fastchat/serve/openai_api_server.py](https://github.com/lm-sys/FastChat/blob/main/fastchat/serve/openai_api_server.py)
* [Langchain-Chatchat/server/llm_api_stale.py](https://github.com/chatchat-space/Langchain-Chatchat/blob/master/server/llm_api_stale.py)
* [FastChat——一个用于训练、部署和评估基于大型语言模型的聊天机器人的开放平台](https://cloud.tencent.com/developer/article/2297923)
* [使用fastchat实现大模型高并发对话](https://blog.csdn.net/jining11/article/details/133076780)
* [比HuggingFace快24倍,伯克利神级LLM推理系统开源,碾压SOTA,让GPU砍半](https://36kr.com/p/2310989263285510)
* [vLLM: Easy, Fast, and Cheap LLM Serving with PagedAttention](https://vllm.ai/)
* [Welcome to vLLM!](https://vllm.readthedocs.io/en/latest/index.html)
* [vLLM Supported Models](https://vllm.readthedocs.io/en/latest/models/supported_models.html)