Continue
Continue
介绍
Continue 使您能够在 IDE 中创建自己的 AI 代码助手。使用 VS Code 和 JetBrains 插件保持开发者的流畅体验,这些插件可以连接到任何模型、任何上下文以及任何其他你需要的东西。
- 轻松理解代码部分
- Tab 自动完成代码建议
- 重构您正在编码的函数
- 询问代码库相关问题
- 快速使用文档作为上下文
- 使用斜线命令启动操作
- 将类、文件等添加到上下文
- 立即了解终端错误
Continue 使您能够使用适合工作的模型,无论是开源还是商业,本地运行还是远程运行,用于聊天、自动完成或嵌入。它提供了许多配置点,以便您可以自定义扩展以适应您现有的工作流程。
开发语言
| 语言 | 占比 |
|---|---|
| TypeScript | 74.0% |
| Kotlin | 11.8% |
| Rust | 4.9% |
| CSS | 3.6% |
| Scheme | 2.5% |
| JavaScript | 2.4% |
| Other | 0.8% |
贡献(Contributing)
使用
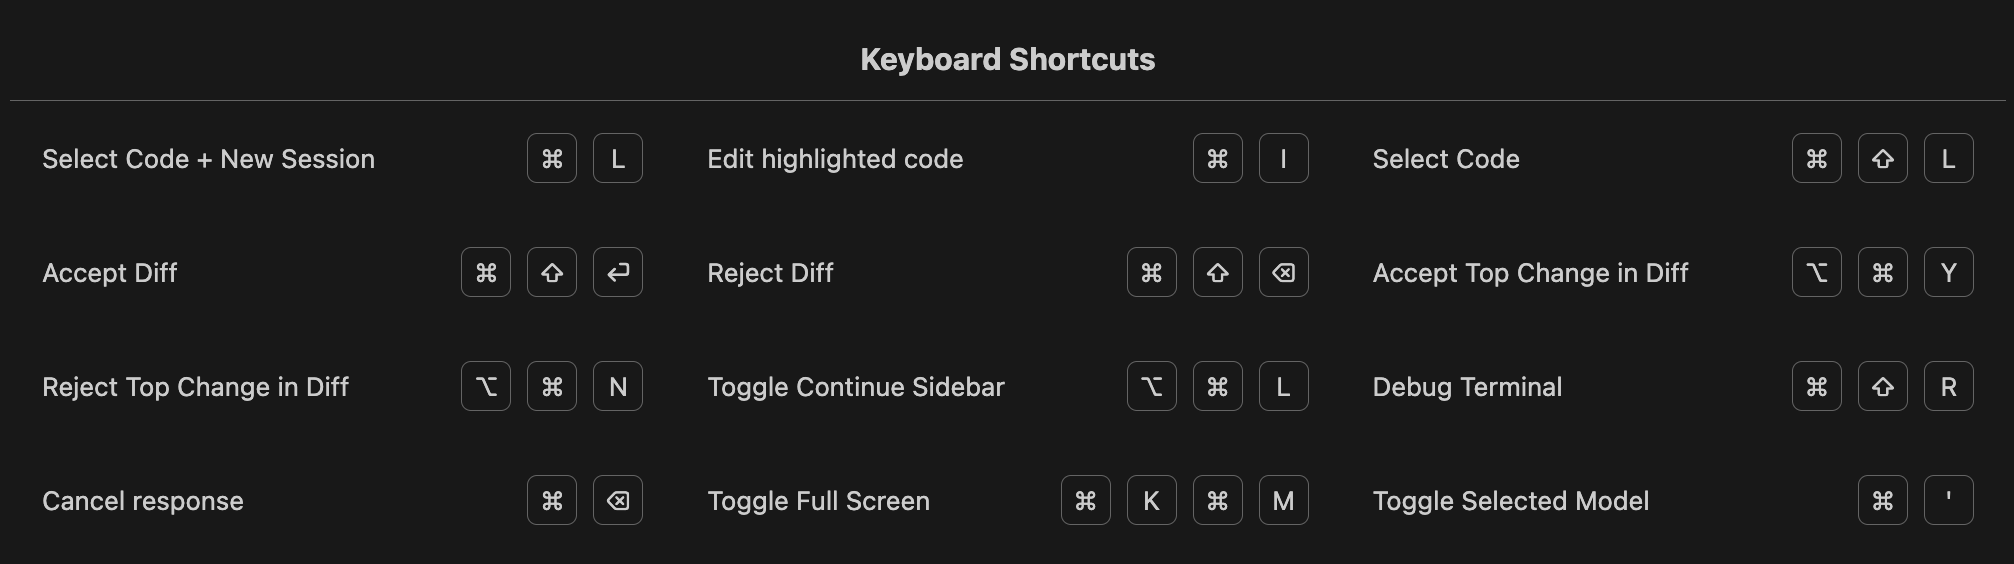
| 功能 | VS Code 快捷键 (MacOS) | JetBrains 快捷键 (MacOS) | VS Code 快捷键 (Windows) | JetBrains 快捷键 (Windows) |
|---|---|---|---|---|
| 轻松理解代码部分 | Cmd+L | Cmd+J | Ctrl+L | Ctrl+J |
| Tab 自动完成代码建议 | Tab | Tab | Tab | Tab |
| 重构您正在编码的函数 | Cmd+I | Cmd+I | Ctrl+I | Ctrl+I |
| 询问代码库相关问题 | Cmd+Enter | Cmd+Enter | Ctrl+Enter | Ctrl+Enter |
| 快速使用文档作为上下文 | @docs | @docs | @docs | @docs |
| 使用斜线命令启动操作 | /edit | /edit | /edit | /edit |
| 将类、文件等添加到上下文 | @files | @files | @files | @files |
| 立即了解终端错误 | Cmd+Shift+R | - | Ctrl+Shift+R | - |
VS Code 快捷键
配置
配置文件 ~/.continue/config.json
{
  "tabAutocompleteModel": {
    "title": "Tab Autocomplete",
    "provider": "ollama",
    "model": "codestral:22b",
    "apiKey": ""
  },
  "models": [
    {
      "title": "DeepSeek API",
      "provider": "openai",
      "model": "deepseek-coder",
      "apiBase": "https://api.deepseek.com/v1",
      "apiType": "openai",
      "apiKey": "sk-xxx"
    },
    {
      "title": "Ollama DeepSeek-V2-16B",
      "provider": "ollama",
      "model": "deepseek-v2:16b",
      "contextLength": 4096,
      "apiKey": ""
    },
    {
      "title": "Ollama Codestral-22B",
      "provider": "ollama",
      "model": "codestral:22b",
      "contextLength": 4096,
      "apiKey": ""
    }
  ],
  "slashCommands": [
    {
      "name": "edit",
      "description": "Edit highlighted code",
      "step": "EditHighlightedCodeStep"
    },
    {
      "name": "comment",
      "description": "Write comments for the highlighted code",
      "step": "CommentCodeStep"
    },
    {
      "name": "share",
      "description": "Download and share this session",
      "step": "ShareSessionStep"
    },
    {
      "name": "cmd",
      "description": "Generate a shell command",
      "step": "GenerateShellCommandStep"
    }
  ],
  "customCommands": [
    {
      "name": "test",
      "prompt": "Write a comprehensive set of unit tests for the selected code. It should setup, run tests that check for correctness including important edge cases, and teardown. Ensure that the tests are complete and sophisticated. Give the tests just as chat output, don't edit any file.",
      "description": "Write unit tests for highlighted code"
    }
  ],
  "contextProviders": [
    {
      "name": "diff",
      "params": {}
    },
    {
      "name": "open",
      "params": {}
    },
    {
      "name": "terminal",
      "params": {}
    },
    {
      "name": "code",
      "params": {}
    },
    {
      "name": "docs",
      "params": {}
    }
  ],
  "allowAnonymousTelemetry": true,
  "embeddingsProvider": {
    "provider": "ollama",
    "model": "nomic-embed-text",
    "apiBase": "http://localhost:11434" // optional, defaults to http://localhost:11434
  },
  "reranker": {
    "name": "free-trial"
  }
}
- Customization
- Walkthroughs
模型(Ollama)
如果使用 Ollama 作为提供商,可以在配置文件中指定 Ollama 服务器的基本 URL。
{
  "models": [
    {
      "title": "Ollama Codestral-22B",
      "provider": "ollama",
      "model": "codestral:22b",
      "contextLength": 4096,
      "apiBase": "http://localhost:11434",
      "apiKey": ""
    }
  ]
}
最佳体验(官方推荐)
- Chat: Claude 3.5 Sonnet
- Embeddings: Voyage Code 2
- Autocomplete: Codestral
Telemetry
{
  "allowAnonymousTelemetry": false
}
停止 Continue 尝试向 PostHog 请求匿名遥测。
无需互联网运行
在没有网络连接的计算机上,如果您使用本地模型,也可以运行 Continue。
VSIX
下载
构建
在 extensions/vscode 目录中运行 npm run package。这将生成 extensions/vscode/build/continue-{VERSION}.vsix。
cd extensions/vscode
npm run package
安装
code --install-extension continue-0.9.167.vsix
禁止 Anonymous Telemetry
编辑文件 ~/.continue/config.json
{
  "allowAnonymousTelemetry": false
}
- 这将阻止 Continue 尝试向 PostHog 发送 anonymous telemetry 请求。
配置本地模型(config.json)
最佳配置:
- Chat: DeepSeek Coder V2
- Embeddings: Nomic Embed
- Autocomplete: CodeQwen 或 Codestral
{
  "tabAutocompleteModel": {
    "title": "Tab Autocomplete",
    "provider": "ollama",
    "model": "codeqwen:7b",
    "apiKey": ""
  },
  "models": [
    {
      "title": "Ollama DeepSeekCoder2:16B",
      "provider": "ollama",
      "model": "deepseek-coder-v2:16b",
      "contextLength": 16384,
      "apiBase": "http://localhost:11434",
      "apiKey": ""
    }
  ],
  "embeddingsProvider": {
    "provider": "ollama",
    "model": "nomic-embed-text",
    "apiBase": "http://localhost:11434",
    "apiKey": "NULL"
  }
}
重新启动 VS Code 以确保 config.json 中的更改生效
开发
依赖:
- vscode ^1.70.0
- node >=20.11.0
^1.70.0 和 >=1.70.0 是在 package.json 文件中指定依赖版本的两种不同方式,它们的含义和行为有所不同:
- ^1.70.0:
- 这是一个“插入符号” (caret) 版本范围。
- 它表示兼容 1.70.0 及其后续的次要版本和补丁版本,但不包括 2.0.0。
- 具体来说,它允许的版本范围是 >=1.70.0 <2.0.0。
- 例如,1.70.1、1.71.0 都是兼容的,但 2.0.0 不是。
-
=1.70.0:
- 这是一个“范围”版本。
- 它表示任何版本大于或等于 1.70.0 都是可以接受的。
- 没有上限限制,因此包括 2.0.0 及其后续版本。
- 例如,1.70.1、1.71.0、2.0.0、3.0.0 都是兼容的。
- 总结:
- ^1.70.0 更加保守,只允许向后兼容的更新,确保不会引入重大变化。
-
=1.70.0 更加宽松,允许任何新版本,包括可能引入重大变化的版本。
VS Code
初始化
- 克隆 Continue 代码
https://github.com/continuedev/continue - 打开命令面板
cmd/ctrl+shift+p,选择Tasks: Run Task,然后选择install-all-dependencies


在 macOS 上打开时间长了(几天,几个星期),经常会出现各种各样的错误,这时候重新操作系统即可。
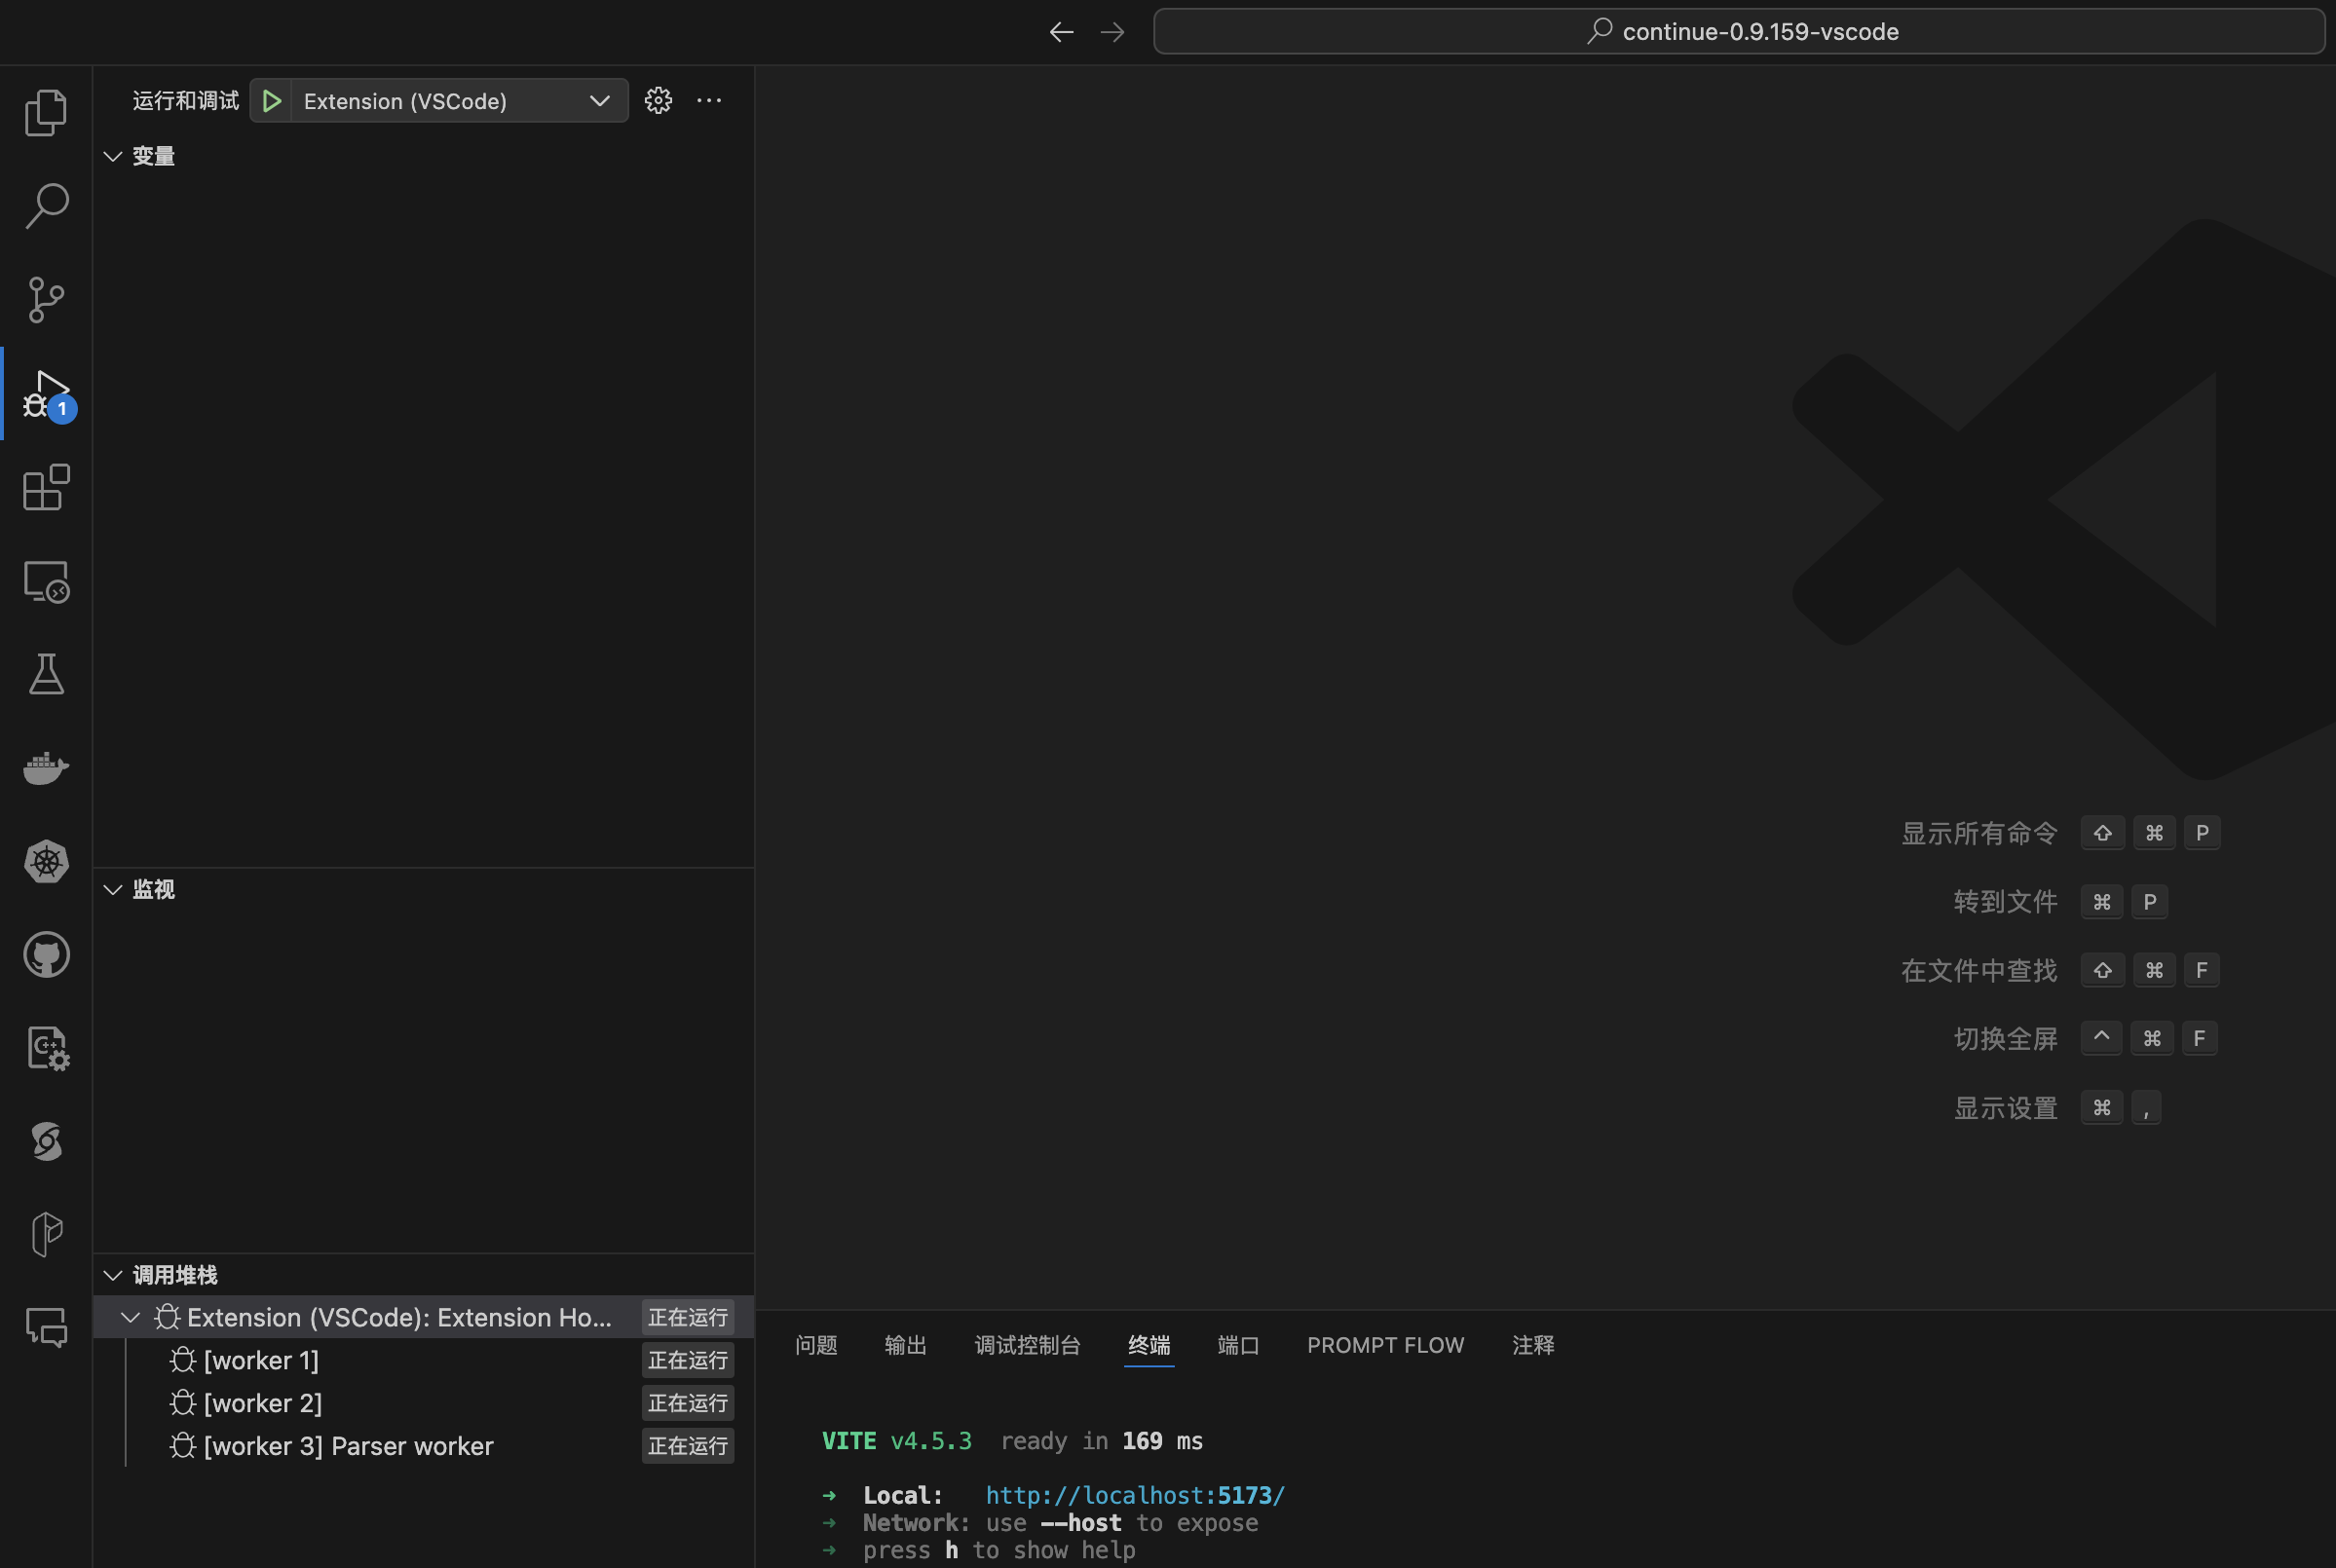
启动调试
- 切换到运行和调试视图
cmd/ctrl+shift+d
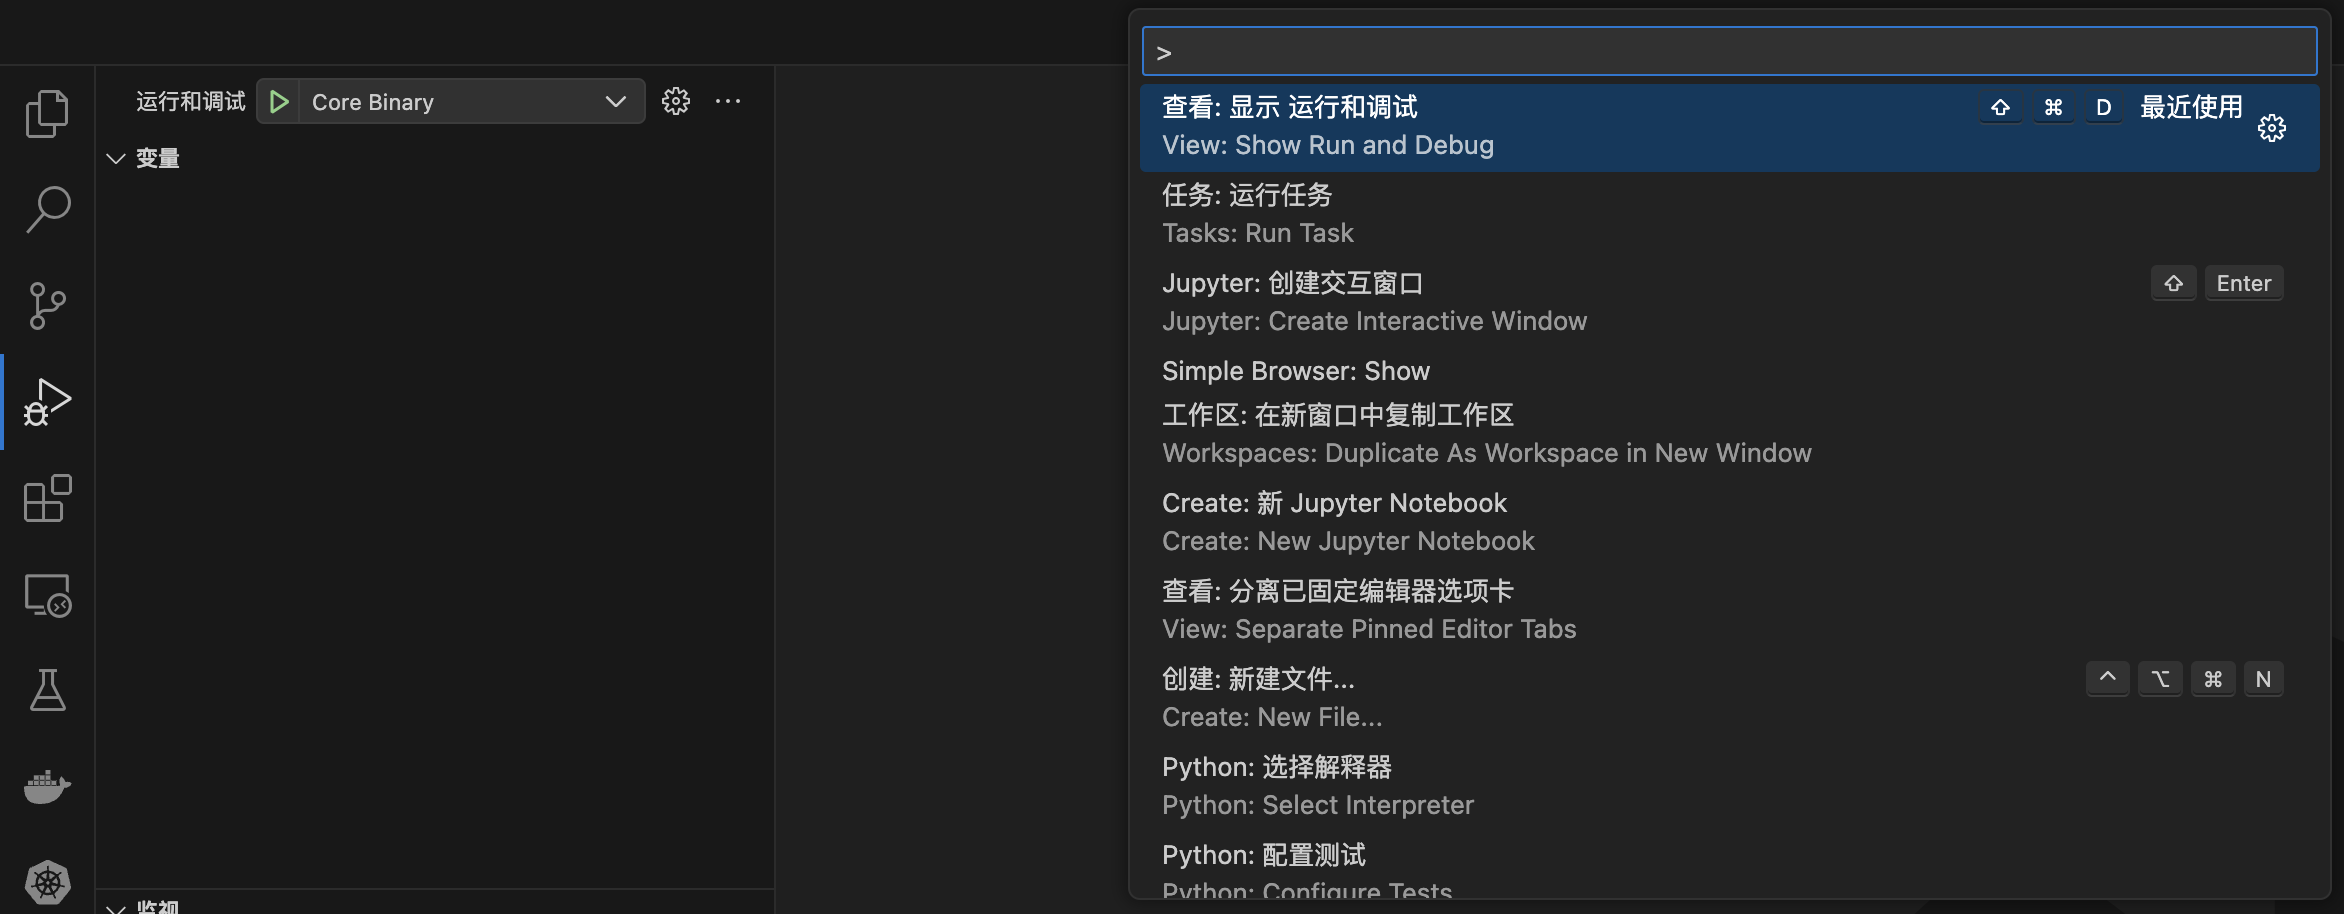
- 从下拉菜单中选择
Extension (VS Code)
.png)
- 点击开始调试按钮
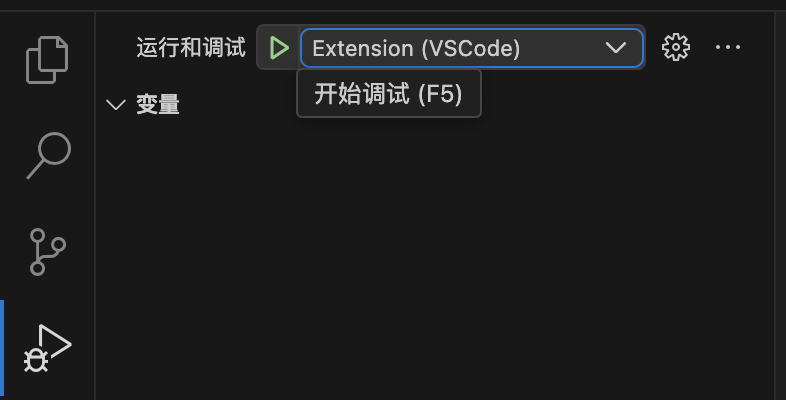
- 这将以调试模式启动扩展,并在安装了扩展的新 VS Code 窗口中打开
- 具有扩展的新 VS Code 窗口称为 Host VS Code
- 启动调试的窗口称为 Main VS Code
容易出现的错误
出现错误:正在执行任务: npm run tsc
zsh:1: command not found: npm
出现错误:node /Users/junjian/GitHub/continuedev/continue-0.9.191-vscode/extensions/vscode/scripts/prepackage.js
zsh:1: command not found: node
在 VS Code 中,打开设置(Cmd + ,),搜索 terminal.integrated.shell.osx,在 settings.json 中编辑,路径为:~/Library/Application Support/Code/User/settings.json。
{
    "terminal.integrated.env.osx": {
        "PATH": "$PATH:/opt/homebrew/bin:~/.local/bin"
    }
}
调试
- 断点 可以在调试时在
core和extensions/vscode文件夹中使用,但目前不支持在gui代码中使用。 - 热重载 使用 Vite 启用,因此如果对
gui进行任何更改,应该会自动反映出来,无需重新构建。在某些情况下,您可能需要刷新 Host VS Code 窗口才能看到更改。 - 同样,只需重新加载 Host VS Code 窗口,即可自动包含对
core或extensions/vscode的任何更改。
日志
控制台日志(Console logs)
cmd+shift+p(MacOS)/ctrl+shift+p(Windows)- 搜索并选择
Developer: Toggle Developer Tools - 这将打开 Chrome DevTools window
- 选择
Console选项卡 - 阅读控制台日志

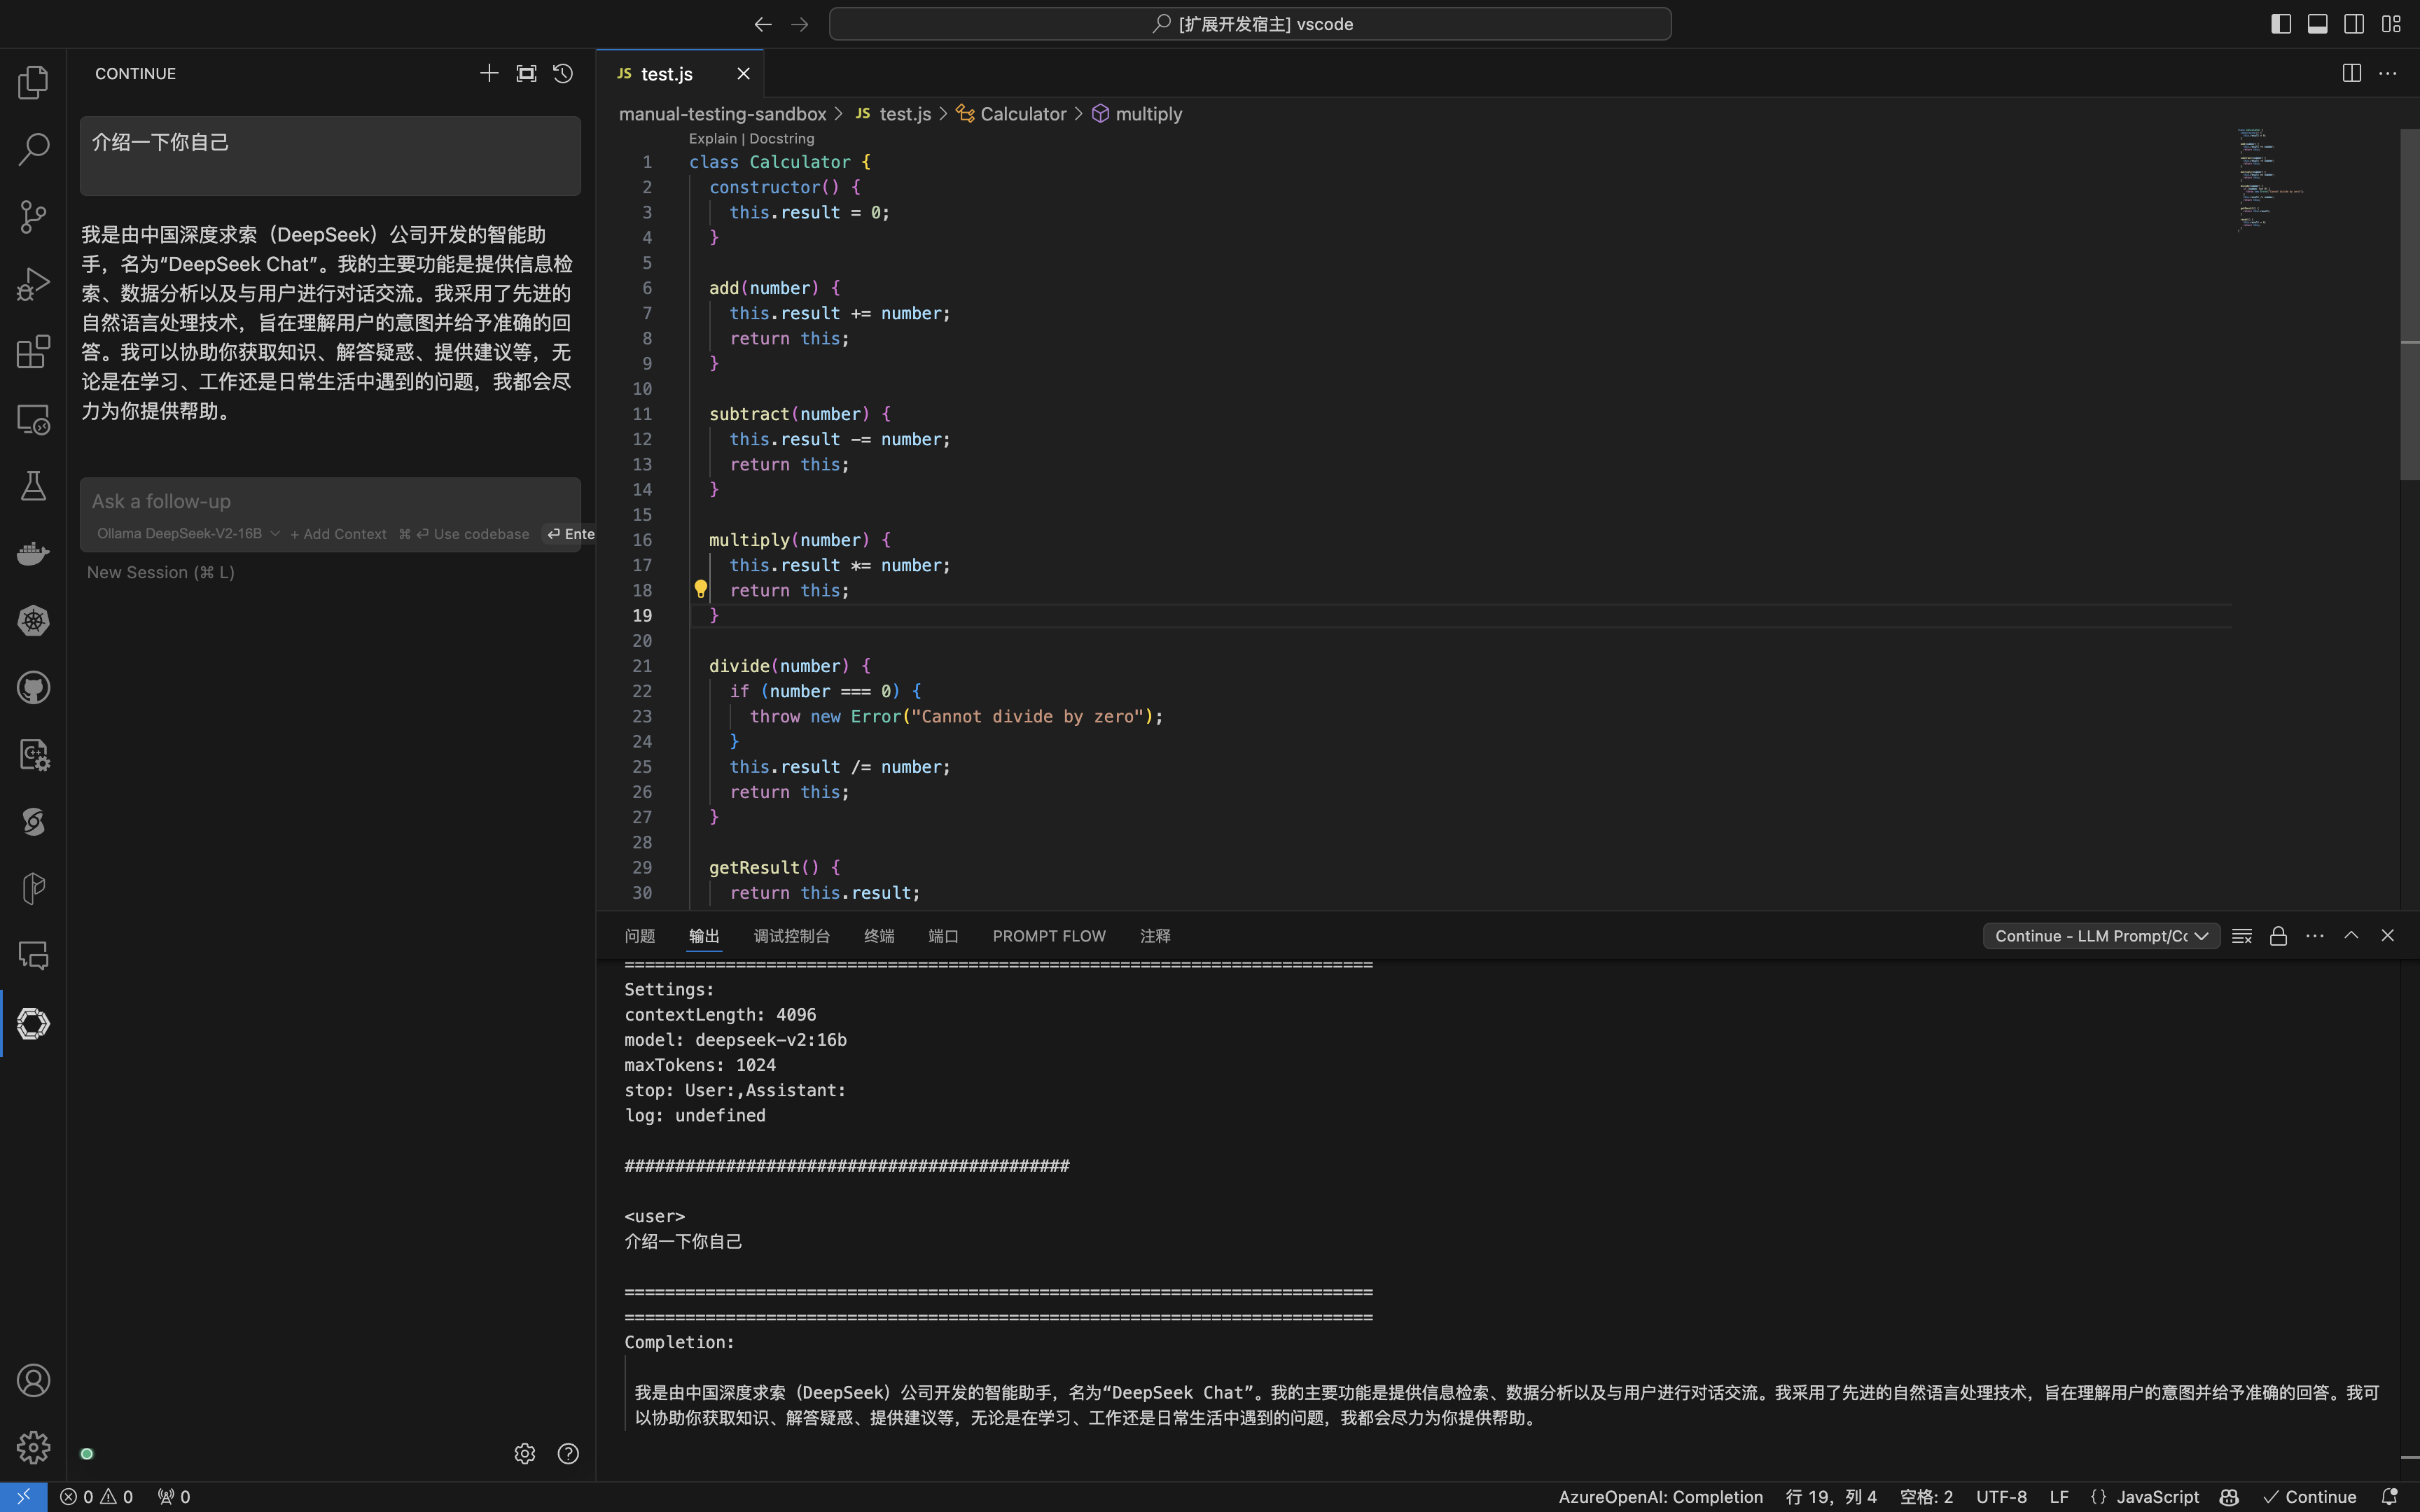
LLM prompt 日志(LLM prompt logs)
- 打开
输出面板(在终端旁边) - 在下拉菜单中选择
Continue - LLM Prompts/Completions - 查看发送给 LLM 的确切提示和接收到的完成情况
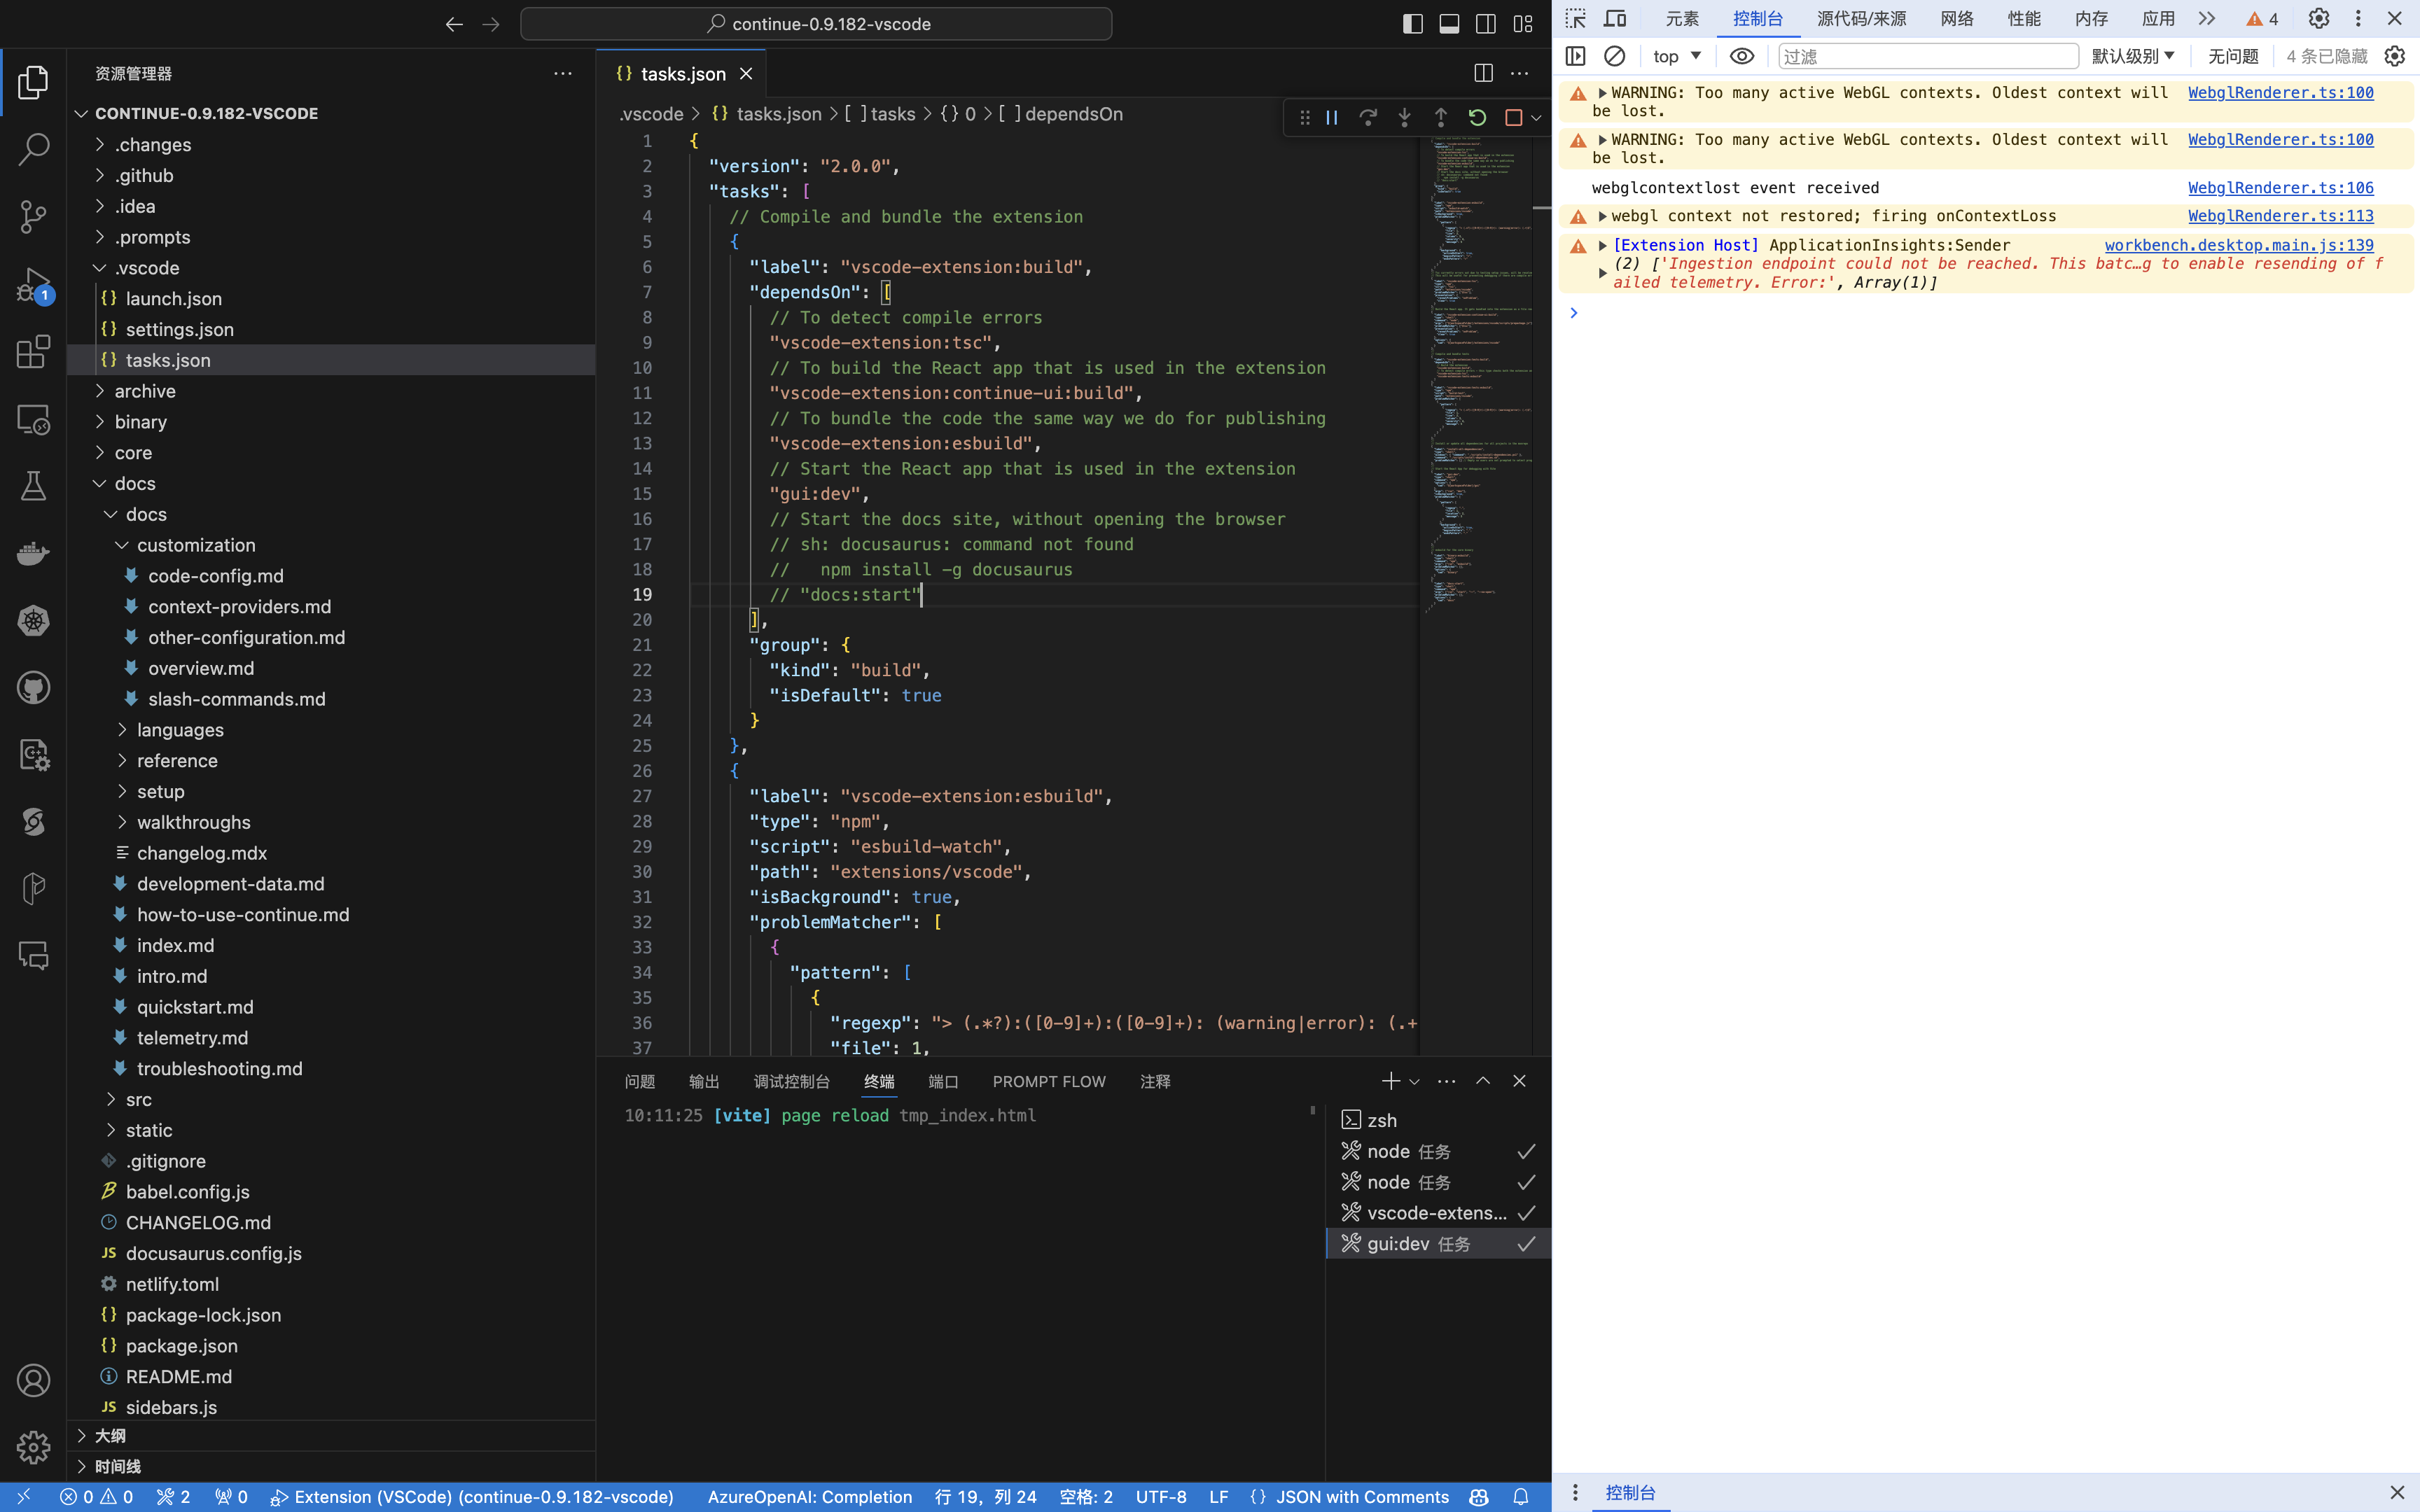
打包
- 要打包扩展,可以在
extensions/vscode目录中运行npm run package。这将生成extensions/vscode/build/continue-{VERSION}.vsix。
cd extensions/vscode
npm run package
这样打包的扩展,并没有把 gui 更改的内容包含进去。编写了一个脚本 scripts/release.sh,可以自动重新构建扩展,包含不同平台的扩展。
#!/usr/bin/env bash
# This is used in a task in .vscode/tasks.json
# Start developing with:
# - Run Task -> Install Dependencies
# - Debug -> Extension
set -e

# 记录开始时间
start_time=$(date +%s)

echo "Installing Core extension dependencies..."
pushd core
npm install
npm link

popd

echo "Installing GUI extension dependencies..."
pushd gui
npm install
npm link @continuedev/core
npm run build

popd

# VSCode Extension (will also package GUI)
echo "Installing VSCode extension dependencies..."
pushd extensions/vscode
# This does way too many things inline but is the common denominator between many of the scripts
npm install
npm link @continuedev/core
npm run prepackage
npm run package-all

popd

echo "Installing binary dependencies..."
pushd binary
npm install
npm run build

popd

echo "Installing docs dependencies..."
pushd docs
npm install

# 记录结束时间
end_time=$(date +%s)

# 计算用时
elapsed_time=$((end_time - start_time))

# 显示用时
echo "脚本执行完毕,总用时: ${elapsed_time}秒"
运行脚本 sh scripts/release.sh 后,会在 extensions/vscode/build 目录下生成不同平台的扩展。
extensions/vscode/build/continue-win32-x64-0.9.208.vsix
extensions/vscode/build/continue-linux-x64-0.9.209.vsix
extensions/vscode/build/continue-linux-arm64-0.9.210.vsix
extensions/vscode/build/continue-darwin-x64-0.9.211.vsix
extensions/vscode/build/continue-darwin-arm64-0.9.212.vsix
安装
-
您可以通过在扩展视图中选择
从 VSIX 安装...来安装。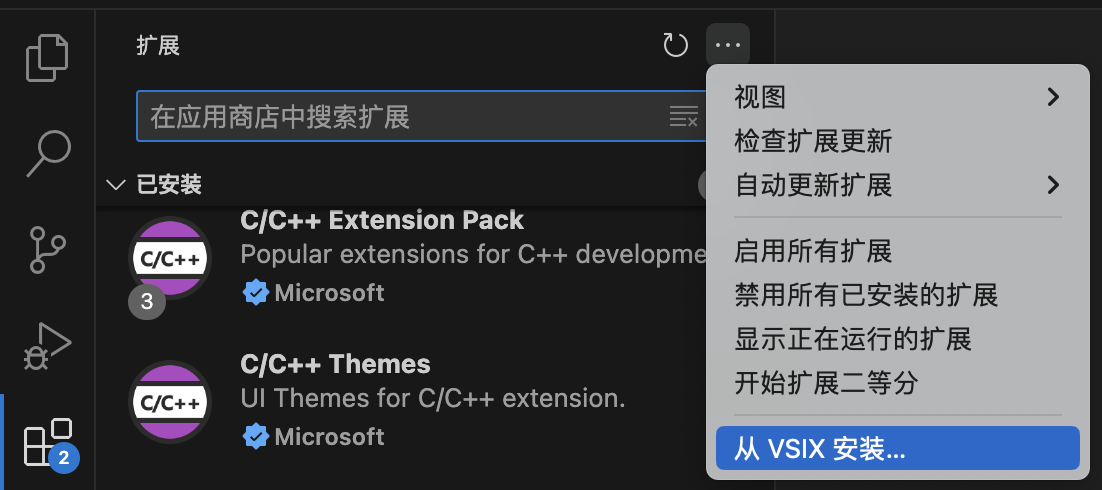
自定义
Slash Commands
当您经常重复使用提示时,自定义命令非常有用。
Custom Slash Commands(Use Natural Language)
编辑配置文件:~/.continue/config.json
  "customCommands": [
    {
      "name": "test",
      "prompt": "Write a comprehensive set of unit tests for the selected code. It should setup, run tests that check for correctness including important edge cases, and teardown. Ensure that the tests are complete and sophisticated. Give the tests just as chat output, don't edit any file.",
      "description": "Write unit tests for highlighted code"
    },
    {
      "name": "explain",
      "prompt": "}\n\n详细解释所选代码。详细说明其功能、用途和工作原理。使用示例来说明您的解释。",
      "description": "解释代码"
    },
    {
      "name": "fix",
      "prompt": "}\n\n分析并修复代码中的错误。提供详细的解释和解决方案,包括但不限于语法错误、逻辑错误或性能问题。确保您的解决方案是正确的,并且能够解决所有已知的问题。",
      "description": "修复代码"
    },
    {
      "name": "check",
      "prompt": "}\n\n请阅读突出显示的代码并检查是否有任何错误。您应该查找以下内容并保持高度警惕:\n- 语法错误\n- 逻辑错误\n- 安全漏洞\n- 性能问题\n- 任何其他看似错误的内容\n\n一旦您发现错误,请尽可能清楚地解释,但不要使用多余的词语。例如,不要说“我认为第 5 行有一个语法错误”,而应该说“第 5 行有语法错误”。针对发现的每个错误,给出一个要点作为答案。",
      "description": "检查代码是否存在错误"
    }
  ]
- name: 命令的名称,将使用 /name 调用
- description: 命令的简短描述,将出现在下拉列表中
- prompt: 要发送给 LLM 的模板化提示
}: 使用斜线命令输入的任何其他输入。例如,如果您键入 /test only write one test,则输入将为 only write one test。这还将包括突出显示的代码块。
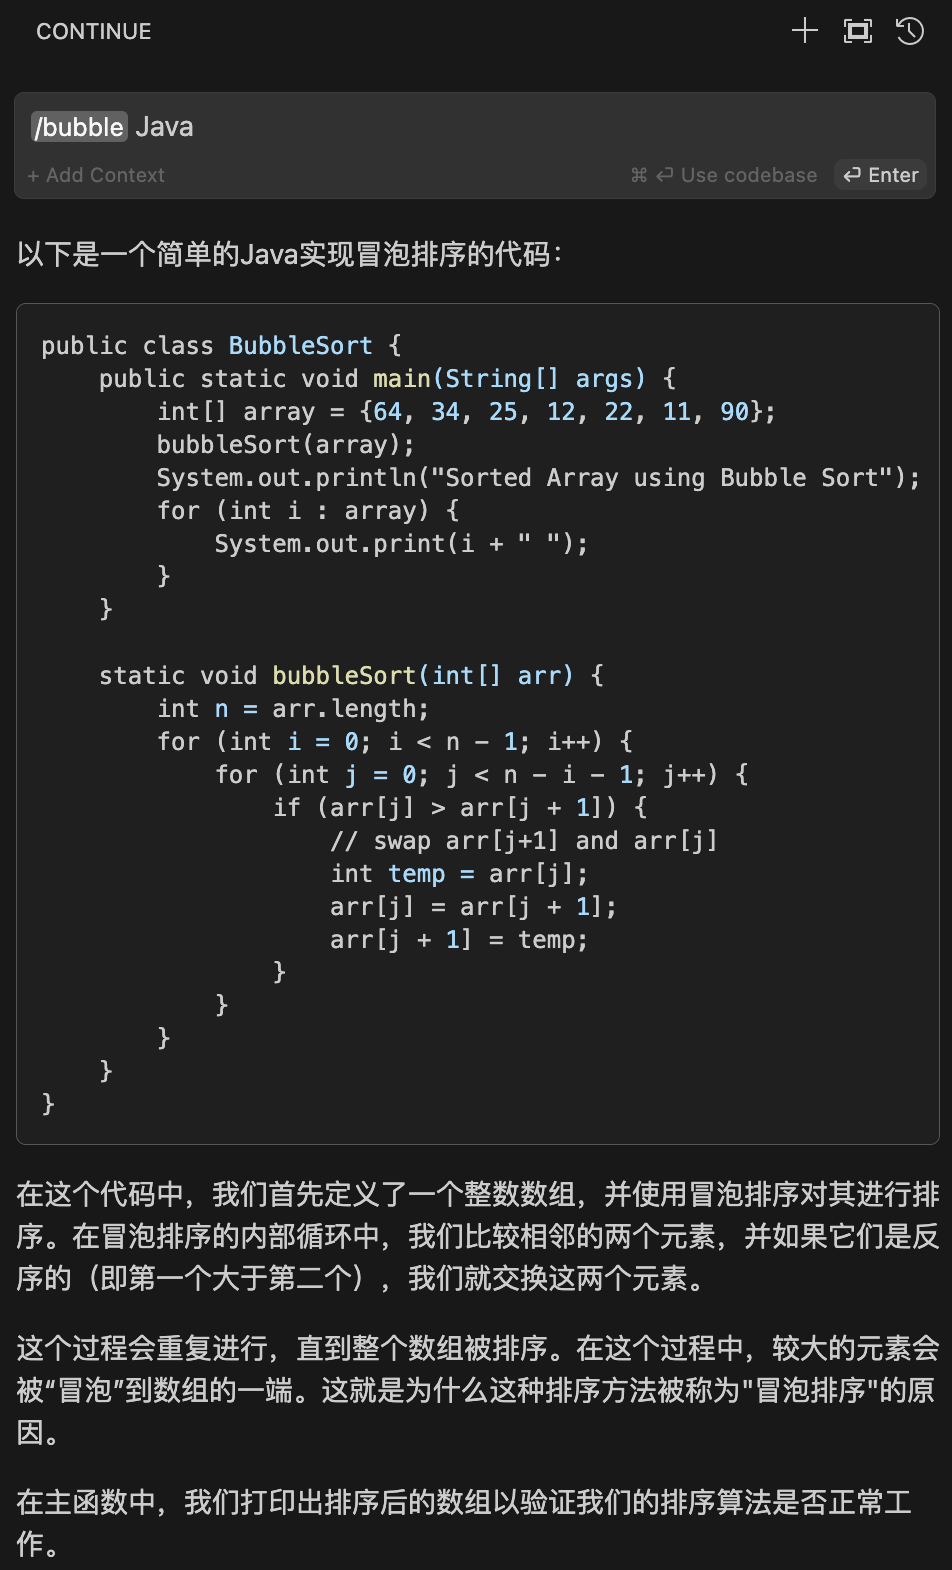
Custom Slash Commands(Use Function)
这需要使用 config.ts 而不是 config.json。
- Complete
export function modifyConfig(config: Config): Config {
  config.slashCommands?.push({
    name: "bubble",
    description: "冒泡算法",
    run: async function* (sdk) {
      const input = sdk.input
      for await (const message of sdk.llm.streamComplete(
        `使用 ${input} 实现冒泡算法\n`,
        {
          maxTokens: 2000,
        },
      )) {
        yield message;
      }
    },
  });
  return config;
}
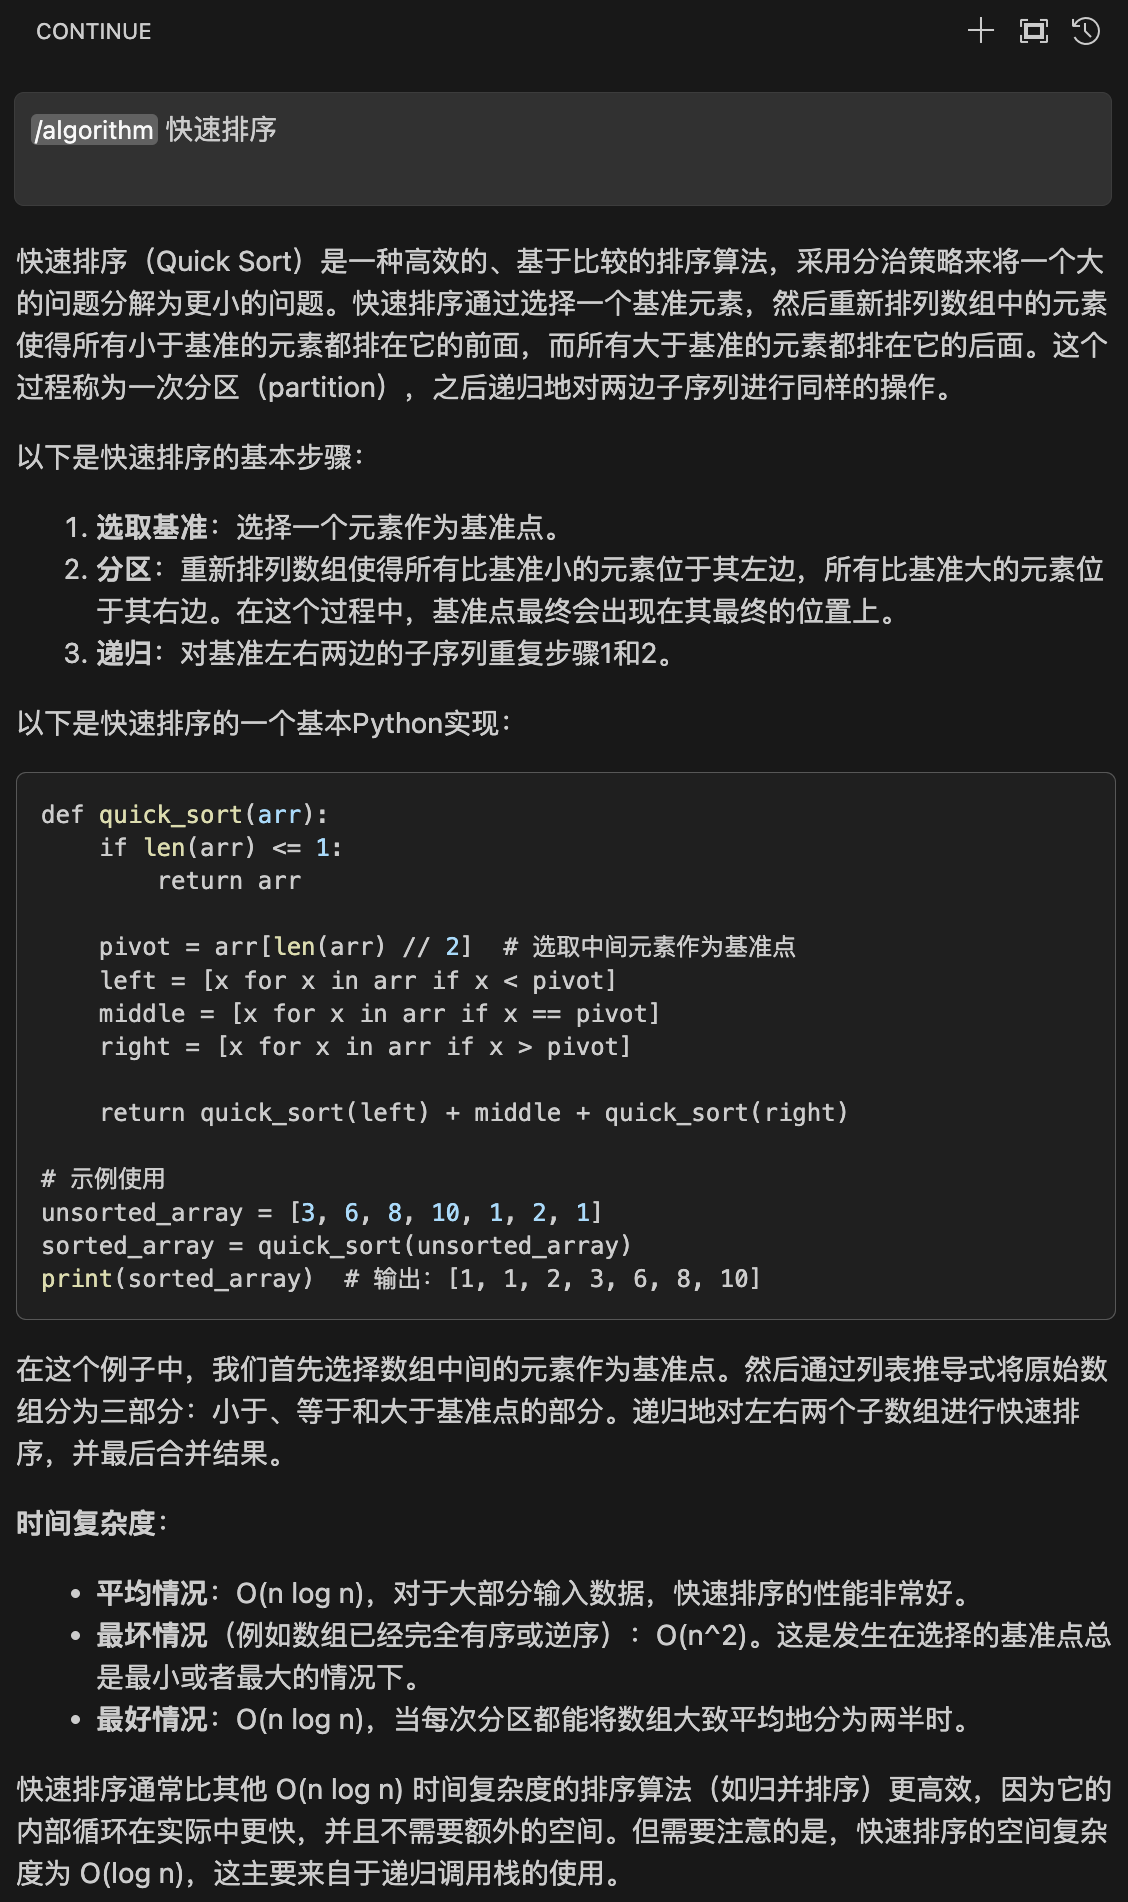
- Chat
export function stripImages(content: MessageContent): string {
  if (Array.isArray(content)) {
    return content
      .filter((part) => part.type === "text")
      .map((part) => part.text)
      .join("\n");
  }
  return content;
}

export function modifyConfig(config: Config): Config {
  config.slashCommands?.push({
    name: "algorithm",
    description: "算法专家",
    run: async function* (sdk) {
      const input = sdk.input
      for await (const chunk of sdk.llm.streamChat([
          { role: "system", content: "你是一位计算机教授,精通算法。" },
          { role: "user", content: `${input}` }
        ]
      )) {
        yield stripImages(chunk.content);
      }
    },
  });
  return config;
}
Context Providers
上下文提供程序允许您键入“@”并查看内容下拉列表,这些内容都可以作为上下文提供给 LLM。每个上下文提供程序都是一个插件,这意味着如果您想引用此处未看到的一些信息源,您可以请求(或构建!)一个新的上下文提供程序。
Build-in(内置)Context Provider
编辑文件:~/.continue/config.json
  "contextProviders": [
    {
      "name": "url",
      "params": {}
    }
  ],

Custom Context Provider
编辑文件:~/.continue/config.ts
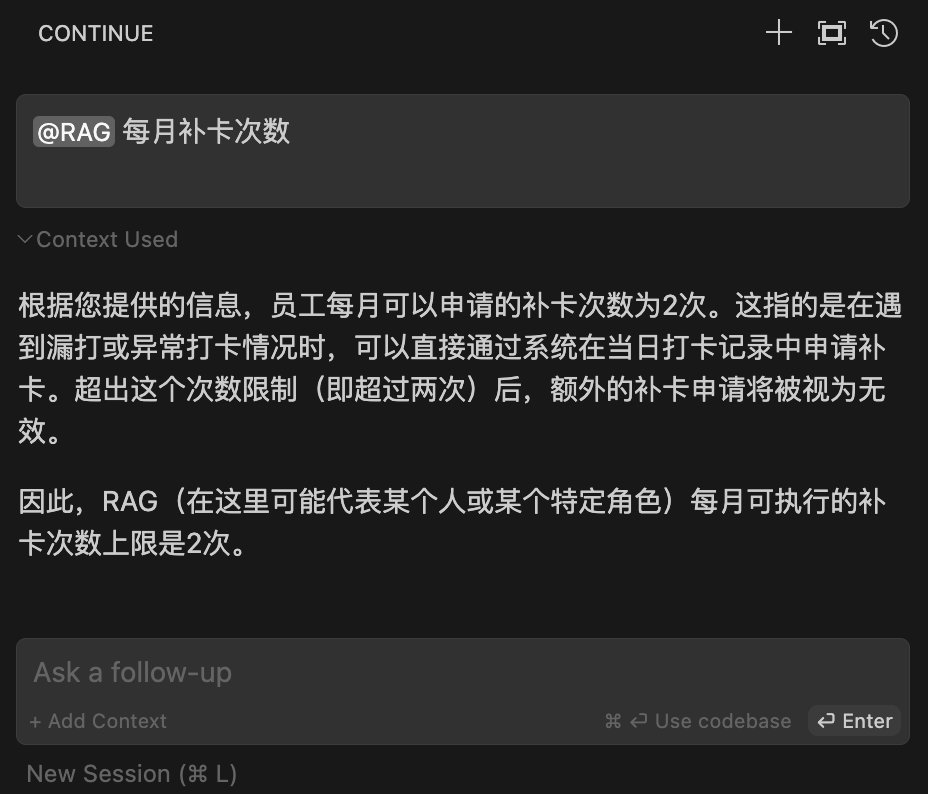
const RagContextProvider: CustomContextProvider = {
  title: "rag",
  displayTitle: "RAG",
  description:
    "Retrieve snippets from our vector database of internal documents",

  getContextItems: async (
    query: string,
    extras: ContextProviderExtras,
  ): Promise<ContextItem[]> => {
    // const response = await fetch("https://internal_rag_server.com/retrieve", {
    //   method: "POST",
    //   body: JSON.stringify({ query }),
    // });
    // const results = await response.json();

    const results = [
      {
        "title": "001",
        "contents": "1. 补卡申请:\n(1)补卡次数:漏打、异常打卡可申请补卡(直接在当日打卡记录中申请补卡),每月补卡次数不超过2次,超过部分补录无效。\n(2)补卡时间:补卡需要在3天内(从缺勤当日起算)提交申请,超出时限视为无效。",
      },
      {
        "title": "002",
        "contents": "六、结算矫正\n每月8日之后系统可生成上月合作方结算预月报;在正式提交结算月报前,部门管理员可根据合作方人员出勤打卡补录申请、部门确认情况,进行矫正处理。请注意:部门管理员结算矫正时只允许对有报工但无出勤情况进行矫正,无报工情况无法矫正(具体矫正要求以公司管理制度为准)。一旦结算确认后将无法进行矫正。",
      },
      {
        "title": "003",
        "contents": "匹配异常:有报工无出勤打卡、有出勤打卡无报工均为异常。\n费用结算以报工匹配出勤为依据,报工不可矫正。",
      }
    ]

    return results.map((result) => ({
      name: result.title,
      description: result.title,
      content: result.contents,
    }));
  },
};
举例来说,假设您有一组已在向量数据库中编入索引的内部文档。您已设置了一个简单的 REST API,允许内部用户查询并返回相关摘要。此上下文提供程序会将查询发送到此服务器并返回向量数据库的结果。返回类型 getContextItems 必须是具有以下所有属性的对象数组:
- name:上下文项的名称,将显示为标题
- description:上下文项的详细描述
- content:上下文项的实际内容,将作为上下文输入到 LLM
代码库检索(Codebase Retrieval)
Continue 会对您的代码库进行索引,以便稍后能自动从整个工作空间中提取最相关的上下文。这是通过基于嵌入式的检索和关键字搜索的组合来实现的。默认情况下,所有嵌入式计算都在本地使用 all-MiniLM-L6-v2 完成,并存储在本地的 ~/.continue/index 目录下。
目前,代码库检索功能作为“代码库”和“文件夹”上下文提供者可用。您可以通过在输入框中键入 @codebase 或 @folder 并随后提出问题来使用它们。输入框中的内容将与代码库(或文件夹)中其余部分的嵌入式数据进行比较,以确定相关的文件。
代码库检索通过 contextProviders 的 @codebase 或 @folder 来使用。
配置
编辑文件:~/.continue/config.json
{
  "contextProviders": [
    {
      "name": "codebase",
      "params": {
        "nRetrieve": 25,
        "nFinal": 5,
        "useReranking": true
      }
    }
  ]
}
-
nRetrieve 从向量数据库中最初检索的结果数量(默认值:25)
-
nFinal 在重新排序后最终使用的结果数量(默认值:5)
-
useReranking 是否使用重新排序,这将允许最初选择 nRetrieve 个结果,然后使用LLM(大型语言模型)来选择排名前 nFinal 的结果(默认值:true)
@codebase 和 @folder 的配置是一样的。
Embeddings Providers
通过在 ~/.continue/config.json 文件中设置 embeddingsProvider 属性来进行配置。
Transformers.js
Transformers.js 是流行的 Transformers 库的 JavaScript 端口。它允许在浏览器中(或者,在这种情况下,在IDE的侧边栏内)本地计算嵌入。所使用的模型是 all-MiniLM-L6-v2,该模型随 Continue 扩展一起提供,并生成大小为 384 的嵌入。
{
  "embeddingsProvider": {
    "provider": "transformers.js"
  }
}
Ollama
Ollama 是开始使用开源语言模型最简便的方式。它为操作大型语言模型(LLMs)提供了一个完全本地化的 REST API,包括生成嵌入。推荐使用如 nomic-embed-text 这样的嵌入模型。
- 英文
{ "embeddingsProvider": { "provider": "ollama", "model": "nomic-embed-text", "apiBase": "http://localhost:11434" // optional, defaults to http://localhost:11434 } } - 中文
{ "embeddingsProvider": { "provider": "ollama", "model": "herald/dmeta-embedding-zh", "apiBase": "http://localhost:11434" // optional, defaults to http://localhost:11434 } } - herald/dmeta-embedding-zh
- DMetaSoul/Dmeta-embedding-zh
OpenAI
- FastChat
{ "embeddingsProvider": { "provider": "openai", "model": "bge-base-zh-v1.5", "apiBase": "http://172.16.33.66:8000/v1", "apiKey": "NULL" } } - XInference
{
"embeddingsProvider": {
  "provider": "openai",
  "model": "bge-base-zh-v1.5",
  "apiBase": "http://127.0.0.1:9997/v1",
  "apiKey": "NULL"
}
}
自定义被索引的文件
Continue 会遵守 .gitignore 文件来决定哪些文件不应被索引。如果您想排除更多文件,可以将它们添加到 .continueignore 文件中,该文件遵循与 .gitignore 完全相同的规则。
如果您想确切地查看 Continue 已经索引了哪些文件,元数据存储在 ~/.continue/index/index.sqlite 中。您可以使用像 SQLite Database Browser 这样的工具来查看该文件中 tag_catalog 表的内容。
如果需要强制刷新索引,请使用 cmd/ctrl + shift + p 然后输入 Reload Window 来重新加载 VS Code 窗口。